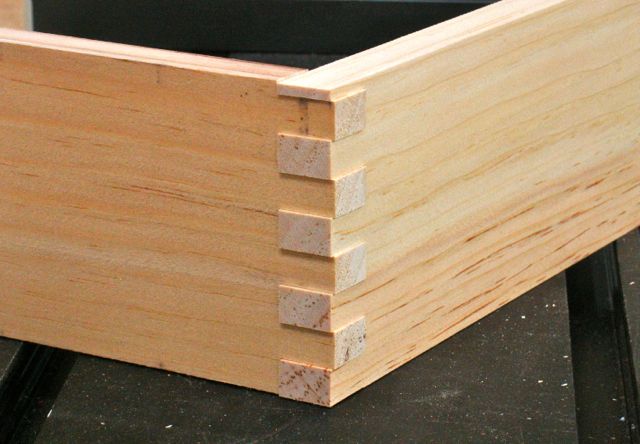
First Practice Joint
This will be a very brief post to show how I modified the finger joint jig that I used on the Jet cabinet saw to now work on the SawStop equipped with the Sliding Table. It took a number of hours to do it but I must admit that this is such a vast improvement over the technique of cutting finger joints (aka: box joints) before I just had to post and share it!
A bit of history first, ever notice how magazine titles always seem to shout out at us that the current issue has the best way to ………. for whatever? I can think of many at the grocery check out line that have nothing to do with woodwork whatsoever! Well, that seems to be the case with these jigs and through the years I’ve probably made a dozen of them with mixed results.

Woodsmith Jig
The one that seemed to work best was found in a ShopNotes publication titled Best Tips, Tools, & Techniques for the Tablesaw. Mine is an older copy but I did find this LINK to the current edition you may want to check out. The jig is pictured here and what made it one of my favorites is that it rides in both of the miter gauge slots of the tablesaw. It allowed you to make interchangeable carriages for different size finger joints. Also the insert behind the blade is replaceable which helps prevent tear out. The only drawback was feeding the wood through the blade, difficult to get the right angle and keep the jig firm in the slots.
What I did for the SawStop was to only use the carriage from this jig. In this blog I went into detail explaining how to make an auxiliary fence/jig that will slide into the slots of the sliding table. Briefly, you drill a 1/4″ hole 1 3/32″ up from the bottom of the jig after making a 1/2″ counter bore that will accommodate a M6-1.00 x 25 mm button head cap screw and washer. This can now slide into the arm as shown below:
Jig attached to sliding arm

Fine Tuning Location
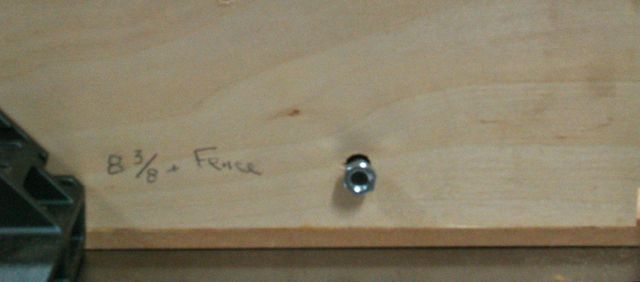
Notice I penciled in 8 3/8″ fence? After putting both of the nuts into the slot the fence was slid to the right against the jig which was tightened when the indicator read 8 3/8″. This located it “in the ballpark”, fine tuning was done with a spacer the exact size of the slot made by the Freud box cutter set. Actually, this set cuts 1/64″ oversize. The first thing I did was run a set with some 1/4″ MDF and surprisingly enough — they seemed to be right on! Next up was some pieces of Pine and the fit was perfect — my lucky day!
The bottom line is that the action of cutting these finger joints with the sliding arm is so smooth and controlled there is no comparison with any other method I’ve used over the years. For the upcoming craft show in October I need to build up my inventory of boxes and this should make that process go smoothly. For safety there is a block of wood glued to the back of the jig directly above the blade. Not sure where I learned about that but it’s a good way to tell your hands not to go below it! After making the slight adjustment the fence indicator reads 8 7/16″ so when I’m ready to cut the joints I’ll just need to slide the jig into the arm, push it and the fence to that measurement, and tighten it in place. Small adjustments may be needed but that’ll be easy enough to accomplish. If you have the sliding table for your SawStop you just may want to give this a try.


Love it! Thanks for sharing this.
LikeLiked by 1 person