
Why take the time to blog? That’s a question that I’m asked from time to time and the answer is somewhat complicated! For starters, as a career teacher I seem to have a natural inclination to share with others. A practical aspect, as I approach my seventh decade; is that it is an on-line diary to help me recall what the heck I did — some of you may be at that stage of life now and know what I mean! All that aside, it’s rewarding when someone appreciates my work and asks how to get those results for themselves in their own work. That being said, recently there have been a few questions about carving picture frames so I’ll use that as a springboard to share my process.
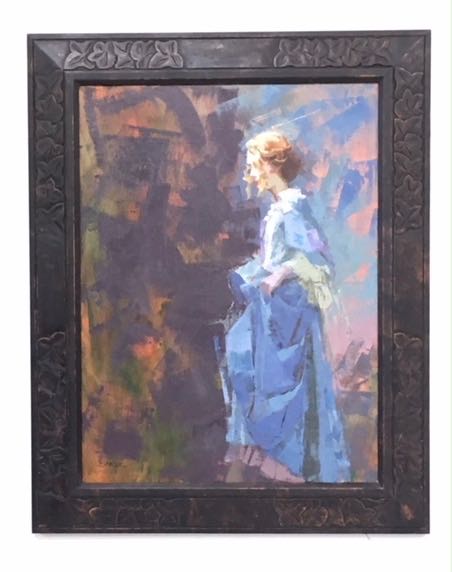
Dreaming In Blue
Diane Eugster
18 x 24
This is the painting the Diane recently completed that needed a frame. The subject has an Art Nouveau feel to it so my first instinct was to find a pattern that would compliment the painting and the brush strokes in it. Although Diane, being my wife, is my best client the process is the same for anyone that commissions me to do a frame for them. I try to get a feel for the emotion the artist had and begin by making sketches and designs. This will eventually lead up to making a corner sample for approval. That’s pretty important, most people won’t be able to visualize your idea from a sketch. My usual source for inspiration comes from image searches on the internet and copying them. Once they’re copied they can be manipulated and printed out to the required size. I couldn’t find anything I liked so went to a book Diane has titled Alphonse Mucha Masterworks. On a few of the pages there was a graphic of these ivy leaves that caught my eye so it was copied and manipulated to fit the space on the custom profile Basswood molding made for this painting. Now the fun, aka frustration; can begin!

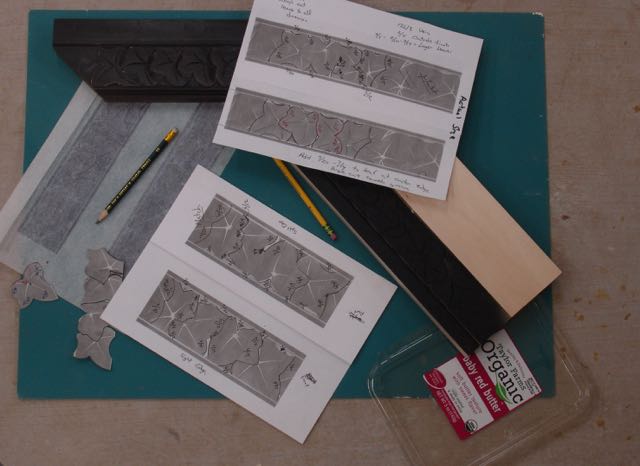
Plastic Pattern
Time consuming for sure but rather than go by “time is money” concept I prefer “time is care & quality”. The first step is to take the correctly sized pattern and use spray adhesive to attach it to a piece of plastic commonly found as salad containers. This is stiff enough to follow with a pencil and flexible enough to lay onto any curves your profile may have. It’s also easy to flip over to get the needed mirror image on the opposing corners of the miter. The pattern in cut out with the gouges that I have — when you carve a frame the elements need to be consistent and I’m not skilled enough to have that consistency with a V-tool. Using the curvature of the various gouges is key for me to stay consistent. As I cut the design out of the plastic I also annotate it on another piece of paper for reference. To take care of the interior aspects of the design tracing paper can be used to make your own carbon paper.


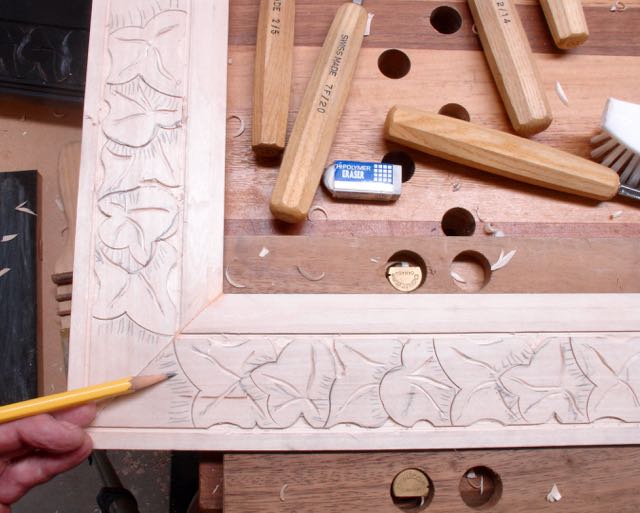
Pattern Work
As you can see, it’s a somewhat complex process. I usually carve a sample and in this case discovered I needed to change the pattern around to make it appear more random. Went through a number of changes and revisions to come up with something my client liked. I go through this process for all my clients but when it’s for my wife it may be a bit more daunting! In any case, her gallery; MeyerVogl, in Charleston likes her work and tells us that the fact her frames are custom made for each painting by her husband adds to the story behind her art.
Work in Progress
Once the carving was complete it’s on to the finish. Diane did an under painting of warm oranges and greens on her painting and asked for a black frame. Rather than do the traditional Japan Black over red clay a mix of yellow and red clay resulted in a rust colored clay. After burnishing, a coat of thinned down Japan Black was applied and then rubbed back to expose that clay undercoat. I feel that the over-all effect of the frame compliments the emotion Diane put into the painting. In my opinion, the frame should compliment the art without upstaging it. Granted I have a bias but going to shows and seeing a beautiful painting that the artist framed with an inexpensive, mass produced, and probably imported frame is sad. I know frames can be very expensive and my goal has always been to make frames affordable for the artist so their work can be showcased the best way it can.
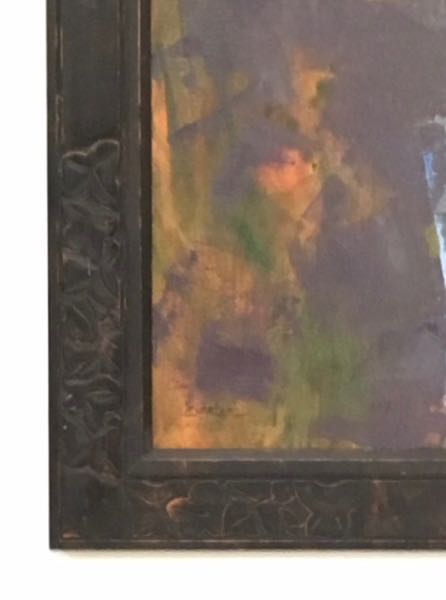
Corner Detail
Here’s a close up of one corner of the frame. Each corner and section is different of course but this is the left side which has a lot of background. I attempted to expose more of the undercoat to mimic Diane’s brush work in that section of the painting. The next question most folks ask is “how long did that take?” I’ve heard a tongue in cheek answer to that: “all my life” implying that to get to this stage of work you’ve been going at it for a long, long time. And for me that’s probably the best answer. Any of you that work at a craft know that it’s not about getting rich but rather it’s the enjoyment of the results of your creative process — at least that’s it for me. Hope this helps those of you who asked about the process. Keep your comments and questions coming — I appreciate them!

Beautiful work John … as always.
You’ve carved out quite a niche for yourself.
LikeLiked by 1 person
Thanks Bob, I appreciate that!
LikeLike
By the way, your “carved out quite a niche” is also appreciated and noted! What’d we do before the internet; working the way we do is quite solitary and it’s nice to be able to share and get some recognition.
LikeLike