End of Year Goals Met

Christmas in Phoenix 2016

Christmas in Phoenix 2016

This has been quite a year for the Eugster’s to say the least!  It began with Diane and I challenging ourselves and moving to Scottsdale, Arizona for our 20th. anniversary.  We’d always wondered how living in a more arts oriented area compared to Las Vegas would be so we rented an apartment for six months to give it a try.  Diane has lived in Las Vegas most of her life and I’d been in the Southern Nevada area since 1977 so this was a major step for us both.  That challenge led to us moving here to Phoenix where Diane’s work has blossomed, she’s in a new gallery in Charleston where she has had a number of sales.  As for me, I now have a free standing woodshop!  For that 6 month period the focus of my woodwork shifted from furniture to carving and gilding picture frames.  As artists, you always strive to “get to the next level”; whatever that may be!  We both feel that this move has been good for us in that respect.

Once we decided to make this move permanent there were those details of selling our home of 20 years in Las Vegas.  Those of you that follow my blog (thanks!) recall what we termed our “real estate hell” due to the foul ups of our buyers agent — he was a joke and the brunt on many negative reviews from us!  In the midst of this chaos, an email came to me requesting a custom picture frame.  This came from a client in New Jersey and my initial thoughts were those of doom and despair — here I have a potential job and no shop to do it in!  This gentleman was extremely patient and told me no problem, he wasn’t in any hurry but had a definite idea of what he wanted for his frame.
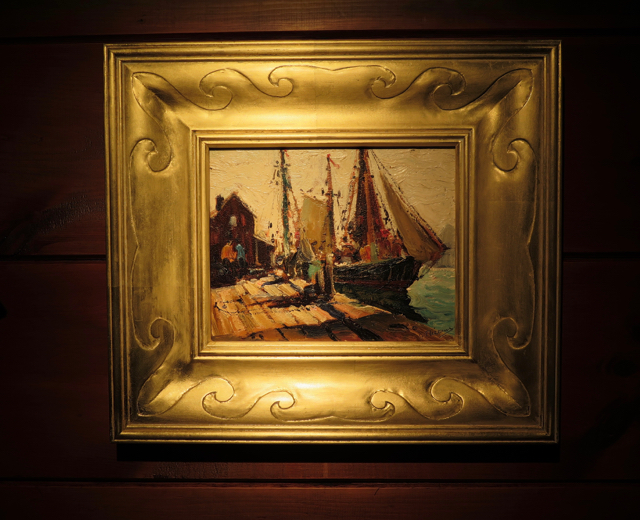
Anthony Thieme Painting in Ocean Waves Frame

Anthony Thieme Painting in Ocean Waves Frame

The painting is by Anthony Thieme; a Dutch/American artist working during the 1920-1950’s and measured 8″ x 10″.  He sent me a picture of the painting in its current frame as well as images of a frame style he thought would be a better fit.   Although rebuilding the shop here in Phoenix had more than it’s share of challenges my personal goal was to get this frame to him by years end.  I shipped it out on the 27th. of December and met that goal.  After he received the frame he sent me this picture of it along with this comment: “Frame looks fabulous and really complements the painting. I have attached a picture of the painting and frame.  Please feel free to use it in your blog/website, etc…”  As I used to always try to impress upon my students, the money you earn from your work is great but won’t compare to the compliments you receive; money is spent but accolades for your work will stay with you forever.

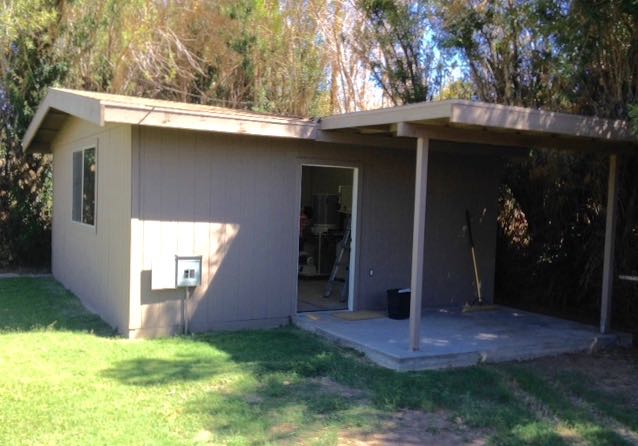
The last major goal for the year was organizing and rebuilding my first, climate controlled, free-standing woodshop.  That’s like 80% complete.  The shop is just under 500 square feet, it is quite an undertaking to organize from scratch.  A good friend of mine from the woodworking group in Las Vegas also moved and is setting up a shop of about the same size.  Bill and I have compared photos and it’s interesting to see our different styles when it comes to that phase.  I have one major cabinet/drawer unit and prefer to hang stuff on the walls similar to how the Shakers set up their space.  That system starts out with 8/4 Alder, ripped to size, then planed.  I add a chamfer or shelf to the top, then pegs positioned to hold the tools.  Really wonderful to use my planes again after a years time some beeswax was required to make it a real joy.

Here’s a montage of how the shop is shaping up.  I need to work on a bid for a possible Etsy commission but the next major undertaking for the shop it to build the doors for the storage area.

And, so ends a wonderful year.  Hope that you, like us; are looking forward to more adventures and excitement in 2017!


Posted in Carving, Phoenix Woodshop, Picture Frames | Tagged , , , , , | 3 Comments

Ocean Waves Frame — Shining Brightly!

And, that’s really not a good thing!  Yesterday morning this frame was gilded along with a short section of the molding that will be used to see how the different toning affects may look.  If you’re unfamiliar with what’s commonly referred to as oil gilding this process begins with sealing the wood to eliminate any wood grain telegraphing through the leaf.  That’s another reason for using a wood such as Basswood since besides holding carving details quite well, its’ grain is pretty nondescript. For the sake of comparison, when using 22kt gold leaf that is referred to as water gilding.  That process is much more involved and consequently much more expensive.  For it you need to brush on many layers of gesso which is basically a chalk and rabbit skin glue mixture.  With the oil gilding process this is simplified with the application of a single layer of what’s called a burnisher/sealer.  This is heavily pigmented and burnished with oil free steel wool prior to laying on the composition gold leaf.

Since my client requested a lighter frame than what he sent a picture of, it seemed best to use a yellow burnisher/sealer.  I did a test sample with the red burnisher/sealer but didn’t care for how it showed through the inevitable faulting of the leaf.  Notice that plastic bag next to the frame?  That’s something new I’m trying from Lee Valley, called a finish storage bag.  Instead of having the air in a typical paint can react and skin over the finish with this you can squeeze out all the air and then cap it off.  My only complaint is that it’s a two person job — couldn’t maintain pressure on the bag and twist the cap on once all the air was out.  In any case, oil size is ready for leafing after 10-12 hours so susceptible to dust landing on it.  This is a simple PVC frame with Kraft Paper over it to eliminate the dust problem as much as possible.  After the frame was completely gilded you need to wait 24 hours for the size to be completely cured.  At this point it’s pretty darn brassy and bright as the picture on the left shows.  The initial step to knocking this down is to burnish it lightly with 4/0 steel wool then air brush on a few coats of shellac.  My preference for the steel wool is Liberon since it is completely oil free and for shellac I mix mine up fresh with flakes purchased from Shellac.Net.  These need to be de-waxed and for this frame, super platinum.  Note the difference in the frames appearance, freshly gilded on the left and burnished/shellacked on the right.

Toning will take place after Christmas but the frame will be ready to go to its new home in New Jersey before the years end.

Speaking of appearances, I’ve been in the process of re-vamping my website with Diane’s’ help.  When it comes to woodwork, teaching, or running ultra-marathons I have tons of patience. Throw a computer into the mix and that seems to vanish!  In Las Vegas much of my work was through word of mouth and recommendations from my clients.  Establishing myself here in Phoenix will require some work.  I’d been told that my website portfolio was hard to find and navigate so Diane has been working to make that easier.  Rather than having a separate page for chairs, tables, picture frames, boxes, etc. she has created one portfolio page.  On it will be a representation of my work broken down into a few categories.  The category completed so far is the custom furniture.  The tab at the top of the site says Woodworking Portfolio.  This WordPress site lets you create a tiled mosaic which to my eye, looks more interesting than a bunch of pictures all laid out in columns.  If you have the time and inclination I would like to hear your feedback about how it looks to you.  Now that Diane has helped by setting this up it’s now up to me to organize the rest of the portfolio page.

 Thanks for following my blog and your feedback,

Here’s wishing all of you:

Merry Christmas and a Happy New Year


Posted in Carving, Gilding, Picture Frames | Tagged , , , , , , , , , , , , , | 6 Comments

Ocean Waves Frame Progress

My Happy Place!

My Happy Place!

Ah yes, it’s been a long time coming and now the plan to become known as a custom, boutique framer is under way.  My goal is to establish my work here somewhere between those frames that are priced in the thousands of dollars and the big box frames that are okay for framing diplomas or you grandkids picture but not really gallery quality.  Like Diane told me; “You need to be the artists friend”!  Pricing will be the key knowing first hand that the phrase “starving artist” is really valid!  This frame, Ocean Waves; is the first on that will be made from the Woodworks by John#1 molding.  After talking with many of you at the Scottsdale Artist School and hearing your questions about my process of frame making I thought this would be a good opportunity to share that with you.  It’s very similar to the process I use with custom furniture where my clients input plays an important role.  In the past, I used some of the molding we had milled for Diane’s work or else the moldings I’d get from Foster Planing Mills seconds area.  Now that Barger Molding here in Phoenix is milling my profile this will be my stock molding.

The process begins with our initial contact.  The price for this 8″ x 10″ carved and gilded frame is $330.00 plus shipping.  My client emailed me from New Jersey with these images, the one on the left is of the painting he now owns and the one on the right is of the frame idea he has in mind:

Seeing that frame you can understand why I chose to title it “Ocean Waves”.  The painting it was on was much larger so the design obviously needed to be modified.  Technology comes into play first by allowing  me to scan and resize the image with computer and printer.  This is then modified by old fashioned drawing!  After getting approval from the client a pattern is created to ensure that all corners be uniform, there is more detail about that process in this Blog.  The next step is to figure out which chisel is appropriate to first outline the pattern.  The pattern, which is mounted to a piece of thin plastic, is actually cut out with the chisel and noted on a piece of paper.  This helps me remember which chisel to use — keep in mind there are eight of these to carve!

I realize that this pattern could be programmed into a CNC router and spit out in minutes rather than hours of hand work but the final product just isn’t the same.  Even if I were to make a number of these frames, each one would have its’ own personality and hand crafted quality.  The carving process begins by outlining each curve, connecting the longer elements with a V-chisel, and then grounding out to set it apart from the background.  The challenge is maintaining a uniform depth, thankfully the quality of the Basswood is great!


This process is time consuming but many of you artists know that feeling of becoming so engrossed by the creative process that time doesn’t seem to matter.  Many times we get  into that “zone” and discover half the day has passed without even realizing it!  Great feeling isn’t it?  At this point half of the frame is pretty much complete.  The steps that follow include applying burnisher/sealer to the entire frame followed by gilding and patination.  I’ll keep continue to blog about the process.  Here is how the frame is looking at this point.

Partially Complete

Partially Complete

Posted in Carving, Gilding, Picture Frames | Tagged , , , , , , , , , | 1 Comment

Want it done right? — Do it Yourself!

Before getting into the latest project let me summarize what Diane and I have been up to this crazy and exciting year!  After a 20th. anniversary celebration of living in Scottsdale for 6 months we decided to sell our home in Las Vegas and move to Phoenix.  For Diane, the purpose was to be close to the Scottsdale Artists School and the generally more art oriented environment.   My objective is similar for my furniture work and also finding a group of artists to make “boutique frames” for.  Someone needs to fill the niche between the multi thousand dollar frames most artists can’t afford and the big box crappy ones.  Another big plus was that this house already had a free standing shop of sorts.  It has taken some time to get it to my liking and you can read about some of it here.

Woodworks by John #1

Woodworks by John #1

So, to make what could be a very long (and boring) story short I began to look for a suitable molding; one that was wide (3″-4″), could accommodate stretched canvas, and had a panel that had space and a contour that could be carved.  I searched the few raw molding suppliers on line and checked with Foster Planing Mills in So. California who we had used before but shipping would be a killer.  Then I learned about Barger Moulding and ended up designing and ordering 100′ of the profile we designed.  That’s the reference in this blogs’ title.  If it’s worth doing or if you can’t find what you want you either do or make it yourself.  This profile is called Woodworks by John #1.  Enough background, let’s get into the first frame currently under construction.

A few months ago, while we were in the middle of our move; I received an email from someone on the east coast.  It was from a gentleman who had seen my website and was interested in having a frame made for a painting he had recently purchased.  My first reaction was a slight panic — I’ve been wanting to expand my custom frame work and here I am without a shop and in the middle of what we called our “Real Estate Hell”.  We had a few emails back and forth and thankfully he is very patient and willing to wait until the new shop is complete — thank God!

Anthony Thieme Framed Painting 8" x 10"

Anthony Thieme Framed Painting 8″ x 10″


It was interesting to see that the artist, Anthony Thieme; is someone who like me, came from Holland!  Here is an image of the picture my client bought along with the frame it came with.  Along with this image he also sent an image of the style of frame he would like to have for this piece.  screen-shot-2016-12-08-at-5-09-14-pm


This design is more fitting with the carved waves on the panel.  Obviously, this painting is much larger than the size of his painting.  He also asked for molding to be wider, somewhere in the neighborhood of 4″ which is what the new, Woodworks by John#1; his frame will be the first to be made from my custom molding design!


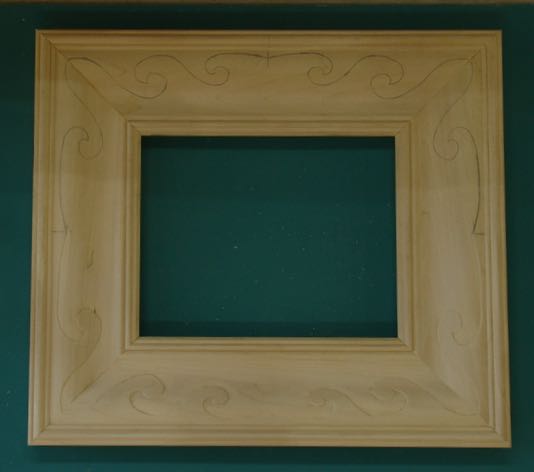
The first step was to come up with the design.  This is accomplished by grabbing the image and manipulating the size to fit the frame.  I discovered that with a frame of only 8″ x 10″ having two waves at each corner wouldn’t work.  Reducing the second wave by 25% allowed me to fit both elements and get a pleasing design.  Once the design is drawn out it is attached to a piece of plastic from a salad container.  In this picture you’ll notice the pattern being cut with the chisels of the correct profile — their size and sweep is noted on a piece of paper to facilitate the actual carving:


Pattern Making

Pattern Making

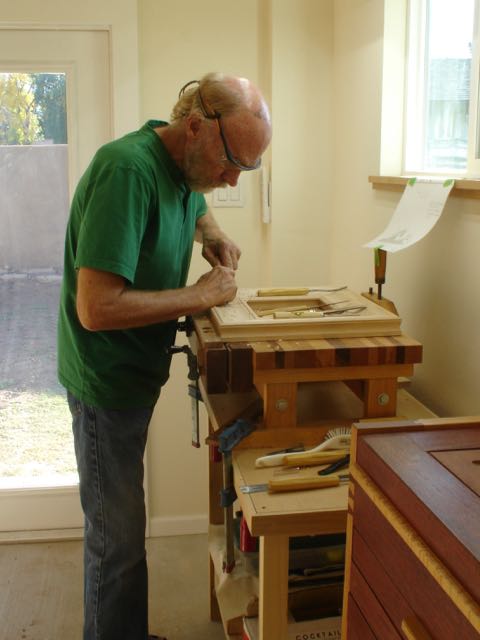
Next is the the actual carving on a corner sample.  I was anxious to see how this Basswood from Barger would cut and am impressed with the quality of the wood.  Using the plastic for the pattern makes it easy to flip and get that mirror image on the corners.  The line on the outer edge of the molding indicates the center on each leg.  Yep, I’m in my “happy place”, in front of the carving bench lost in making the design come to life!

Posted in Picture Frames | Tagged , , , , , , | 5 Comments

Drawer Unit Complete: No Dovetails Here

I just had that “ah ha moment”.  Once I found my camera and began to use it on the tripod rather then my phone I noticed the pictures all seem to have a yellowish tinge to them.  I played around with the usual suspects but it’s still there.  I mentioned it to Diane and she thinks it may have to do with the setting for the type of light — no duh!  My new shop has LED lights while the old one had fluorescents.  I’m guessing that’s the culprit, I’m willing to bet that this camera won’t have a setting for LED, it’s pretty old!

Grooving drawer unit sides

Grooving drawer unit sides

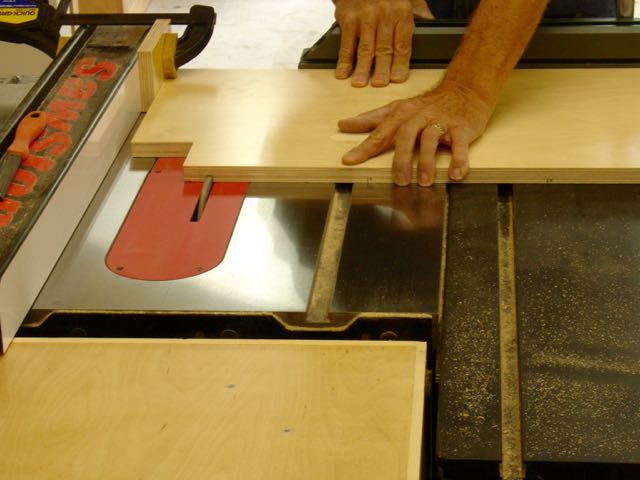
For the drawer units I decided to use an old standby which I’d like to say is “quick and dirty” but nothing really is, is it?  In the old shop I used a drawer system where the bottom of the drawer also functions as the guides.  It begins by carefully cutting 1/4″ grooves in the plywood sides of the unit.  You need to pay attention that you end up with sides that face each other and aren’t mirror images.  Having a notch for the toe kick helps.

Tongue & Groove drawer joint

Tongue & Groove drawer joint

After cutting the fronts and backs for all the drawers it was time for a fairly straight forward tongue and groove joint.  This too is 1/4″ since 1/2″ clear coat Baltic Birch plywood was used for the drawers.  Like I said, no dovetails for this project and it’s even been assembled with glue and nails!  After the unit itself was built, 1/4″ MDF was sized to fit into the grooves and slide easily.  It’s not like these are kitchen drawers that will be opened and closed many times a day — basic shop storage units designed to be utilitarian but still look good.  After gluing and nailing the box together, the bottom was attached using spacers to align and square the entire assembly.  A couple of nails (#18 x 1 1/4″) did manage to blow out of the side but that’s to be expected.  Here’s the process simplified:

This slideshow requires JavaScript.

The next step was planing the Alder I had remaining for the drawer fronts down to 1/2″ in thickness.  Can’t help myself here, have to use my L-N Bronze smooth plane to finish all of the surfaces, utilitarian or not!  The drawers are about 14″ deep and 26″ wide so I think two pulls are in order.

From Wood to Pull

From Wood to Pull

Rather than buy them my choice was making them.  I saw a recent Facebook video post lamenting how we’ve become such a throw away society and that many folks have no idea how things are made or put together.  As a life long shop teacher that was something I always emphasized;  what we have was made by someone.  Nowadays, most things are “spit out” by some computerized contraption that a human being switches on and off!  Don’t want to get on a soap box but these drawer pulls are made from a piece of Pine that the previous owner left in the garage.  This picture shows the rough piece of wood and the subsequent pull.  I thought about all of the little steps required to get from that board to 16 pulls, allow me to list them: 1. Plane edge; 2. Rip to 7/8″; 3. Plane edge again, repeat until there is enough stock for all 16 pulls plus a spare or two “just in case”; 4.  Cut 45 degree on all edges on tablesaw; 5. Block plane those edge; 6. Cut to length; 7. Chamfer ends to match; 8. Counter bore for screw head; 9. Drill through hole 10. Spray Deft for protection — and that’s only for the pulls!  Also needed to plane, chamfer, and finish the drawer fronts.  Then locate mounting hole for the pull in the same location on all eight of the drawer fronts.  Simple jigs were made to aid with this.  When it was all said and done it was quite time consuming but worthwhile in my opinion.  It’s all about the process of thinking and planing to get from point A to point B.  I rather enjoy that process, here’s a slide show to illustrate that.

This slideshow requires JavaScript.

The final step for this storage wall is to make sliding doors that will cover the shelves.  I do need to get started on the picture frame design to secure the commission for it.  Seems like it’s been such a long time since I’ve done any carving I’m a bit apprehensive!  Most definitely will blog about that, looking forward to that project and process.

Posted in Phoenix Woodshop, Uncategorized | Tagged , , , , , , | 2 Comments

Thanksgiving — much to be Thankful for!

My On-Going Challenge

My On-Going Challenge

Those of you following my blog know the work going on to get the woodshop here in our Phoenix home up and running.  So thankful we have the resources and talent to get that accomplished although my wallet is getting a bit flat!  Now that the shop is basically done it’s time to figure out where to put everything.  Amazing how much “stuff” you can accumulate and keep even after garage sales and the move.  Making those decisions as to what you need, what you may need, and what you should just get rid of isn’t easy.  This is the second garage (only 14′ deep) where I’ve put most of the “shop stuff”.  Can’t begin to tell you how many times I’ve gone through those boxes looking for something I needed.

Organization started out by making two tall cabinets to fit in the entry alcove.  I’m using 3/4″ ClearKote Birch ply for the shelves and Alder for the face frame and sides.  I know my reputation is one of using hand cut joinery for my work but in this instance I kept telling myself, hey; it’s utilitarian and storage only and I need to get it done!  After sizing the Alder pieces for the face frame, they were prepped for biscuit joinery.  I remember when this system came out how it revolutionized the joinery process, now we have Kreg systems and the Festool Domino for high end work.  I can’t bring myself to use nails to attach the face frame. Instead, using tongue and groove joinery cut on the table saw which was then glued and clamped is as “high tech” as I can go .  Here’s a slide show to illustrate the process.  The new combination assembly and out feed table worked great for this project.

This slideshow requires JavaScript.

The way I attached them to the wall was by first screwing cleats to the wall studs then nailing the shelves to them and the cabinet carcasses.  Using the walls as the back and one side for these cabinets helped my budget by only buying one sheet of the Alder plywood.  Since this area used to be the porch for the building the floor wasn’t all that great so needed a lot of shims to make things square and secure.  There will be a drawer unit between these two cabinets and I have barn door hardware to hang doors which will conceal the shelving.  My plan is to make sliders out of Alder and corrugated tin — we’ll see how that works out!

While waiting for the  things that were clamped and glued to dry I was able to do the window sills and begin hanging my tools on the walls.  Hanging my most used tools for easy access is my style, somewhat reminiscent to how the Shakers had pegs around their rooms to hang chairs, tools, brooms, etc. — I like that concept and think it’s a good way to outfit a shop.  As you can see, the window openings weren’t as square as we’d like to see them but by scribing the angle with a small sliding bevel square they came out alright.

WoodworksbyJohn#1 Profile

WoodworksbyJohn#1 Profile

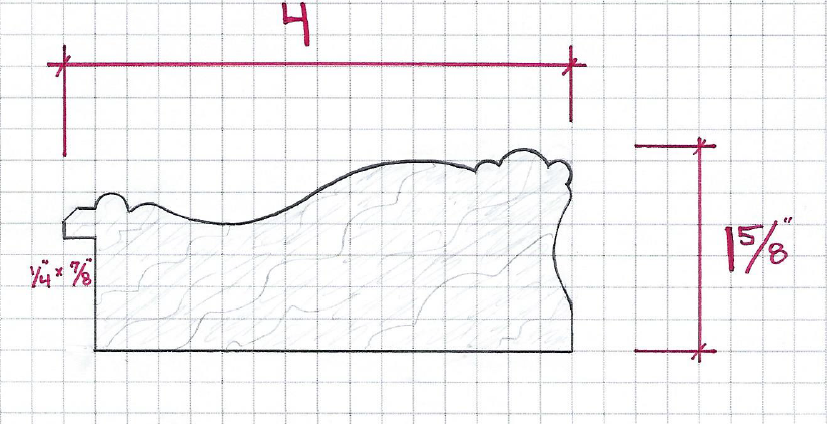
Here’s some news about the quest to become a boutique frame carver and maker; I have a client who sent me some ideas of what he’d like in a frame for a painting he has acquired.  After searching through the catalogs of the limited number of picture frame suppliers I decided to go out on a limb and designed my own profile.  There is a custom moulding and millwork shop here in Phoenix by the name of Barger Moulding.  They are similar to Foster Planing Mill in SoCal who I’ve dealt with many times in the past except Barger doesn’t have any stock moulding profiles.  The picture you see at the right is my own design and I’ve gone ahead and ordered 100′ of it.  It’s designed so that there is a wide panel area for carving.  Hopefully it will be ready next week — stay tuned!


Posted in Phoenix Woodshop | Tagged , , , , , , , , , | 1 Comment

Long Time Coming!

Well, finally I’ve been able to do some woodwork that didn’t fall into the category of construction, drywall, paint, etc. and it feels real good!  I mentioned the difficulty of placing the machinery in the new shop which is compounded by having a post right in the center of the space and the sliding table on the SawStop.  Needed to plan how most of my work is sized in order to place the saw, although it has a mobile base once the sliding table is attached it’s pretty difficult to move.  There are two main things needed to get the shop up and running after placing the machinery.  The first was an assembly table plus a small table that will serve as the stand for my carving chisel chest.  The assembly table is designed to serve as an outfield table for the tablesaw as well.  Here’s the completed table and stand.  As you can see, things aren’t quite finalized in the carving area.  The bench is the one I made for our Scottsdale adventure, the window still needs a wooden sill, and as for the assembly bench/out feed table I need to extend the sawdust collection duct from the saw for easier access.  Bar clamps are always a hassle to store so that table is designed so they are underneath adding weight and stability plus keeping them out of the way but easily accessible.

Now that’s accomplished the second major item is building a storage area that will be a combination of shelving and drawers.  This will be located in the entry/alcove area on the wall opposite the carving area you see in the picture above.  My original thoughts was to make the table out of 8/4 Poplar but Peterman Lumber here in Phoenix had some 12′ lengths of 8/4 Pine that had a price I couldn’t resist!  Also used 3/4″, Clear Kote Baltic Birch ply for the table tops and eventual shelving.  The slick surface of the Birch ply made it tricky to hold securely while screwing the top to the table apron, you’ll see how I solved that problem in the slideshow.  Working with my planes, chisels, and tools after such a long time away from them was such a great feeling — here’s a slide show to illustrate the process used to make those tables.

This slideshow requires JavaScript.

I spent much of today finding a way to organize and hang my tools.  I know many prefer to build a chest to house their planes, saws, chisels, etc. but I’ve always liked a simple system of hanging them from a board with pegs.  In my previous shops that board was mounted directly above the workbench but now that I have windows it’s off to one side.  I’ll share that as well as building the storage areas in my next blog.  Alder and Birch ply will be used for that and OMG: biscuits, glue, screws, and nails!!!

Posted in Phoenix Woodshop | Tagged , , , , , , | 1 Comment

So Much Good Stuff!

I’ve been so wrapped up and concentrating the bulk of my attention to the shop transformation that I wrote about in my last blog that I totally spaced out sharing this exciting honor I recently received.   Early in October I received an email from Joanna Werch Takes the editor of Woodworkers Journal.  Kind of a long story but quite a few years before, a former editor of the Journal came to Las Vegas and interviewed a number of local woodworkers in their home shops for a possible article.  That never materialized but Joanna apparently found his notes and decided to turn it into a story.  Her first email caught me a bit off guard but I decided to respond which lead to a phone interview of about 40 minutes — very interesting experience!

During the course of the interview she asked permission to go through my blog and on line portfolio and did what I consider to be a wonderful job.  She pulled pictures and a video that I feel illustrated my years of work.  If you have the time and inclination I’d be honored for you, my blog readers to check it out.  Here’s a LINK to that interview, I’m humbled but extremely happy to get the recognition.

Lastly, just want to share some good stuff about the shop and actually making sawdust and plane shavings.  Current project is the combination assembly table and out feed for the tablesaw and then storage for all of those items we accumulate as woodworkers but don’t want to get rid of!  The table is being made of 8/4 Pine and that Clear Kote Baltic Birch.  That’s some nice stuff.  I’ll leave you with a couple of pictures of actual woodwork!

Posted in Phoenix Woodshop | Tagged , | 1 Comment

Phoenix Shop Transformation

Hallelujah;  looks like I’m just about ready to make some sawdust rather than drywall chalk dust and paint drippings!  It seems like a much longer time then what it’s been but I began the construction work on the woodshop around September the 14th. and now it’s ready for work.  Quite excited to say the least!  First up is a combination out feed table and assembly table by the tablesaw.  Then I have plans for an eight foot storage area that will combine a drawer unit flanked on either side with shelf units.  The plan is to conceal them behind sliding doors.  More on that as it happens, I really need to do the storage unit because as it is now, everything I need is in boxes in the second, smaller garage.  Can’t tell you how tired I am of going through them over and over to find what I need.  If you know me at all you know my habit is to have a place for everything and everything in its’ place — can’t stand to waste time looking for stuff.

Original Entry and Front Porch

Original Entry and Front Porch

Let’s stay super positive, thought I’d do a series of pictures documenting the before and after, let’s start with the entrance.  The original shop building had a single door which just won’t work for bringing in materials and taking out projects.  This meant taking out the single door, putting a beam across that opening and eventually framing in what was once a covered porch.

That was a major structural change since that was a bearing wall, if you’re interested you can see the details in this BLOG ENTRY.

The next major changes had to do with the windows.  The original structure had one large window centered on the west side.  Couple of problems with it other than the fact you could see air around the edges!  There is a load bearing post right in the middle of it which meant you couldn’t hardly open or close it and also the counter weight was broken so closing was almost impossible.  After taking it out I replaced it with two, single hung windows and added a small slider to the porch enclosure.  You can read about it in this BLOG ENTRY.

There was a ton of work done to the interior along with problems I’ve already talked about, mainly the way it was framed up.  Not sure how or why the stud and rafter spacing was so goofy but it certainly didn’t follow the standard 16″ on center for walls and 24″ on center for rafters.  This presented a real headache when it came to installing the drywall but that was overcome with a bit of grumbling and lots of head scratching figuring out how to get the best yield from the drywall.  Here’s a series of before and after pictures — what do you think?

So, it goes without saying that I’m extremely pleased.  There’ll be an adjustment period as I figure out how to create an efficient workflow pattern but excited to work all of that out.


Posted in Phoenix Woodshop | 2 Comments

Woodshop Progress — Dilemma’s Continue

I don’t know about the rest of you but I often have “me to I” talks as I work by myself!  Constantly asking: “What was he thinking as he was working on this building?”  Again, don’t get me wrong, I feel very blessed to have been able to purchase a home that already has a free standing shop building but getting it up to par presents challenges.

First off, I knew my stud spacing would be off a bit when I enclosed the porch area due to the existing posts and roof structure.  During the week it was time to insulate the ceiling so that the drywall process can begin.  Can’t figure out how the builder came up with the rafter spacing. Customary spacing is 24″ on center but these vary from 15″ to 27″ and leaves me wondering how the sheathing was attached for the roof.  We’ve had rain and no leaks so at this point I’m leaving that alone.  I purchased R-19 insulating batts which were fine except for attaching them.  Check out the pictures, I ended up being able to staple one side and then cut filler pieces to fill gaps as needed.  Not wanting to go to Home Depot for  tie wire to support it until the drywall goes up I decided to try this yellow, mesh joint tape and staple it up as I went across the span.

Porch Lamp

Porch Lamp

That worked out okay (itchy job!) and the insulation was extended all the way out into the 2′ overhanging eave.  This was then boxed in with the same material used for the siding and capped off with the installation of this semi-industrial looking porch lamp.  Now it was time to figure out how to attach the drywall to the rest of the ceiling in the main shop area.

The first concern here was that the ridge board isn’t the same size as the rafters which would leave a space in the drywall ceiling.  Thought that a picture or two is worth more so here’s a little slideshow to illustrate how this was solved by creating a faux beam at the center of the roof:

This slideshow requires JavaScript.

Monday was a great day, Wolfgang’s Air Conditioning and Service here in Phoenix came out and installed the mini-split system.  It’s going to be so cool (no pun intended) to have a shop that is climate controlled.  Here’s a few pictures of the progress, I did need to remove the rest of the drywall to complete the install.  Cranked it up in the afternoon even though the windows and doors aren’t installed yet and it felt good.  Super efficient, super quiet, 1 ton unit with a SEER rating of 29.3!

Speaking of drywall, after messing with it to remove all of the previous owners mistakes decided to check the budget and get some estimates on possibly having this job subbed out.  The neighborhood we live in here in Phoenix has an historical designation as Rancho Ventura.  There is a homeowners group (no HOA’s) that also has an on-line newsletter.  After putting in a request for drywall finishers I contacted a man who happens to live on the next street.  He has a drywall business called Kabco and came over as scheduled.  To make a long story short, after getting a bid for just tape and texture I decided to ask him about hanging it as well.  I liked the price and he and I have been working out there the last two days and getting along well.  At this point all of the drywall is hung and he’ll be back to add the corner bead, tape, and texture.  Without a doubt, had I taken this on alone it would be a 3 week job rather than a 1 1/2 week.  My knees and back are thankful — many miles on this body running marathons and my 50 – 100 mile trail races have made climbing ladders and crouching down to cut drywall a less than delightful chore, really glad that hiring Kevin was in the budget.

Final thing for this post is the progress on the window at the front of the house.  You may recall from the previous post where I talked about all of the problems with it.  Just came back from Home Depot and they told me that both the windows and doors are scheduled to be at the store by the end of the week.  In any case, here’s that large window removed and the framing for its replacement of two, single hung windows instead.  Still can’t understand why anyone would put in a large window with a structural post right smack dab in the middle of it — oh well!

Posted in Phoenix Woodshop | Tagged , , | 1 Comment