
-
Archives
- March 2026
- February 2026
- October 2025
- September 2025
- August 2025
- June 2025
- May 2025
- April 2025
- March 2025
- December 2024
- November 2024
- August 2024
- July 2024
- May 2024
- March 2024
- December 2023
- November 2023
- October 2023
- September 2023
- August 2023
- April 2023
- March 2023
- February 2023
- January 2023
- December 2022
- November 2022
- October 2022
- August 2022
- July 2022
- June 2022
- May 2022
- April 2022
- March 2022
- February 2022
- January 2022
- August 2021
- July 2021
- June 2021
- May 2021
- April 2021
- March 2021
- February 2021
- January 2021
- December 2020
- November 2020
- August 2020
- July 2020
- June 2020
- May 2020
- April 2020
- March 2020
- January 2020
- December 2019
- November 2019
- October 2019
- August 2019
- July 2019
- June 2019
- May 2019
- April 2019
- March 2019
- February 2019
- January 2019
- December 2018
- November 2018
- October 2018
- September 2018
- August 2018
- July 2018
- June 2018
- May 2018
- April 2018
- March 2018
- February 2018
- January 2018
- December 2017
- November 2017
- October 2017
- September 2017
- August 2017
- July 2017
- June 2017
- May 2017
- April 2017
- March 2017
- February 2017
- January 2017
- December 2016
- November 2016
- October 2016
- September 2016
- August 2016
- July 2016
- June 2016
- May 2016
- April 2016
- March 2016
- February 2016
- January 2016
- December 2015
- November 2015
- October 2015
- September 2015
- August 2015
- July 2015
- June 2015
- May 2015
- April 2015
- March 2015
- February 2015
- January 2015
- December 2014
- November 2014
- October 2014
- September 2014
- August 2014
- July 2014
- June 2014
- May 2014
- April 2014
- March 2014
- February 2014
- January 2014
- December 2013
- November 2013
- October 2013
- September 2013
- August 2013
- July 2013
- June 2013
-
Meta
Lining the Bottom of a Box
Another series of boxes I’ve done for the Etsy store and also for the craft fair is one I’ve named the Lidded Finger Joint. I’ve gone into the construction of it on previous blogs but the thing that sets it apart is that there is a hinge pin concealed in the finger joint. I use some 1/8″ brass rod for that. What’s tricky is assembling the entire box all at one time. Here are three of them ready to be photographed and placed on the store.

The wood on these is Macacauba. Hard to see it but after assembly brass screws are screwed into pre-drilled holes between the fingers. After the screw is driven in to the shank it is cut off, filed, and sanded. Time consuming? Yes; but this gives a nice, decorative touch to the corners.
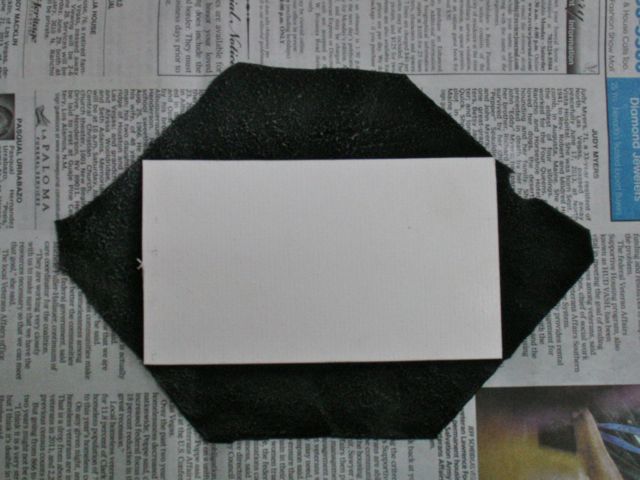
To complete the box it’s nice to line the bottoms of them for a finished look. The most common material I’ll use is an ultra suede fabric but leather or wool are other items I’ve used in the past. Generally, this is reserved for what I consider my high end work. The process is the same for each material, it begins with cutting a piece of mat board that fits in the bottom of the box. It’ll be smaller than the box dimensions to accommodate the material used for the lining. Once these are cut the material is sized.
 For that, I use the guide you see on the right. It’s simply a piece of plywood with that is lined up with the mat board. Notice the marks close to the Sharpie? These are 3″ from the top of the guide and indicate where to cut the top of the material and are aligned with the top of the mat board. The guide itself is 3″ wide. This will allow 1 1/2″ of material on both sides for wrapping around the mat board.
 After cutting the material, the mat board is centered on it and the corners are cut at an approximate, 45 degrees. Depending on the material used this could be cut directly with a knife or marked with a Sharpie and cut with a scissor. In any case, the next step is to glue the pieces together.
For that, use a spray adhesive and center the mat board on the material:
This is a piece of leather, had to cut around the natural defects on this one! Here’s a hint to make this process a bit neater. I generally do several boxes at one time so after cutting the board and material they’re layered between the pages of a newspaper section. After doing the glue up on one it’s a simple matter of folding that piece of newspaper up and exposing the next, clean layer. You don’t want to lay your material on a piece of newspaper covered with sticky, spray adhesive! Follow the directions on the can and wrap the board one edge at a time.

The final step to this procedure is to glue the completed piece into the box. I think the results add that final touch of quality to my work.
Posted in Craft Fair, Lidded Finger Joint Box, Tutorial
Tagged custom made wooden boxes, custom wood box, custom wooden boxes, customized wooden boxes, handcrafted wooden boxes, handmade wooden boxes, leather lining, lined box, personalized wooden boxes, small wooden box, ultra suede lining, wood storage boxes, wooden box design, wooden boxes, wooden boxes for sale, wooden craft boxes, wooden keepsake box, wooden memory box
1 Comment
Slanted Dovetail Box Series
Glad to be back working on the finer aspects of woodworking as compared to making the craft show display shelves. Yes, lots of tablesaw work, glue-ups, nail guns, electric sanders, and paint sprayers have their place but nothing compares to the quieter aspect of woodwork when you use primarily hand tools.
A box style that I developed is one I call Slanted Dovetails. This box design features sides that are either angled in or out and the sides of the box are then dovetailed into it. Pretty labor intensive but the over-all look is one people seem to like. Here’s an example of what that looks like. I titled this box Maple Splendor and sold it on my Etsy store.

As you might imagine, cutting those long dovetail sockets in the end grain of a chunk of Maple is pretty time consuming. Here’s a LINK to a previous post on how I used to go about it.
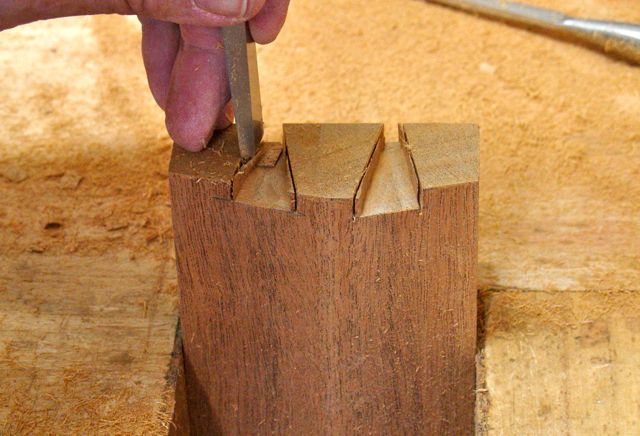
I’ve changed my methods to expedite cutting the sockets. Here’s a quick tutorial, the first step is laying out the tails. For this I have no magic formula but rather draw the outline of the box sides on and eyeball what looks good to me. I’m using a 1/6 ratio and make the cuts into both of the side pieces at the same time.

Before sawing the outer pieces off my habit is to use a chisel to start the saw cut.

The first cut is straight down on the marking gauge line. This is followed by removing a small notch from the board.
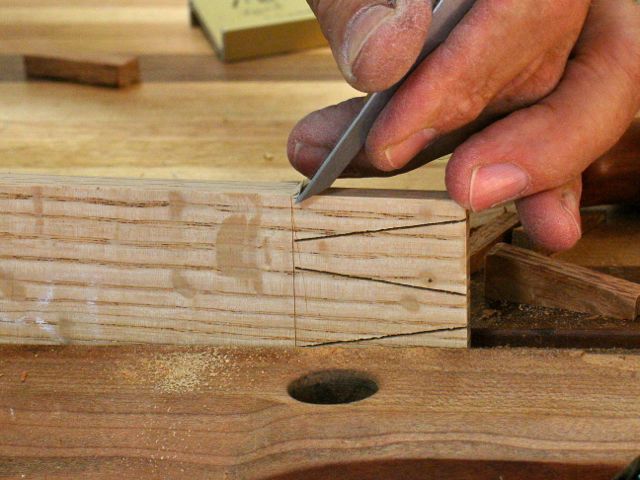
I find that this simplifies starting the saw since you’ve created a squared off notch to begin your cut. Next up is removing the waste between the tails. I start this process pretty much the same way; a vertical chisel cut into the line made by the marking gauge during layout.

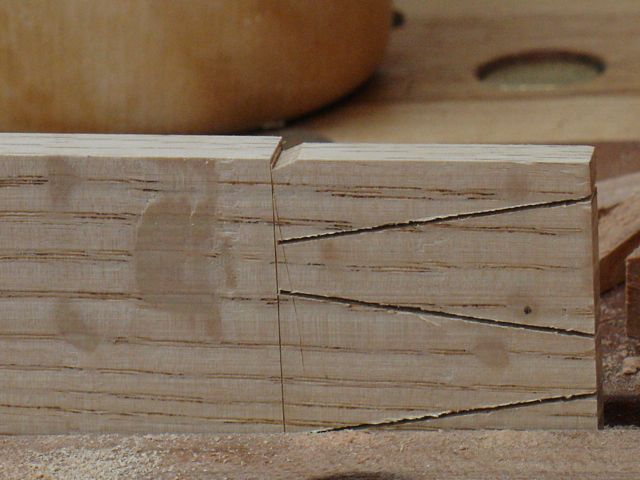
That cut is followed up with angled cuts to begin the waste removal process. On a tail this long I don’t even bother trying to remove the material all the way to the end of the board. Instead, I’ll continue to create the notch pointed out by the pencil until I’ve removed about half the thickness. Then I’ll flip the board over and repeat the process on that side until the waste is removed. There’s been a lot of talk lately on using a fret, coping, or the new Knew Concept saw to remove the waste but to me chiseling it out this way is just as efficient.
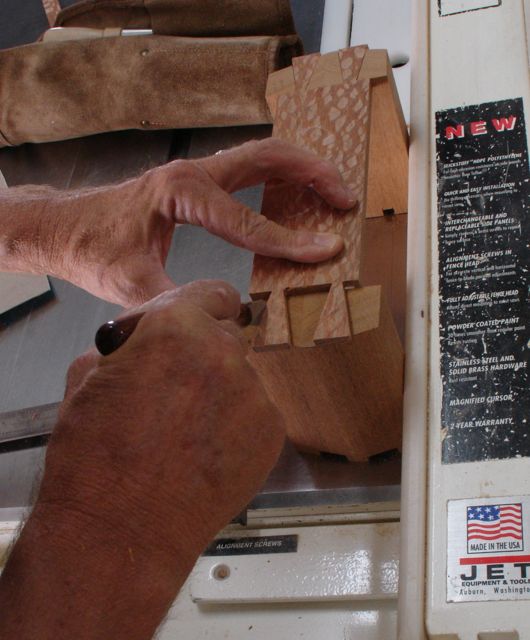 Next step is lining the tail board onto the ends and scribing them in. It can be a bit tricky keeping everything squared up! Using the tablesaw fence as a guide worked for this particular box.
This is an example of my “hybrid” woodworker concepts. As I mentioned at the start of this post, I used to remove all of the material with chisels.

My amended/revised procedure is to make the cuts with a rip style dovetail saw followed by a trim router and small bit to remove the bulk of the waste. This leaves me with enough wood at the sides to trim with the chisels. A definite advantage is that the bottom of the socket is smooth and uniform, something that’s hard to accomplish with chisels alone. I’m going to take credit for coining the phrase “hybrid woodworker” and define it as one who utilizes power tools in the same way the craftsman of old utilized apprentices. Once the grunt work is done, it’s my joy to use hand tools to fit and finish to perfection or as close to it as I can muster!
How much time does it take? Who really cares when you’re on a creative journey. At a recent Sin City Woodworkers meeting someone was asked how long it took to make a piece and how much he charged for it. He said he couldn’t remember exactly but figured he earned close to fourteen cents an hour!
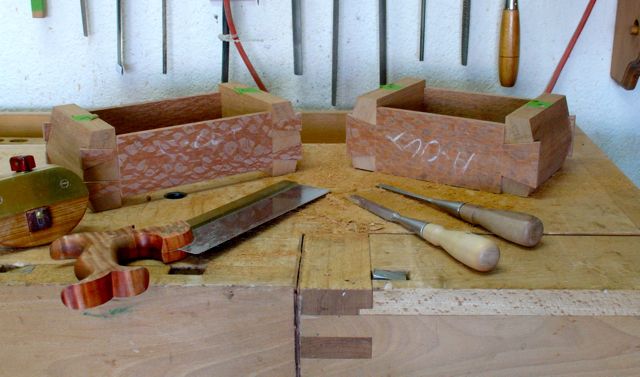
So, what ever amount of time it took me I must admit that I enjoyed the process. Here’s a picture of two more boxes ready for the next step. I’ve picked up a technique from my wife. Whenever she begins a series of rag dolls she tends to make four at a time. Like woodworking repeating the process for four boxes at a time is more efficient than making one at a time.
Posted in Slanted Dovetail Box, Tutorial
Tagged craftsmanship, custom box, dovetail, hand joints, hybrid woodwork
Leave a comment
Final Work on the Craft Show Shelves
There are a few new things going on with my woodworking. First of all, this is the first post I will try to publish via WordPress! I always tell Diane that I want to grow up and be just like her in many ways. To that end, I’ve decided to follow her lead and combine my website with my blog. The website program I’m using now is rather cumbersome and somewhat difficult to update with new work. The other thing is that if I use WordPress instead of Blogger everything I do can “reside” at http://www.woodworksbyjohn.com. Actually, Di is working on that as we speak. I must admit that address forwarding, web hosting, mumbo jumbo is hard for me to wrap my head around so very thankful that not only does she grasp on to it quicker than me, she’s also more than happy to work through it for me!
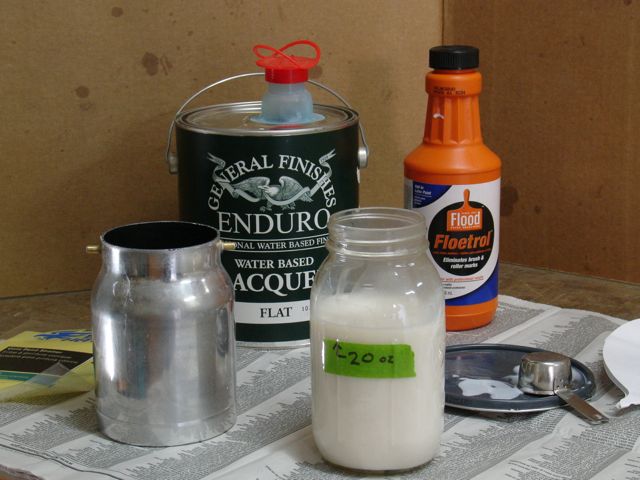 Here’s what was on this mornings menu. Probably could have used a roller or brush but with our temperatures in the 80+ and humidity around 5% that just wasn’t in the cards! When we re-modeled the kitchen I bought an Earlex, 3 stage HVLP sprayer. General Finishes makes a waterborne lacquer which we bought locally (always a plus) in a flat finish. Because of the weather conditions this was thinned 10% with Floetrol. Using a 1.5mm needle worked great. I poured 20 ounces into the mason jar, then added 2 ounces of the Floetrol and was happy with the results.
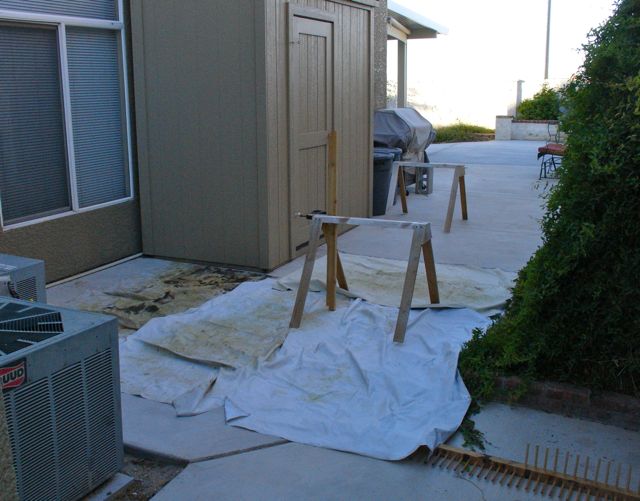 After the initial spray a few days ago I learned how to utilize my limited space at the side of the house to its best advantage. The sawhorse in the foreground has a 2×4 clamped to it to support the shelf for spraying. Once that’s done, the shelf is put into the rack you see at the lower right.
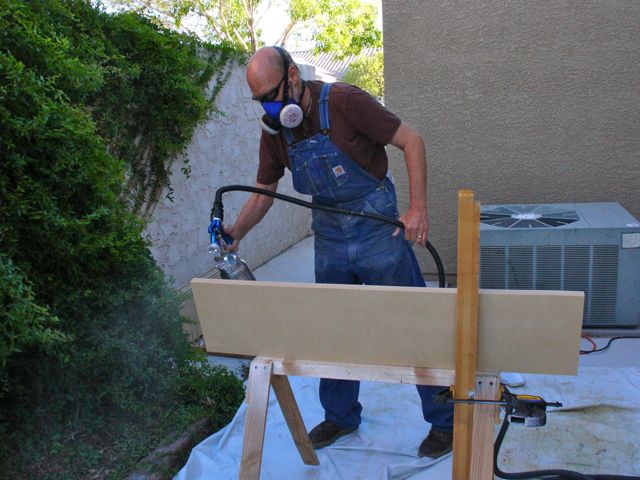
That sawhorse holds the shelf securely, HVLP does shoot out a pretty powerful blast of air and since the shelves are light I had some problems the first time out.
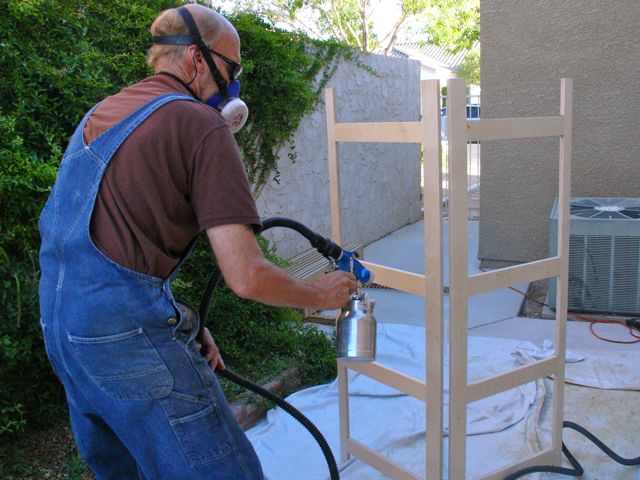
After doing all of the shelves on one side it was time to spray the uprights. These were easier since they stand by themselves. Uprights done and it was time to spray the other side of each shelf.
With the temperature and humidity levels as they were drying quickly was not an issue! Everything was sanded with 320 grit paper after the first coat. Although it’s recommended to sand between every coat since these are strictly utilitarian I skipped sanding and applied a fairly wet third coat to everything. Even though there’s enough lacquer left for a fourth coat the sun’s starting to come over the roof and it’s time to call it a morning!
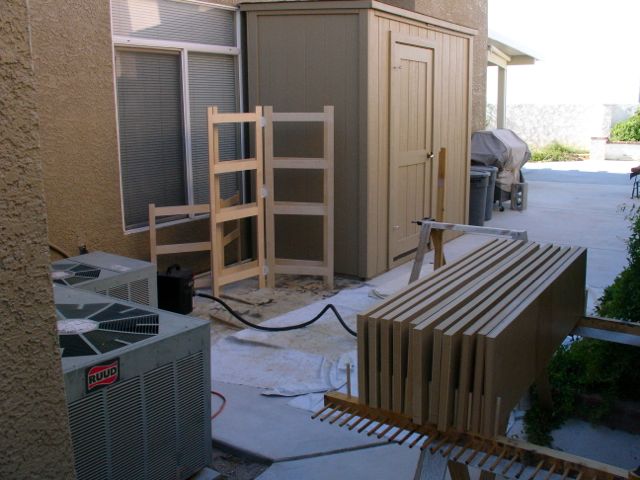
All done, time for some more precise woodworking. Projects like this though make me very glad that I invested in a sprayer. Can you imagine brushing/rolling all of this and then having to wait for it to dry? Add the dusty atmosphere of the desert to the equation and spray’s the only way to go!
Starting to use WordPress
I’ve been using Blogger for many years but my wife uses WordPress. The advantages of this seems to be that I can combine my blogging with my on-line portfolio and have them both in one internet location. This will be a work in progress since I’m not a great fan of internet research. I do, however; thoroughly enjoy blogging my thought process and design decisions as I create a piece of furniture. This holds true for the table you see above or when working on a commission for a client. I have made over 400 blog posts on my blogger site and invite you to check them out: http://woodworksbyjohn.blogspot.com
It will be a while until everything I do on the internet will be combined onto this new WordPress site but I invite anyone who’s stumbled upon this to join me.
