Patio Table is Done!

Happy to say that the table is done and with the help of a neighbor it’s on the patio ready for the first outdoor meal!  Always rewarding to see anything you “conjured” up in your mind, then put on paper, actually come to life and have it look just as you imagined.

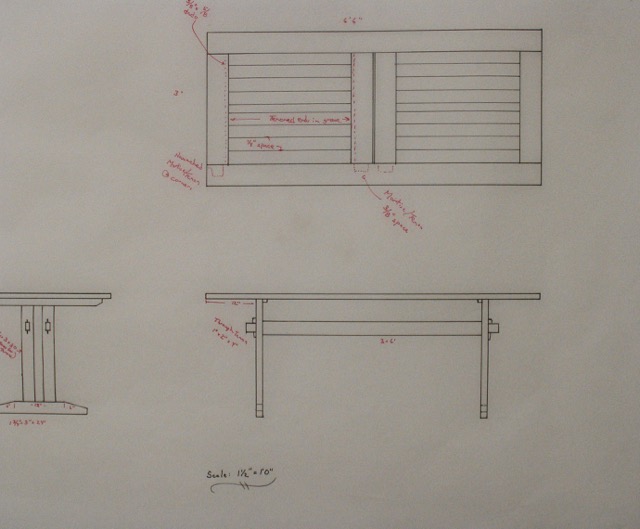
In the last blog the trestle was complete and there was an issue with the Watco Exterior Oil. Although this finish has mixed reviews I’m willing to give it a try since I really do not care for surface coatings that inevitably crack and peel resulting in lots of sanding prior to refinishing.  Since this table will be under cover most of the day the plan is to refresh the finish every 6 months or so with the Watco thinned down to help penetration — I’ll try to keep you up to date as to whether or not this will work.  Assembling the top went as I hoped, after assembling the two ends and center pieces to one side work began on the infill pieces.  Since the Alder was random width it took some math calculations to determine their sizes.  Worked out that with the 1/4″ gap between they ranged from 5″ to 5 1/4″  so the variation is barely noticeable.
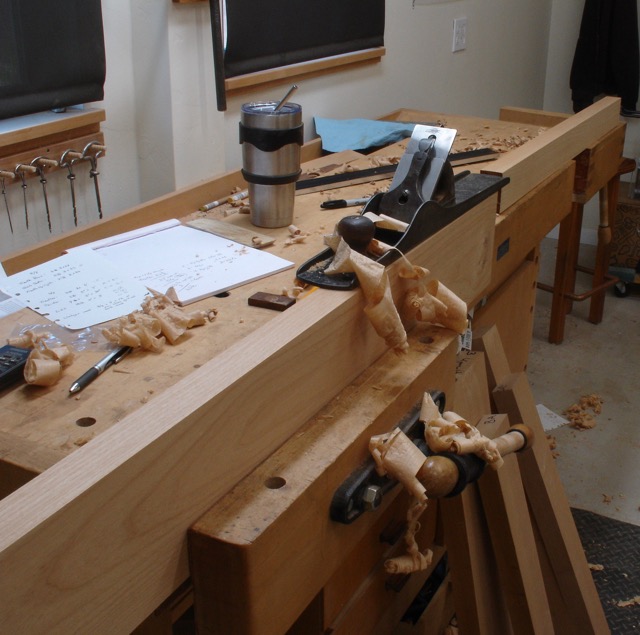
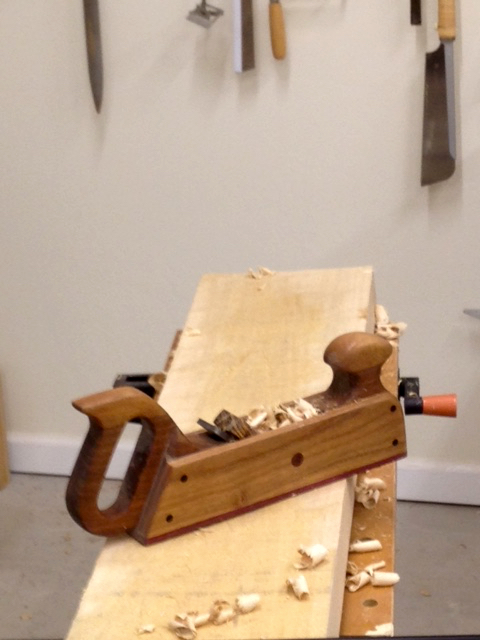
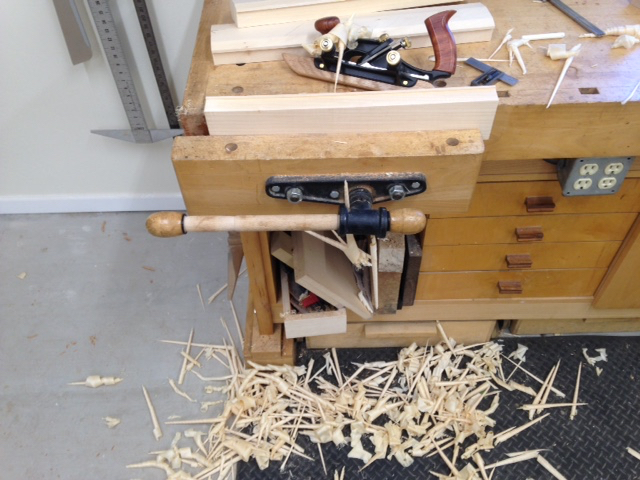
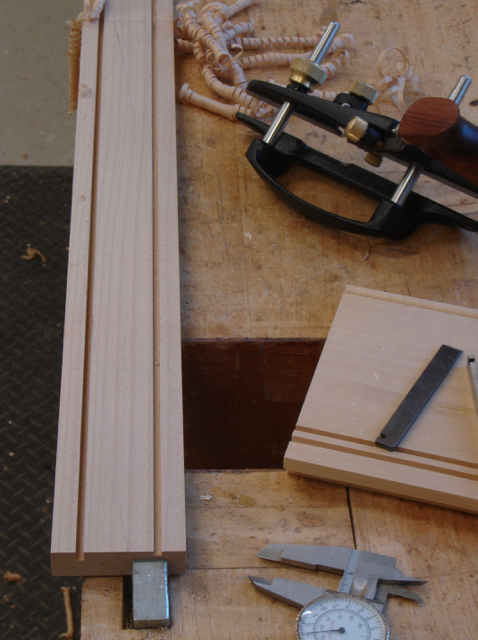
Cutting Tongues

These tongues were cut on the tablesaw with a dado head.  The goal was to have a snug fit in the groove but still allow them to expand/contract with seasonal changes.  Everything got two coats of the Watco, it wouldn’t have been possible to get the oil into the grooves and on the tongues if the finish was applied after the top was assembled.  Care was taken to avoid getting any of the finish on the joints.  You can see the tongue cutting process in this picture.

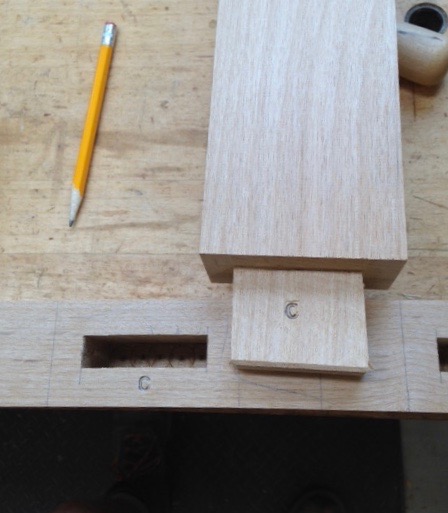
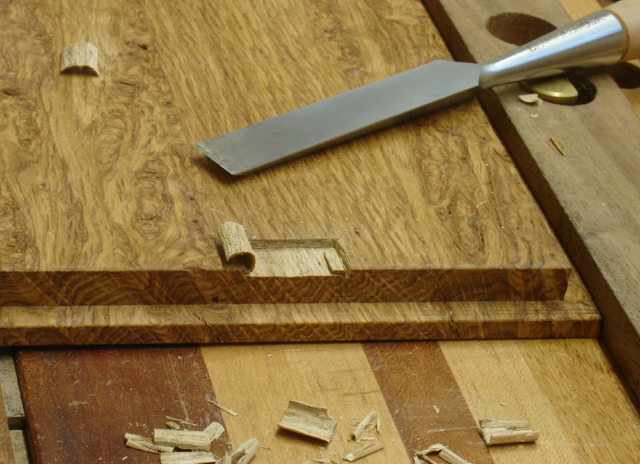
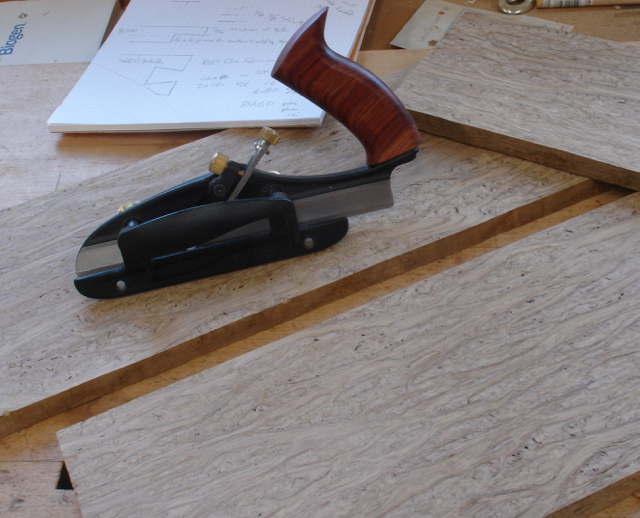
Now it was time to see if the calculations were right; as the dry-fit began my concern was that the ends could splay outward if they were pinned before assembling  the opposite.  After all of the pieces were slid into the grooves loose I saw that was not a concern.  Everything was dissassembled and given two coats of the Watco Exterior oil.  I used Titebond III Ultimate on this project.   After drying overnight, the clamps were removed and two #16 brads were centered to secure each infill piece.  To keep the gaps uniform spacers were made out of some 1/4″ MDF and a guide for pinning completed the operation.  My thought is that this is similar to breadboard end construction and will prevent too much cupping on the top — any opinions from you other woodworkers reading this blog?, love to hear them.

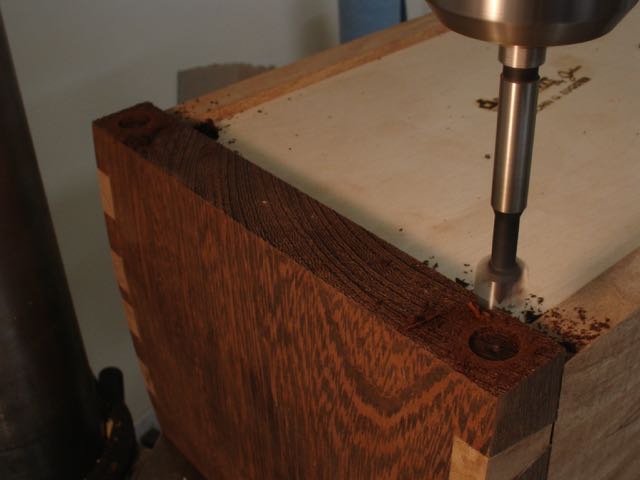
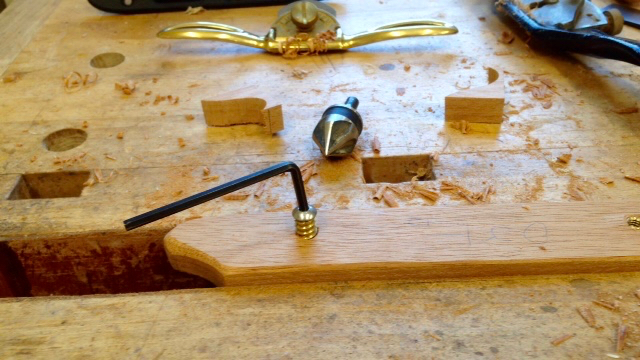
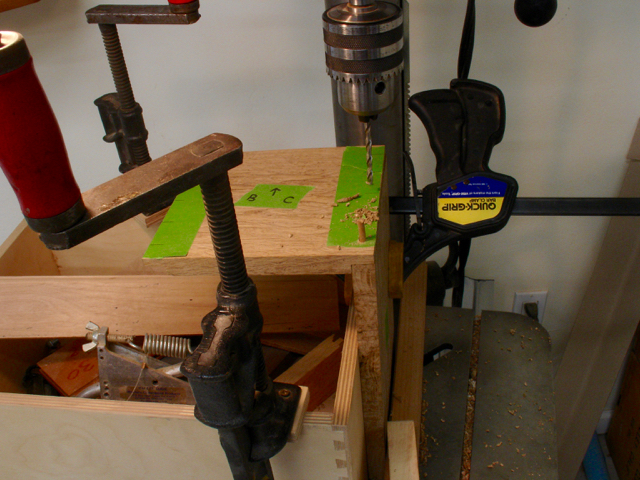
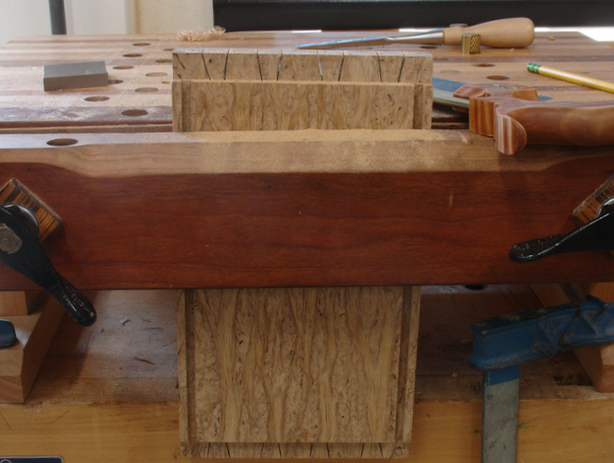
The last step was drilling and counterboring the holes in the legs to attach the top.  Sounds simple enough but it’s a three step process which began by drilling an oval counterbore with a 3/4″ forstner bit followed by a slotted 1/4″ hole for the screws.  A fence set up on the drill press kept things aligned.  The slot is so the top can expand/contract during those seasonal changes without fear of splitting apart.

Some friends and neighbors have mentioned that the table top reminds them of an entry door.  This design and way of making a top is not one I’ve seen before (although sure it’s been done) so I’d appreciate any comments from you other woodworkers that read this blog.  My thoughts are that only does the gap between the infill pieces add a style feature but also that as the years go by, the table won’t do like outdoor tables tend to do which is cup and warp all over.

SaveSave

SaveSave

SaveSaveSaveSave

Posted in Patio Table | Tagged , , , , , , , , | 4 Comments

Patio Table: Phase 2

In the last blog the table base was in progress.  Fine Woodworking had a video series by Gary Rogowski showing the way he built a trestle table which I used for inspiration.  As you’ll see, I don’t like to build from someone else’s plan so designed my own table.  The video showing how the wedge was made was of great help.  You may need to be a member to have that link open for you.  Anyway, here’s the assembled trestle of my design:

The wedges were cut at 9° and are made of Sapele.  My first instinct was that the mortise in the stretcher would need to be tapered at one end and square on the other but the video from Rogowski showed how that wasn’t the case.  It’s 3/8″ and was cut on a hollow chisel mortiser after tilting the table.  I only have one mortise chisel, a 1/4″ wide so I was able to refine the cuts made on the mortiser.  Rogowski also showed making this simple jig for the bandsaw to cut the wedge.  It was cut over-sized then hand planed to fit.


Working Drawing

Next step is creating the top, let me let you in on my plan and we’ll see if it works out!  On paper it looks good but the logistics of it are new to me.  You can see that the base came out as drawn, now for the top.  The length of my clamps (3′ +) dictate that the table is 3′ wide.  Since  6’6″ is the total length and I sold my 10′ pipes before we moved here the end pieces need to be mortised into the sides.  After cutting all of the mortise and tenon joints to assemble the perimeter, ends, and inner pieces that will be glued up — but wait, there’s more!  On the inside of the end and center pieces there is a 1/2″ x 1/2″ groove.  The goal is to cut tongues on the pieces that will infill the table.  To accomplish that I plan to glue the ends and center piece to one side only.

End and center pieces glued to one side

This proved to be quite a hassle since the clamps only open to 3′ plus about 1/2″.  I had to beat the heck out of it before the clamps could get on it with the most important consideration being that the glue up was square.  Here’s a picture of the results, I think so far so good — whew!  Now, the infill pieces need to be cut to slide into the grooves.  It’s a puzzle calculating the width based on the material I have but it looks as if 5 pieces will do it.  Notice there’s a 3/8″ gap between the center pieces and the infill pieces will have a 1/4″ gap.  The nice thing about this is that these can all be pre-finished before glue up. They will slide into the grooves and center of each board will be pinned from the bottom allowing them to expand and contract with the seasonal changes.

Everything else was pretty straight forward.  To cut the haunch on the 2 1/2″ long tenons I needed to use a Japanese joinery saw.  Clearing out the haunch which will be visible at the ends was done with an antique Stanley #271.  I can see where the improved ones from Lie-Nielsen and Veritas are easier to adjust but this one’s paid for!  When ever there are a lot of joints to keep straight I like to use metal marking stamps.

Since I don’t care for surface coatings my choice to finish this is Watco’s Exterior natural oil.  It’s a product I’ve used for my furniture for over 40 years and even though Min-Wax screwed up the formula trying to meet EPA standards I understand that now that Rustoleum makes it is almost back to what it was before environmental standards messed it up.  That being said, the quart purchased to experiment had some problems where an orangish color came in — I now need to sand the trestle part down which means it’ll still be lighter than the top but at least Rustoleum is sending me a refund to the quart.

Posted in Mortise and Tenon Joint, Patio Table | Tagged , , , , , , , , | Leave a comment

Patio Table

Thankfully, there’s always another project to keep me occupied — as you know; I don’t relax well.  Our house here is Phoenix has a large, covered back patio where Diane and I find ourselves having lunch daily.  What better project than a table to dine at!  Diane found some nice patio chairs (6 of them) so we purchased those at Pier One.  It was another good excuse to explore Phoenix since we went to 3 different locations to pick up 2 chairs at each!  Over the fourth of July we went to Las Vegas for some family time with the kids.  While there, Adam was showing me how he is designing his portable work bench which holds all of his tools in one compact and moveable table.  He showed me how he designed it using SketchUp, amazing!  Then I showed him my old school way of design — he laughed!

Jointing the Edge

This table will be my own trestle design utilizing wedged through tenons.  Sized at 3′ wide and 6′ 6″ long it’ll be made of Alder.  Not being one who likes to build from someone else’s plans I prefer to make my own.  After purchasing 8/4 and 6/4 Alder from Woodworkers Source here in Phoenix it was time to start prepping the wood.  The procedure is the same, I’ll have them straight line rip one edge then my work begins by refining that with a #7 Stanley jointer plane and going on from there to rip boards to the required width.  This is followed by planing to thickness after flattening one face if needed with a scrub plane.  The first part to be made for the table will be the legs.  These began from the 8/4 stock and are mortised and tenoned with 1/2″ wide and 1 1/2″ long tenons.

The top stretcher was cut thinner at the ends on the bandsaw.  To remove the bandsaw marks I found that a spokeshave was just the thing.  Paring chisel did the trick on the angled cut that the spokeshave couldn’t get.

Machine work is done, time for quiet hand work to refine and fit.

As a hybrid woodworker, in other words someone that uses machines to do the grunt work; the tablesaw, bandsaw, planer, and mortiser rough out the wood to dimensions that are close but then need to be refined and fitted with backsaws, chisels, and hand planes.  For a project of this size it only makes sense to me to work this way.  For example, the through mortise for the trestle are 1″ wide x 2″ tall and go through a piece approximately 1 5/8″ thick.  Using the hollow chisel mortiser with the widest chisel I have (5/8″) made fairly quick work of this process.  I worked from both sides and almost to the line, fine tuning will be accomplished with chisels.  Before this method I’d lay it out carefully on both sides and chop halfway planning to meet in the middle.  This method worked well.

All the tenons were cut slightly oversize, here’s my bench set up for bringing them to fit:

Tenon Set-Up

Mortise & Tenon marked

At the left the tenon is cut to width and the end chamfered with chisel. At the far right I’ll use a rabbet block plane to carefully fit it to the corresponding mortise.  Since there are eight joints to keep track of letter stamps are used to help keep me organized.  This method works for me.  At this point both of the legs are glued up and drying.  The next step will be the stretcher with its angled mortise to accept the wedge and hold it all together — something I’ve not attempted before!

SaveSave

Posted in Hand Tool Woodworking, Mortise and Tenon Joint, Patio Table | Tagged , , , , | 3 Comments

Keepsake Box Final Details

Let me start this out by showing off the completed box and then boring you with the details later,  I’ve often said “it’s all about the wood” and in my mind this project exemplifies that!

After glue up it was time to trim the excess tail material.  More than your usual 1/32″ or so due to the angles that were cut on the side pieces of Wenge.  Spalted Maple is difficult to cut cleanly, even with a freshly sharpened paring chisel with a 20° bevel.  It tends to “chunk out” so after cutting as closely as I dared it was time to do some sanding — happy to report that all went well.  Mortises were cut for the stop hinges as well as the lid lift which was actually a cut-off from the sides.  I used every bit of the wood I could for this project.

Another request from the client was for a tray, this was made from the last piece of Spalted Maple I had and you can see the grain is much more pronounced.  Just enough to make a square tray for it using mitered joinery and the packaging tape assembly method.  A 3/16″ piece of plywood for the bottom sits in a groove made with the plow plane.  The tray and the bottom of the main box were lined with burgundy velvet.

Counter bored hole for silicone pad, notice the cathedral grain on the Wenge caused by cutting the angle — like it!

The only request that wasn’t met was an engraved nameplate of sterling silver.  After checking numerous local trophy shops, on line jewelers, and Etsy shops I was unable to find someone capable of engraving it.  My client settled for a standard, silver (aluminum) plaque from a local shop.  Apparently sterling is difficult to engrave but can be sand blasted or cut with a laser.  Seems it just doesn’t do well with automated processes.  The finish on this project is platinum shellac and wax.  The process used to attach the silicone feet was changed for this box.  Rather than just stick them on and run the risk of them being knocked off a flat bottomed hole was drilled into the bottom first and then a spot of crazy glue added to help keep it in place.  It also lowers the box a bit which I like.

So, thanks to USPS Priority mail this project arrived safely three days after being brought  to  the Post Office.  My client was very happy with this project and really, isn’t that what creating these things is all about?

SaveSave

Posted in Current Commission, Etsy custom order, Etsy Store, Hand Cut Dovetails, Hand Tool Woodworking | Tagged , , , , , , , , , | 2 Comments

Keepsake Box: Wenge & Spalted Maple

It’s been over a month since my latest blog and that’s partially due to our summer schedule but also my latest Etsy commission is one that my client didn’t want to see until it was complete.  Here’s a picture of the completed box, let me share the backstory and creation of this piece.  I connected with a friend of mine from high school (50 years back!) on Facebook.  He likes my work so asked me about creating a keepsake box for him and his wife to replace a sterling silver one they lost in a fire, along with pretty much all of their other worldly possessions.  He gave me approximate size and a few things he’s like to have but then gave me artistic license to create something suitable.  This has happened a few times before and in a way, it puts a bit more pressure on my design and esthetics.  I knew I wanted to use hand cut dovetails since they are a benchmark of woodworking and something I incorporate in much of my work.

Re-Sawing Spalted Maple

I looked around through the meager wood supply I had (much was given away prior to our move) and found a choice piece of Spalted Maple and also some Wenge.  The size of these pieces determined the size of the box but also added some stress to the project knowing that if I made a mistake or the wood decided to crack or show some flaws there was no extra material or back up plan.  The Spalted Maple yielded enough 5/8″ thick pieces for the sides and top — awesome seeing that figure appear with each slice!  After running it through the planer the surface was finished off with a smooth plane.  The Wenge was then cut in half and; you may notice, a slight chamfered cut was made on the outside of each piece.  This created a little bit of cathedral grain on the sides of the box.  That wood tends to splinter and not plane cleanly no matter how sharp the blade was or how tight the mouth of the plane was adjusted to — sanding required on this piece of wood.

Plowing the bottom groove, notice the lipped area for the dovetails

Once the pieces were prepared and sized it was time to begin the joinery.  As is my habit, I employ the Stanley 140 trick for the sides, that was cut with the skewed rabbet plane.  Then a groove was made for the bottom with the plow plane.  Planing a wood like Spalted Maple is different since the “splatedness” is really fungous so no real grain direction to be had.  Luckily on these pieces a groove was formed.

Now it’s time to cut the dovetails, since I’m a “tails first” person that was the first step after figuring out how the layout should be.  The challenge was knowing the areas that had a lot of that “spaltedness” weren’t the strongest the layout had to be designed with that in mind.  Too much trial fitting could lead to failure of the joint which encouraged me to be as accurate as possible.  Cutting the pins on the Wenge was tough, needless to say the chisels all needed to be sharpened after this project.

After preparing all of the joinery it was time for glue up — always stressful right fellow woodworkers?  I believe it was Tage Frid who said a dovetail should only go together completely once and that was during final assembly.  Fitting bottoms usually finds me completely assembling a project more than once but due to the fragile nature of the Spalted Maple I controlled myself on this project.  My glue of choice is generally Old Brown Glue which is a liquid hide product.  Due to the oily nature of the Wenge, Gorilla glue was used instead.  Glue up was successful so I’ll leave the final details for my next blog.


SaveSave

SaveSave

SaveSave

Posted in Etsy custom order, Etsy Store, Hand Cut Dovetails, Hand Tool Woodworking | Tagged , , , , , , , , | Leave a comment

The Making of Frame # 107

I was reminded of a documentary film that followed the making of a Steinway Grand piano from start to finish as this picture frame started to take shape.  It came out around 2007 and maybe some of you other woodworkers saw it. The title was  “The Making of Steinway L1037”.  As a furniture maker who’s passion is working  primarily with hand tools I really enjoyed this film.  Not to compare my work with something the magnitude of a Steinway piano but the process that takes place as we make an item by hand is taken for granted by the general public.  During my teaching career something I always tried to  emphasize is that everything we see, use, or touch was created by someone; it didn’t just happen!  As this frame went from an idea to an actual piece it brought up the memory of that documentary, if you haven’t seen it you can probably still find it on Netflix or another internet provider.

Summer Breeze by Diane Eugster

This painting titled Summer Breeze; was painted by my wife, Diane Eugster.  She hired a model and spent the morning taking pictures of her in various costumes and locations throughout  our house and yard.  The goal for my picture frame designs is to incorporate an element of the painting into the frame whenever possible.  Diane asked for a silver, cool frame to complement the painting.  One feature that stood out to me was her braids so being up for a challenge (as always!) I made it my mission to find some clip art or an image that I could possibly carve to give the illusion of braids.  The thing to keep in mind is that it’s the painting that is the star of the show, not the frame.  Think of the frame to be jewelry or eye-candy that will draw the viewer into the art.  It’s always surprising that many artists will scrimp on the frame even though it may be that “hook” that makes their work stand out from all the others in a gallery or show.

Braid Designs

The frame making process begins by first cutting and joining the pieces together.  To see what that process entails, check out this page of my website.  Now comes the fun part, finding an image that is usable.  Thank goodness for internet image searches and copy and paste capabilities because my artistic abilities aren’t up to this task!  The first braid design I found was really cool but it used three strands.  A flexible plastic pattern was made and I carved a couple of trials — the problem came when it was time to model it.  Even after coloring in each strand to see which goes under, which goes over, etc., etc. it became apparent to me that this was just a bit too complicated.  Since the plan is to have it go about 9″ from the miter on each corner there is too much chance for error.  The time spent was a good lesson and practice in carving but in the end the design chosen is what you see in brown which has only two strands to it.  We changed the ending of it so it wasn’t quite so literally strands of hair.

Creating the Pattern

Just a brief recap on how I make these designs; once it’s manipulated on the computer to the size needed it is attached to a piece of plastic you can get from salad containers with spray adhesive.  This picture is of the three strand braid but the process is the same.  The plastic piece with the design is stapled or taped to a piece of wood and then cut out with carving chisels.  The size/sweep of the chisel used is annotated on another paper so I can remember what the heck I did!  Salad container plastic is flexible enough to fit into the cove and by flipping it over I can trace a mirror image on both corners of the frame.  The pattern is cut at 45° to align it with the miter.  Since the ending of this braid is modified there are two pieces for this particular pattern.

This frame is rather large so I needed to pull the bench out from the wall. The plan is to first lay out the basic design and ground it out.  It’s always tricky working on a curved, ogee/cove surface like this but here’s the first two corners.

Although the details have been drawn in to model the braids I’ll wait until all four corners are ground out and attempt to do all of the modeling then.  My thoughts are that I can get a rhythm that way to achieve more consistency.

For the most part, using a chisel or gouge of a certain size is the best way to have consistent curves and profiles on a carving.  Sometimes though, that’s not possible.  Enter one of my favorite little tools I call my Golf Ball Skew!  Using golf balls for handles on my files is something I’ve done for years, they’re great.  You can hold them in any position and the surface provides a good grip.  This is made from a Marples, double skew chisel that came from the factory with an ugly, blue, plastic handle.  It’s my “go to” tool whenever I need to cut lines that don’t match the standard carving chisels I have.  You can sight right over the top of it and pivot the tool exactly on the line that needs to be cut.

So there you have it, a look at how the carving of my picture frames go from my head to the wood.  It really is all about the process — hope you enjoyed it, now it’s my turn to make some chips!

SaveSave

SaveSave

SaveSave

Posted in Artist Furniture, Carving, Gilding, Hand Tool Woodworking, Picture Frames, Tutorial | Tagged , , , , , | 5 Comments

Beaded Frame #105

Scrub Plane

Diane is currently working on a painting that will look better with a more contemporary frame than the molding I had milled at Barger Molding.  I always like the challenge of creating my own profile from rough stock plus it gives me an opportunity to work with the two new planes from Veritas, the plow and skew rabbet.  Unfortunately, no local supplier had any 6/4 Basswood so I made a lot of sawdust and purchased some 8/4 instead.  The process started by flattening one side with the scrub plane then using the planer to bring it to the required size — hybrid woodworking at its’ best.  The painting is 9″ x 12″ so the choice was to cut 4 separate pieces rather than trying to plane and form two longer pieces.  The profile is a fairly simple one as most contemporary profiles tend to be, it will be silver gilded.

Molding Profile

Overall dimensions are 1 3/8″ x 3 5/8″.  Cutting the 15° and 20° angles was done on the table saw then cleaned up with a smooth plane to remove the saw marks.  The sight edge is the shorter one and in hindsight, I should have planed the rabbet before cutting the longer, 15° angle on the other side.  It would have been easier to secure the board in the vise without the angled face — next time!  Since the plow plane works best with a 90° corner, the edge I’m pointing to with the pencil was also cut at 15° to achieve that.

I’ve always liked the simplicity of beaded surfaces and in the past, created them with either a shop made scratch stock or the Lie-Nielsen # 66 bronze beading tool.  An early frame I did of smoked poplar was completely done with that tool.  That is a great way to add details to your work but, unfortunately; Basswood is too soft for that process.  That’s why I was so excited about the small plow plane and the beading cutter!

Cutting the Rabbets

Okay, enough back story, let’s get into this project.  After roughly shaping the stock, the first step was to cut the rabbet which, as this picture shows; created lots of shavings.  It was a bit of a process to get the blade adjusted exactly where it needed to be but with the set screws used position the blade it should be a one time deal.  Yes, a tablesaw could have accomplished this in no time but hand tool work is soothing and I enjoy the process.  It took around 40-50 passes to cut the 1 1/8″ wide by 3/16″ deep rabbet in all of the pieces.  I enjoyed it so much that I decided to bore you with this video (2 parts) and share my enjoyment with you!

Since watching it in it’s entirety may be as exciting as the proverbial “watching paint dry” I broke it into 2 segments.  Here I’m just going down to the final dimensions:

Hopefully you’re not too bored watching these videos and found something informative in them.  Let’s continue with the Veritas small plow plane this time outfitted with a 1/4″ bead blade.  This was also great fun and only took 16-20 passes to cut the beads.  For some reason two of the pieces of Basswood developed this stringy cut, the others cut cleanly from start to finish:

All that remained was to cut the miters and slots for the #20 biscuits and glue it up.  Remember the angled outside corner?  Well, that created a problem when it came to the assembly process.  I use a Merle band clamp for assembly purposes and the jaws are 90°, the outside of the frame is 15° so it wouldn’t clamp securely.  Lucky for me, the cut off pieces were still by the saw so short pieces were attached to the corners with double-back tape — now I was able to glue the frame together.

Next up is the final preparation, gilding, and toning and hopefully it’ll be a great complement to Diane’s latest work.

Posted in Hand Planes, Hand Tool Woodworking, Picture Frames, YouTubeVideo | Tagged , , , , , , , , , , , | 1 Comment

Fence for Plow Plane

Ever view this woodworking we do as an addiction?  I find that the more I do, the more I look forward to the challenge of taking on another project.  I have some plans to make a custom molding for a small (9″x 12″) painting that Diane is working on.  It needs to be silver gilded and have a somewhat simple design.  I’m starting out with Basswood that I’ve milled down to approximately 1 3/8″ x 3 5/8″.  Purchasing the plow plane was partially influenced by this frame design.  In the past, I’ve used a beading tool to create moldings but that tool doesn’t cut very cleanly in a softwood like Basswood.  When I saw that Veritas now makes beading cutters for the plow plane the thought crossed my mind that maybe this was the way to go.  You can guess the rest; go on line, open Lee Valley website, sign in and click that order button!

Auxiliary Fence on Rabbet Plane

After getting UPS delivered the beading cutters it was time to give them a try.  They are a little more difficult to control. Unlike a straight cutter, the beading cutter needs to be carefully guided, any slight variation will show up in the bead.  Straight cuts are usually used as part of a tongue and groove joint or to inset a bottom for a box or drawer.  Since the bead is a detail and variation will be obvious.  Decided it would be wise to make an auxiliary fence just as I did for the rabbet plane.  As with most things, there are plusses and minuses — the fence helps guide the tool but it also decreases the distance you can go from an edge.  Oh well, easy enough to remove if needed.

For the plow plane I had a small piece of Mahogany.  Once is was planed to about 1/2″ thick to accommodate the threaded inserts it was time to form it.  This is where the fun comes in; doing a small, free-form shape with hand tools.  The first step was to draw a shape on the front of the fence then cut it out with a coping saw.  Instead of making a template you can simply take the cut off piece to transfer the same design to the rear of the fence.  This was followed up with a spokeshave to smooth out the coping saw cuts.  I attempted to use an Auriou Rasp but just find that for something this small they tend to tear up the wood — it’s probably going to end up on Ebay soon!  A cutting tool like the spokeshave leaves a much nicer finish.  Similar to using planes to create a smooth face rather than sandpaper which abrades it.

Installing brass, threaded insert

Spokeshave was used to round over the outer edges of the fence as well.  Prior to the shaping process holes were drilled to accept threaded brass inserts (10/24) for the screws that will attach the fence to the plane.  Those inserts can present problems and you’ll find any number of ways to have success with them.  With slotted brass inserts, it’s almost a given that the slots will break as you use a flat tip screwdriver to inset them into the wood.  My method is to find either an allen head screw or bolt which is threaded into the insert.  Now you have something to get a grip on.  Also use a countersink to bevel the hole and beeswax to help the process.  Glad to say it was successful!  Some final sanding and a coat of wax and we are good to go!

Here’s a couple of shots of the plane in use, this beading bit is 3/16″ in width.  The fence really helps keep it all in line but you need to concentrate on pushing the blade securely against the edge, this fence will make that a bit easier.

Next up is cutting multiple beads on about 4′ of Basswood, hope I get the hang of this plane soon!

Posted in Hand Planes, Hand Tool Woodworking | Tagged , , , , , , , , | 1 Comment

Small Plow Plane Box Complete

In the last blog I discussed how this project has gotten away from me and my tendency to get pretty darn obsessive with most everything.  I’d like to think that there are  other woodworkers out there who, like me; get as much enjoyment out of the challenge and process of making a project as we do from seeing the completed work.  This box was no exception to that and if pressed as to how long it took to make I’d tell you I have no idea!  I’m quite pleased with the results so here’s a photo essay of the finished piece.


You recall the difficulty with trying to cut dovetails and eventually running out of the Flamed Oak to have enough for the box.  Notice that the doweled joints are on the shorter side of the box rather than the longer side which is more customary — not enough material left to get the inside length needed for the plane.  As before, rabbets were cut first on the tablesaw and then trued up with the skewed rabbet plane.  The dowel making process is best explained with these pictures.

Drill Press Set-Up

Drilling the holes and keeping them accurate required kind of a Mickey Mouse setup.  I needed a way to keep the long side 90° to the drill bit so came up with the setup you see here.  The box is what I keep shaper cutters and parts in so after lining up the bit it was clamped to the drill press table.  Hole locations were previously marked on masking tape and after the first hole was drilled, a peg was inserted to ensure each subsequent hole would be aligned.  Notice all of the green masking tape on the sides to help keep myself straight — it works for me!

Assembly was the next step and was done using Old Brown Glue, a liquid hide product I like to use.  Dovetails provide a mechanical lock to a drawer or  box which pegged joints don’t have.  Just in case  of a joint failure it’s good to know that hide glue is reversible without serious damage to the wood.  After 24 hours cure time the ebony pegs were cut flush, followed by a block plane and finally a smooth plane with an extremely tight mouth.  The face grain of this wood has some pretty good workability with planes, not so much with chisels though.

Mortising for Latch

The lid for a sliding type box is always tricky since you want to hide the grooves.  Since this wood is so cool looking I used a small piece of it to fill the space at the opening.  After working with this wood I figured a breadboard end wasn’t the way to go so broke the rules and attached it directly to the end of the lid with ebony pegs and Gorilla Glue — small as it is I doubt it will be a problem.  After oiling the entire project it needed some type of locking mechanism to prevent that lid from just sliding out on its own — yes, a piece of Flamed Oak can be mortised!  Just like in carving, the wood cut cleaner and somewhat easier going against the grain.

Creating the Blade holder

The final step was creating a way to store the blades safely with the plane.  Veritas does sell a leather roll but I wanted something different.  The solution was to use the plow plane to cut 1/8″ wide grooves of different depths in a piece of Alder.  It is twice the length needed so that it can be cut in half to create a bottom and top.  The reason for the different depths is to accommodate the varying widths of the blades.  I have space for eight of them, the plane came with 5 and I hope to get the beading blades soon.  The over-all thickness of the blade holder equals the distance from the skate to the guide rods.  In this way, when the plane is strapped into the box it also secures the lid.  The finish is Watco Oil (natural) and my 3 part hand rubbed top coat.

Hope this inspires you to tackle a project like this for one of your special tools — beats the heck out of the factory supplied cardboard box in my opinion!

Posted in Hand Planes, Hand Tool Woodworking, Sliding Lid Box | Tagged , , , , , , , , , , , , , | 5 Comments

Project that’s Getting Away From Me!

Okay, I’ll admit I tend to be pretty obsessive (my principal said “anal”) but I tell myself if it doesn’t kill me in the end I’ll be stronger.  I suppose that helps explain my running history that saw lots of 50 and 100 mile mountain runs.  Enough of that, lets get into this latest project that has become all consuming and much more involved than I thought it would be.  It all started when I purchased a couple of pieces of Flamed Oak from Northwest Woodworks of Arizona  from their booth at the Mesa Woodcarving show earlier this year.  I had never seen wood with this type of grain and thought it would be a good piece for a future project — a box never entered my mind at that time!

So that’s the beginning, fast forward to me breaking down and purchasing a Veritas small plow plane from Lee Valley.  I blogged about my previous misadventure with this plane here but since they fixed the depth stop problem and Lie-Nielsen still hasn’t put theirs into production I decided to get it and like it just fine!  So put these two events together and you end up with the decision to use this spectacular piece of wood to make a proper box for the plow plane.  As a rule, I like to hang my planes for easy access but the plow plane has a set of blades that I felt belonged together.

Flame Oak & Skew Rabbet Plane

Another plane on my wish list was to replace to remedy the aggravation I’d had with my old Stanley #78.  This is the Veritas skewed rabbet plane shown here sitting among the boards of Flame Oak for the box to be!  I use the Stanley 140 trick for all of my drawer and box construction.  It’s been written up in Fine Woodworking and I did this blog on it a long time ago.  Lately I’d cut the shoulder on the tablesaw but that really wasn’t the safest way to go about it.  So I’m not getting any younger and woodworking is my passion so decided to bite the bullet and purchase this plane hoping that it would do the same work as a pair of the 140’s plus have a depth stop.  The blade is 1 1/2″ wide so I’ll be able to raise panels with it as well.  Let me add my 2 cents about Veritas vs. Lie-Nielsen.  In my opinion, L-N is a superior tool; I say that based on their finish, tight tolerances in threaded parts, and over-all quality.  I’ve had students that bring their Veritas tools and there’s just something about them that doesn’t feel right in my hands.  Perhaps that’s because I grew up using Stanley and at 67 my habits and perceptions are set.  All that being said, I wouldn’t hesitate recommending either one of these Veritas planes to anyone.

Board Stretcher Process!

Let’s start on this project.  First obstacle was the size, the boards weren’t tall enough to contain the plane so had to go into “board stretcher” mode.  The grain on this wood had so much variation that it was not a problem trying to match the pattern.  For glue ups like this my choice is always Gorilla Glue, it has proven to be the easiest to clean up and never have had a joint fail.  Once the pieces were sized it was time to begin the joinery.  Dovetails were my first choice and believe me when I tell you; this wood is tough!  When I bought these boards they referred to it as Fire Oak due to the way the grain pattern looks but when your plane is on it it actually sounds more like you’re scraping the blade across a piece of concrete!  Almost more like working a burl than working a board.  I have a Powermatic planer with a carbide, helical cutter head which handles the face grain well, plus a smooth plane performs well on it too.   To square the edges the rough work was done with a #7 Jointer Plane which left an okay finish.  Follow up with a Jack Plane with a super tight mouth gave an acceptable edge.

The first step was creating that rabbeted shoulder for the Stanley 140 trick using the newly purchased skewed rabbet plane.  After playing around with it on soft woods I was ready to give it a try — did I mention planing concrete!  The plane cut but the sounds made during the process made me fear for the life of the cutting edge so choose to go into my hybrid woodworking mode by using the tablesaw to bring the rabbet close to size and then the plane to complete it, that was the winning combination.  In the right hand picture the lid is being rabbeted.

Dovetail & Flame Oak = NoGo

Believe me, after 2 attempts I was convinced that dovetailing the Flame Oak wasn’t going to happen.  I had very little problem making the saw cuts but removing the waste between the tails and then trying to chop out the pin boards proved to be undoable (is that a word?).  With that beautiful burl like grain going in every which direction a smooth chop or cut didn’t seem possible.  The chisels were re-sharpened and honed but to no avail.  Each attempt took almost 3/4″ off the length of the boards so I knew I needed to go to plan B which was to rabbet the corners and use dowels to hold them together — I’ll save that for the next blog.

Posted in Hand Planes, Hand Tool Woodworking, Sliding Lid Box | Tagged , , , , , , , , | 1 Comment