
One of the things that rarely need to be replaced in our homes are the doors. Sure, you may add a more decorative door to the entry to enhance the looks of the house or  French doors to make a more dramatic entry to the back yard but all in all; the slab doors found in most of our tract homes will be there forever. Add functionality and appearance into the equation plus the challenge envolved in making a door and you’ll understand why I’ve taken on this project. The side entrance of my garage is barely visible from the street but being a masonite covered, mass produced slab is looking pretty poor. It’s been repainted several times but the bottom is delaminating and allows water to seep into the shop during those rare desert rains. That takes care of the appearance, as for the functionality of it the main problem is that when it is open it covers my tool chest plus interferes with the tail vise of the work bench. I like it open for the light and the air circulation but an added concern is that Brandy, our miniature Dachshund can go unnoticed and end up out in the street —- not a good option at all!
The first type of door I considered was a Dutch door, one I’d created from a standard door in another shop. That wouldn’t solve the access to the tool chest problem plus it still could interfere with the tail vise. A door with a glass in it (BelAire style) sounds good but the glass creates a security problem plus it’s a western exposure so late afternoons would get pretty toasty. I’ve decided to try my hand at designing a door with a large, “speak-easy” panel that will fold down, flat inside of the shop. After pricing materials I choose to go with 8/4 Poplar for this project. Having never made a door of this size and complexity before I’m headed into this with caution so will take my time to plan it out to the best of my abilities so it will be a success. I selected the best materials I could find at our local Peterman Lumber, boy; that 8/4 Poplar in 16′ lengths is pretty heavy stuff, especially when it’s stored in upright racks!
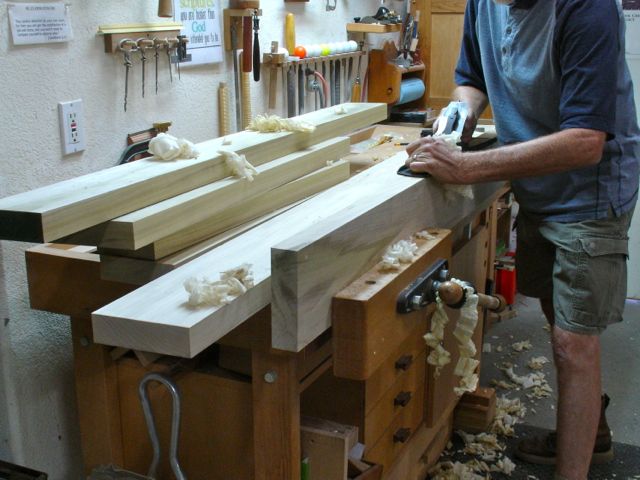
Truing up the edges
Once I got it home the first step was planing their straight line ripped edge with a #7 Joiner plane to square and true it up. This was followed by ripping the pieces to width for the stiles and rails. When I selected the stock I was careful to also find the 5/4 material wide enough to make one piece panels in the bottom section of the door and only need to glue two boards together for the top, “speak-easy” panel. After ripping them to width the next step was to place a 5/8″ wide by 1/2″ deep dado for the panels where it belongs on each piece. Since I’m using this material without bringing it all to uniform thickness first one face was marked so it’ll always be referenced against the fence of the tablesaw and mortising machine.
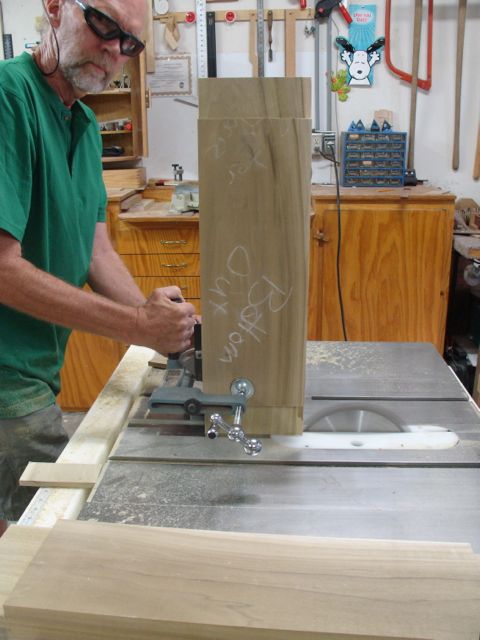
Mortising Stiles
Next up was cutting the mortises where needed. The stiles are 6 1/4″ wide while the rails are 7″ bottom, 5″ middle, and 6″ top. The tenons will be 2 1/2″ deep for the horizontal rails and because of their width I’ll use twin mortise/tenon design. Glad I have a hollow chisel mortiser for this operation. I was concerned about the clamp holding the stock securely but with the addition of a clamp near the end of the table there were no problems.

Spacer for Haunch Depth
By using a spacer block as shown in this picture, it’s a simple matter to change the depth of cut as needed for the haunches. You may notice the chalk markings on the board, I was careful to make sure the same surface of each piece is placed in the same orientation. I’m certain there will be some touch up planing to get everything lined up once the door is assembled but this will simplify that process.
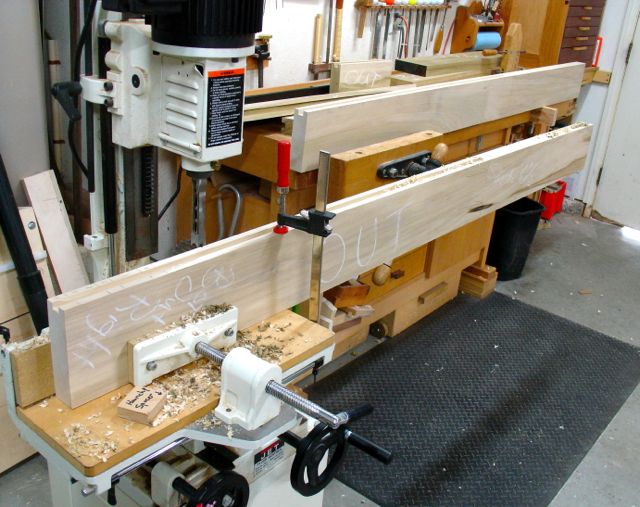
Cutting tenons on tablesaw
Next step was cutting the tenons on the ends of the rails. Being a “hybrid” woodworker I used the tablesaw for the initial cuts and then fine tuned everything with hand tools. These were probably the largest tenons I’ve ever cut but I want this door to last the rest of my lifetime. After cutting the shoulders, the tenoning jig is used to complete the work. At last, the noisy and dusty machine work is complete and I can turn my radio down and get into the quieter work of refining the joinery.
The process began by using a small router plane is used to make the haunch depth uniform on all of the pieces. Ironically, the glass tile pieces recently used for the bathroom remodel were the same size as the haunch so that was used to pencil in that line. Here’s a slideshow of the tenon cutting process:
Next up will be making the panels, locating the hinges and lockset, and putting it all together.

Pingback: Garage Side Door — Unorthodox Methods but Done! | Woodworks by John