
My wife, Diane, has been very busy creating new art work in her studio. She recently changed her website to dianeeugsterart.com Since her studio location is on my way to the shop I get to spy on her whenever the door is open! Sometimes I’ll see one of her works in progress and feel the inspiration for a frame design which was the case for this one. I’ve always liked the Art Nouveau style but find that my carving skill level isn’t quite up to the task of reproducing many of its intricacies.

Carve Prototype
I came up with a simplified design to carve onto the frame and this is the prototype. The frame will be painted black but before painting, the carved areas will be silver leafed. My technique is to allow the paint to cure for a few days and then carefully rub the paint away over the gilded areas to expose the silver. This is done with a cotton ball and wax. I didn’t allow the paint to fully cure — got impatient and wanted to see how it would turn out. The tricky thing (which I goofed up!) is the under/over aspect of the carve. At the far right it flows over and then should have gone under the carve, one of those things that you really have to study to see. On the actual frame the ribbon is carefully laid out.
Laying out the Pattern
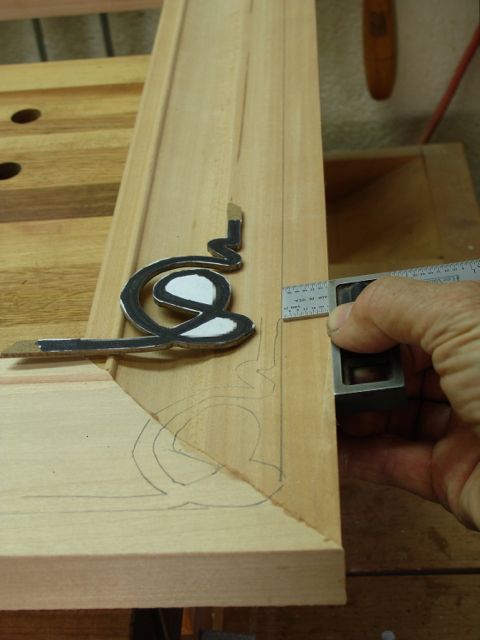
Every project has its new and unknown factors, that’s what keeps me motivated when I create something. To make sure the corner pattern will be as close to the same on each corner as possible a template was made from some 1/4″ masonite and transferred to the actual frame. Initially, lines were drawn completely around the frame and the pattern lined up with that. The white areas of the design were drawn in freehand.
Next up was laying out the single line that connects the corner details. Working at this craft is mostly a solitary pursuit so you need to come up with your own ways to do these things sometimes. My dilemma was how to draw a straight line that would be consistently parallel to the edge of the frame and then equal width all the way around. I chose to use my marking gauge for this and so far it seems to be working! The marking gauge is one I made myself and I was able to extend the cutter (from Hamilton Tools) to get the depth needed.
-

- Cutter extended on Marking Gauge
-

- Scribing parallel lines
Now the work begins. I suppose that oft quoted saying of “ask 10 woodworkers the same question and you’ll get 12 different answers” applies to this project. A few years ago I took a carving workshop from Ian Agrell where I learned his techniques. Essentially, each curvature of the carve is first outlined with the appropriate sweep and size of chisel and then the background is removed. Well, it didn’t take long to discover that this requires a huge number of chisels ($$$!). A friend of mine here in Las Vegas, who is quite an accomplished carver; uses a knife to do almost all of the initial outlining. I’ve had some success with that process but have a hard time making smooth curves as my hand seems to be in the way of seeing the line. So, I improvised by modifying a double beveled, skewed chisel for this purpose. This was a Marples, blue handled chisel I’d had for years but never cared for the look and feel of that handle —- enter the golf ball!
-
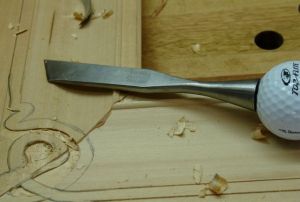
- Marples re-handled with Golf Ball
-
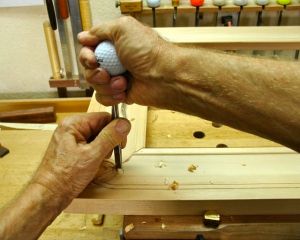
- Hold, pivot, and never lose sight of the line!
I’ve used golf balls for years on handles for files and rasps. They fit comfortably in the hand and allow you to grip it in any position needed. This method seems to be working for me but I wouldn’t turn down any advice from other carvers on how they would tackle a project such as this.

That’s a very interesting design and finishing technique. I can imagine it will be striking.
I write to offer a couple of carving tips, 13th and 14th answer for the 10 questions. 🙂 As you know, I follow Mary May’s carving teachings.
One of the things she advocates is outlining work with a v-tool, rather than setting in edges directly with chisels and gouges. The biggest reason to start this way is that it removes some waste material outside the line. Then when you get to cutting on the line, the material pushed aside by the wedge of the tool will give way toward the waste area rather than having the wedge move the line. Second, by relieving some of the waste there’s less to pare away when defining the line. This makes for better accuracy whether using gouges, chisels or knives. Third, by having already removed some material, there’s lowered risk of splitting … important when you’re working close to the grain lines as you are with the long straight runs.
The other suggestion is about cutting curves when you don’t have a precisely matching gouge. Yes, having lots of gouges makes things easier, but you can do a very decent job with a few. If you don’t have the gouge that fits a curve precisely, find the next closest, but more shallow, gouge and use it in a “walking” fashion. Instead of cutting straight down as with most plunge cuts, start with a corner of the gouge and walk it around the curve in a rolling motion. You actually roll on two axes, rocking from one corner of the edge to the other, and twisting the handle to tighten the curve as you go. Add to that some slicing motion, like you’re doing with the knife, and you can get to the curvature you want with remarkably fewer gouges than you thought you need. Of course, full length gouges with long handles that get your primary hand out of the line of sight also help.
Keep havin’ fun!
LikeLike
Awesome Bob, thanks for all the advice — I’ll try those techniques today. Much appreciated. Just FYI, I have a small v-chisel (4mm) which would have been ideal but I totally ruined it so it’s currently at Woodcraft being reground. I think I finally have a handle on maintaining an edge but as you know, they’re tricky! I find that even a sharp v-chisel can have problems at the miter on a frame with grain direction but as you know, it’s the challenge that keeps us motivated!
LikeLike
Morning Bob, worked on that “walking the gouge” technique and had success, especially on the inside material with the smaller radius — Thanks
LikeLike
Good to hear. One can never have enough gouges, but as blessed as any carver might be, the exact gouge is often not here. So, we go for a walk.
Sounds like someone named Diane is impatient. Looking forward to seeing more.
LikeLike
Hello again…
I just had reason to review some letter carving techniques and found that Mary May details the walking (she calls it “rolling”) approach to curve fitting very well in the lesson about carving the letters R and S.
LikeLiked by 1 person
I can’t wait until this is done!
LikeLiked by 1 person
Pingback: Etsy Custom Order — Two Boxes Continued | Woodworks by John
Pingback: Frame Carving and Gilding | Woodworks by John