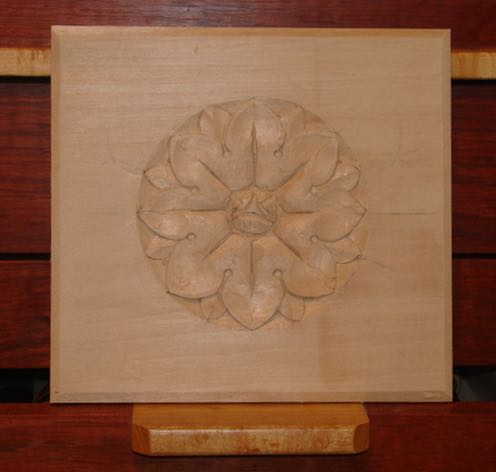
Clayed Up & Ready for Gold!
So it begins — the first of hopefully many frames that I’ll be able to accomplish on our 6 months Scottsdale adventure! This one features the corner leaf design from Chris Pye’s series. What you see is ready to be gilded but I’m waiting for the slow set gilding size to arrive from LA Gold Leaf. Silly me, thought it would be a cinch to find it here in the Phoenix area but neither Dick Blick, Jerry’s Artarama, or the local Arizona Art Supply carry oil based — just that water borne stuff I don’t like! Thought I’d begin this blog by showing the final results and then back track and explain the process used to get here. Very anxious to see how the composition gold (which I like to refer to as Dutch Gold) will confirm to the depth of this carving — that’s the unknown at this point.
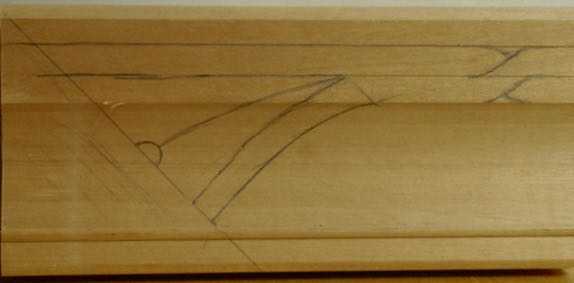
This frame is for an 8″ x 10″ painting and measures about 4″ wide. It’s modified from the remaining molding Diane had custom made at Foster Planing Mill. After doing three exercises of the corner leaf motif from CP’s website I decided it could make a nice frame. The challenges were to incorporate a design from a flat piece of wood to the coved profile of this frame. First up was to draw in a double ribbon that would go around the entire frame then diagonally across the coved area as the border of the design calls for. Drawing free-hand is not one of my strong suits so several templates were made. Using the plastic from salad containers will give you a template that has some real advantages. First of all it’s flexible enough to conform to the coves, you only need to make a half pattern since you can flip it over to do opposite sides of the corner, and lastly it is clear so you can see through it for proper placement. It took two templates to accomplish the inside ribbon, the outside of the straight frame sections were done with a combination square and pencil.


Notice in picture #2, a diagonal line was drawn across the width of the ribbon to determine the template location to add the width. This “ribbon” may look a little bit off but that’s probably because of the cove of the profile. Pretty tricky to outline it with the V-chisel too! There is a pretty hard line where the flat section of the frame transitions to the cove which was softened with a #3/20
gouge. At this point the entire frame was sanded with 220 grit paper. Since I want the carving to be crisp there’ll be no more sanding after this.

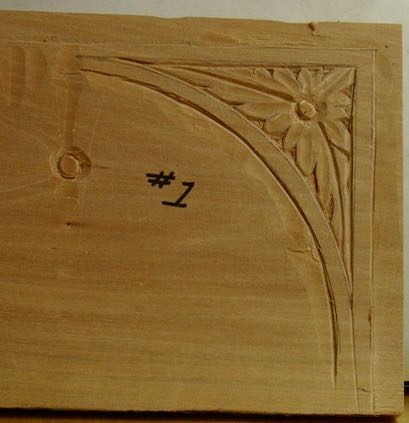
Center Boss in corners of frame
Once the ribbon was complete around the frame it was outlined with the V-chisel in its entirety. It’s not perfect and I’m considering taking a marking gauge the next time I need to carve a straight line completely around the frame — it may give the V-chisel a guiding point. Now it’s time to locate the center boss, this too was awkward to the profile but I’m happy with how it turned out. Cut with a #8/8mm using hand pressure only. My concern here was popping it out accidentally or having it separate since it’s located right on the mitered joint; all’s good!
Being symmetrical is important in a picture frame. There is that saying about the beauty of an item crafted by hand are its imperfections but you don’t want to take that too literal! The goal is that they’re all pretty similar but not so hard edged that they appear to be either compo or CNC routed. After drawing in and cutting the three main leaf separations on each corner (again with the help of a template) the details were drawn in on all sides before any carving began. In this picture you can see those 3 main lines that radiate from the corners and the top of the miter. Notice how steeply the cove comes into the miter making it pretty interesting to carve!
The motif on the right side has been outlined with a variety of #5 and #3 gouges that approximated the shapes of the leaf. Once that was complete on all four corners the modeling began.
In this next photo, the right side has been modeled, primarily with #8 gouges and then the edges were rounded over with a small #3 fishtail. It’s beginning to look like a real leaf!

In Progress
That leads us back to the first picture where the entire frame is now covered with a yellow burnisher/sealer that I get from LA Gold Leaf too. I’ve found that with the yellow, any cracking of the composition gold is less noticeable. That’s the next step, still trying to figure the logistics of that process. When Diane came home after I had applied the size she noticed the smell right away!