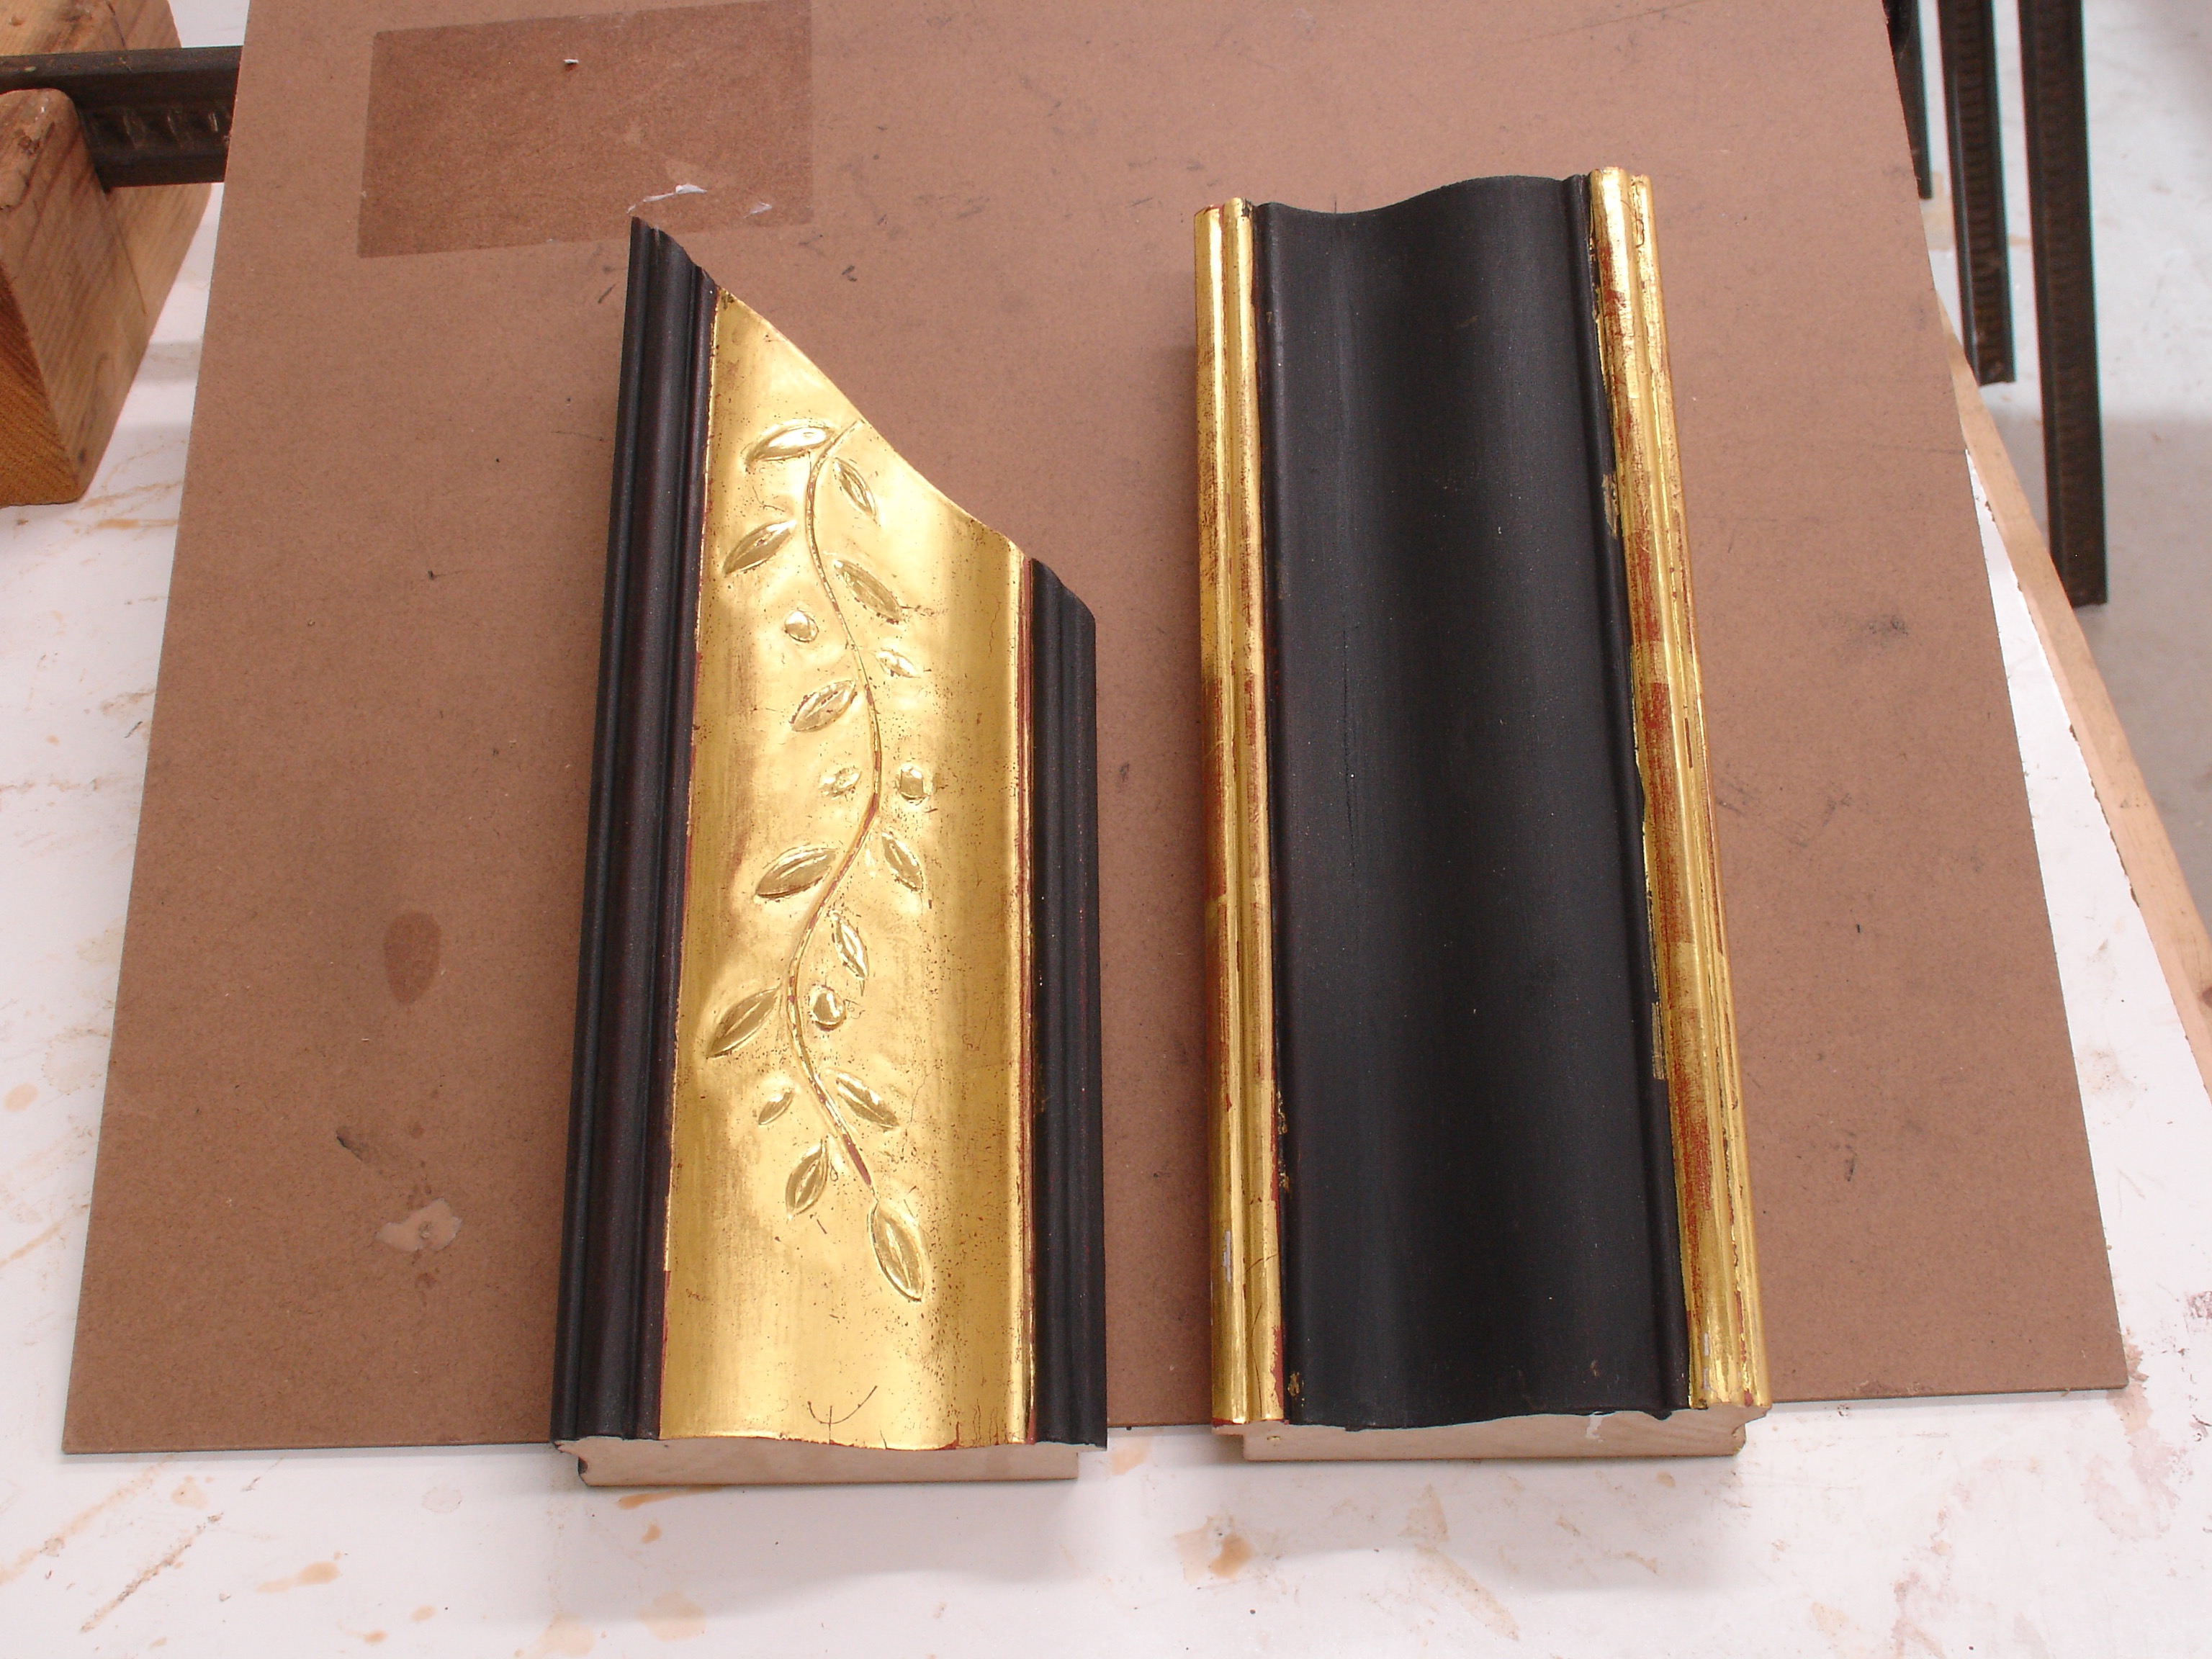
Beaded Frame & Water Gilding Experiments

23 Karat gold leaf

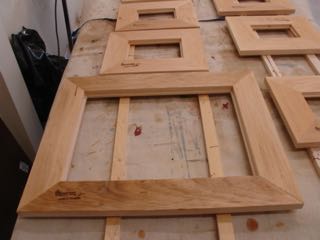
Definitely keeping busy, how in the world did I ever find time to work a “regular” job?  Our house has a bigger yard which requires more maintenance than we’d planned on but having a separate studio for Diane and a free standing shop for me more than makes up for that.  Continuing to experiment and try to hone my water gilding skills after taking the workshop from Charles Douglas.  These two sample pieces feature 23kt. gold leaf with slightly thinned Japan Black to offset the gold.  The carving is a sample piece for a client.  The molding is the profile made for me by Barger Moulding here in Phoenix, just re-0rdered from them.  That design allows space for carving and is pretty traditional, I really enjoy creating my own profiles whenever possible.

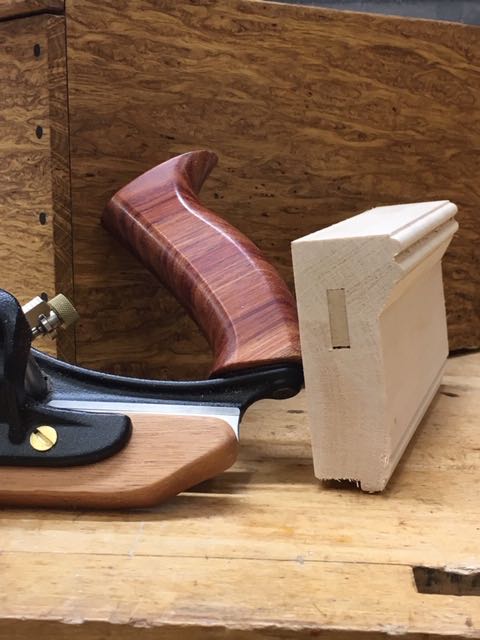
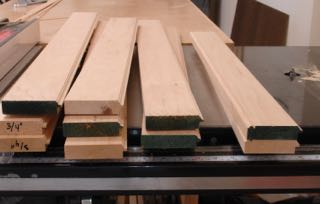
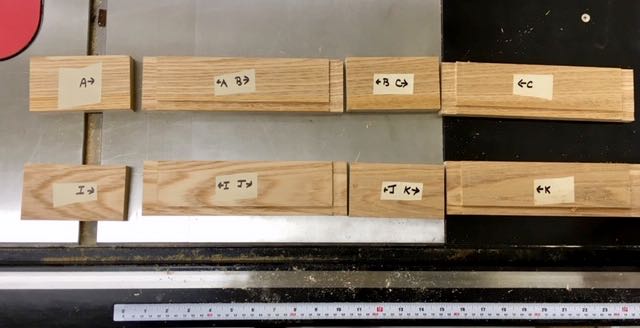
Molding sample, Veritas small plow plane, and Flamed Oak box.

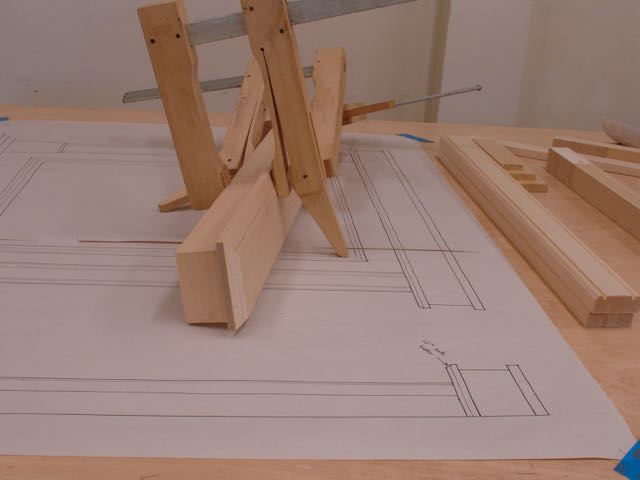
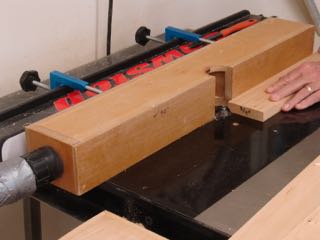
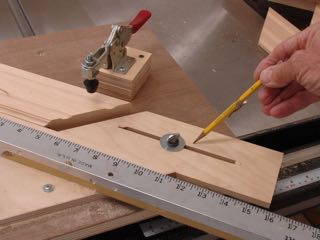
This is one of the more interesting profiles I’ve created.  It’s a two piece design and the beads are formed using a Veritas small plow plane with beading cutters installed .  When I posted this picture on Facebook, it got lots of response.  Probably as many asked about the plane and box as did about the moldings!  If you’d like to know more about the plane and the box here’s a LINK to the creation of it.  To make this profile I used 1-1/16″ Basswood that I get from Peterman Lumber.  The outer piece has two, 1/4″ beads plowed into it and then the groove is cut for the spline.  The groove for the panel is cut at the same setting on the tablesaw.  The panel has one bead which is set back a bit from the edge, it’s trimmed at an angle later.  The critical part is to locate and cut the angle on the outer piece so that it aligns perfectly with the thickness of the panel.  Trial and error with a protractor is how that’s figured out — no CNC or computerized gizmos for me!  Forgot to mention that the panel is finished with a smooth plane prior to cutting the bead.  The rabbet is cut after the pieces are joined to leave a lot of surface so they can be clamped sight edge to sight edge as shown below.  The size of this frame is 16″ x 20″.  The spline is MDF to eliminate any concerns about movement as there would be using wood.

Tinted Grey Base Coat

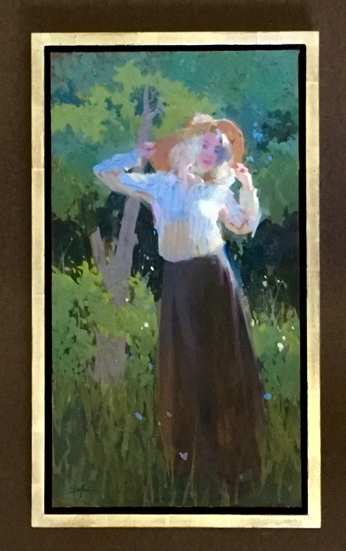
The finish for this frame will play off of the palette used by the artist (Diane Eugster).  The painting is a landscape from the Sonoran Desert which has a deep, blue green hue.  Not being a colorist I get some assistance from Diane.  It began with a grey burnisher sealer which is tinted with Mixol to get the base coat color.  Once this is brushed on and burnished it’s top coated with slightly thinned Japan Drop Black.  Timing is critical and the goal is to just have the base coat ghost through and be exposed more around the sight edge.  There’s a lot of texture in the painting that is a goal of the frame.  There’s a certain time when the paint is at just the right stage of drying where it can be burnished with a 100% cotton rag wrapped tightly around my finger. This will eliminate most of the brush marks and just barely expose the base coat.  It’s a dance of how hard and long to burnish without pulling off all of the black. In my opinion though, this hand worked finish trumps a mass produced, sprayed on finish applied by a robot and probably somewhere off shore!

My current project is another carved frame, again in black.  For this painting the base coat will have a reddish brown base coat.  Ironic that now that I’d like to get into more precious gold gilded frames the market is leaning towards black!

Posted in Artist, custom profile, custom profile, Gilding, Hand Planes, Picture Frames | Tagged , , , , , , , , , , , , | Leave a comment

Ebony Dowels & Sharpening Concerns

Like all of us that work with wood and hand tools, maintaining a sharp edge on our tools is critical.  Through the years I’ve gone from oil stones and no jigs to water stones plus using jigs, and now diamond stones.  On the latest project where I retrofitted shelves into an antique armoire for a client I needed to bring that shelf edging flush with the pre-finished Birch plywood — sharp block plane ideal for that, however; the blade wasn’t quite sharp enough!  I’ve had Lee Valley’s Mk. II honing jig/guide for more years than I can remember and it’s always worked well for me.  Occasionally a plane blade would move a bit but it wasn’t a major issue.  However, it became an issue when sharpening this blade!  No matter how tightly those knobs were the blade shifted and was no longer square in the guide.  I looked at the guide very closely and here’s what I saw — a huge gap!  I was afraid it was time to invest another hundred bucks or so to replace it but decided to see if there was a way to re-align the holder.  After taking a block of wood and fitting it between the studs to protect them I was able to put it into a machinists vise and remove the gap.

So what caused this?  My thoughts are that when putting chisels, especially narrow ones in the guide that bar is bent when you tighten down.  I’d noticed that chisels especially tended to move in the guide no matter how tightly I cramped those knobs.  That’s why in June of 2015 I purchased the Narrow Blade Holder accessory Lee Valley came out with, p/n 05m09.09.  If you experience the Mk.II slipping check the gap!

Banded Shelves for Armoire

Once sharpened the plane worked great to level the banding on these shelves.  This was an interesting job.  Shelves are about 36″ long so did a tongue and groove banding on the front and back for strength.  After notching the corners they will fit into the antique style of sawtooth, adjustable shelf supports.  It was obvious to me that these had been cut by hand since each was slightly different.  Sharp chisel trimmed each support as needed.  My client was told the Armoire came from France.

The latest picture frame to be completed is this one for the painting titled:  When the Rooster Crows by Diane Eugster.   Love the painting, it’s one she did from a recent photo shoot in our backyard.

Australian Lacewood was chosen to not only compliment the over-all palette of the painting but also the texture of her brush work.  Notice that the bottom of the frame has more of those beautiful flecks and rays of the lacewood pattern and diminishes as it goes up which is the same as in the painting.

Creating the Octagon in doweling jig

The pegs are made from some of the Ebony keys reclaimed for a recent box commission.  The process starts by drawing the circle on the end of the key.  This gives me a reference point to begin planing the corners to create an octagon.  The piece is held in what I call a doweling jig.  It’s a simple bench stop design made of MDF with a V cut into it to hold the piece.  There is a piece inlaid at the end that acts as a stop.

After cutting the end with the dowel plate

After planing as closely as possible to the circle drawn on the end, the piece is started into the dowel plate to give an even better guide to plane to.  On smaller diameter dowels you can use a pencil sharpener to point the end of your piece.


Pounding through the L-N dowel plate


Once you get the piece as close as you can it’s time to pound it through the dowel plate.  I use a Lie-Nielsen one that I’ve inlaid into this block.  Just a side note, the block has holes that are slightly larger than the dowel being made.  This helps keep them aligned.  Ebony was a tough wood to turn into dowels this way, kind of wish I had a small lathe!  If you’re interested, I made a video of this process some time ago, here’s a LINK.


Wow, it’s mid-May; keep making sawdust!!

Posted in custom profile, Hand Planes, Hand Tool Woodworking, Picture Frames, Tool Sharpening | Tagged , , , , , , , , | 3 Comments

Picture Frames and a Doggie Ramp!

Beneath the Trees by Diane Eugster: Frame is laying on a brown background

To my way of thinking, a picture frames purpose is to isolate a painting from the rest of the world and subtlety complement the work of the artist.  When I design a frame I observe  the palette and mood of the painting and try to have the frame reflect that in some way.  Being what I refer to as a “boutique frame maker” coming up with a challenge for myself is another aspect of the design process.  Quite often, a client will tell me to just use whatever molding I have but the thing is — I don’t have pre-made moldings!  Somewhat like a restaurants by-line, we don’t make it until you order it!  This painting is by Diane Eugster and the frame has been in progress for quite some time.  The title is Beneath the Trees.  This is the first time I’ve water gilded a floater style frame, it’s in 12 kt. gold leaf.  The story behind it is that it was initially ordered by a client as a 12″ x 24″ but there was a defect in the wood I hadn’t noticed until it was time to join it.  I must be blessed because a day after noticing it she called and asked if it was too late to cancel that part of the order — her painting for it wasn’t working out.  No problem I told her and asked my wife if she wanted an undersized panel and you can see the results.  Definite challenges doing the transition from the gesso and clay surface to the inner black surface but it was a good learning exercise and we (Diane and I) believe it came out nice in the end.

Another completed frame is this one, and again painted by my favorite artist!  It’s on panel and measures 9″ x 12″.  I wanted to experiment and see how it would look with an outer band of 12kt. gold leaf rather than the sight edge.  To draw the viewer into the painting the molding was beveled towards it.  The initial cut is on the tablesaw and then refined with a hand plane.  Wood being what it is and crafting by hand there’s bound to be slight inconsistencies.  One corner didn’t quite match at the inner taper, to match that it was first scribed with an cranked paring chisel then planed until the corner was satisfactory.

The outer edge has a 3/4″ wide, shallow rabbet cut into it for the gold leaf.  This frame is done in black and decided to do oil gilding directly over it, no clay.  Difficult getting a sharp edge but all in all the results are quite nice.  From where I’m sitting now I can see that frame and the way the light catches that edge is appealing.

The final project is this doggie ramp made for Brandy, out miniature long-haired Dachshund.  This ottoman is her favorite place to lay and guard the house but, being a doxie she could be prone to back problems.  Although there are many ramps on the market we wanted something lightweight that could be easily stored under the couch whenever we have company.  This is the answer and now Diane is busy training her to go up and down!

Another fun challenge, mainly making the folding mechanism and way to lock it securely in place.  Since the angle isn’t 45° using available folding leg hardware wouldn’t work.  The supports are fabricated from a piece of 1/8″ thick by 3/4″ wide aluminum stock which was easy enough to cut and counter sink the hardware.  The support almost folds flat but will slid under our couch without a problem.


Posted in Artist, custom profile, custom profile, Floater Frame, Gilding, Picture Frames | Tagged , , , , , , , , , , , , , | Leave a comment

I Love the Challenge!

Chickering & Sons Piano box circa 1917

In almost every aspect of my life, it’s all about the challenge and figuring out how to overcome it.  Makes no difference, it can be  a woodworking project, ultra-marathon  mountain race, personal goal or whatever — rising to the challenge is always satisfactory!  This box was a challenge put to me by the person that started it by offering their well used piano as a source of materials.  Things started out fairly easy as you can read about in this BLOG on the first project made from the materials. When I shared that blog with her it must have set her wheels in motion because a few days after that I was contacted with “the challenge”!

For background, every member of her family are serious musicians and they’ve probably all used this piano sometime in their lives.  She was wondering if a box could be made from it to store sheet music.  If you recall from the first blog, I was hoping to find boards of solid mahogany or walnut but discovered that it was primarily veneer over Poplar and in some areas Chestnut.  I salvaged what I could and ran it through my planer to remove the veneer.  When we met, she used the words “funky box” so I think this will fit that genre!  Sheet music is larger than the standard 8 1/2″ x 11″ paper.  She brought over some of that and our design collaboration began.  Lots of ideas were thrown out but the size of the paper determined the overall size of the box which is 4″ tall x 11 1/2″ wide and 14 1/2″ long.  One piece has the numbers 1301 stamped so I wanted to keep that at the front of the box as proof.  I discovered that the formed key covering piece seems to have been made from one piece of Poplar that was milled and then veneered.  This was cleaned slightly  but all of the original patina left intact.

The first step was to glue up some panels to make the top and bottom of the box.  For that I use Gorilla glue and my old school panel clamps.  The sides and back of the box were made from the Chestnut which has a nice grain pattern.  To keep with the “funky box” genre, they were finger-jointed and the front pieces have part of a tongue that remained after trimming them.  Finger joints are a very traditional way to join boxes together and the jig I made for the sliding table on my SawStop make them quite easy.

Since I also salvaged some of the Ebony keys from the piano they were turned into pegs to join the rabbeted top and bottom to the sides.  Assembly was done with Old Brown Glue, my favorite for dovetails and finger joints.  To keep it all authentic, part of the piano hinge and screws that once graced the piano itself was used for the lid.  The handles are some latches that probably held the top or bottom panel in place.  To secure those to the lid I used the piece of hardware I found at the end of each key where the piano wire was attached to.  After wet sanding in a few coats of Osmo PolyX oil the box was waxed and ready for delivery.

So there it is, 10-11 hours of work and a bit of head scratching to see how it would all come together but the challenge was met.  As of now,  the box hasn’t been delivered yet so don’t know what my clients reaction will be — I like it!


Posted in custom furniture, Design Process, Finger Joint Box, Recycled Wood Furniture, SawStop Sliding Table | Tagged , , , , , , , , , , , , | Leave a comment

What happened to March?

Wow, just turned the calendar to April and wondering what happened to March?  My wife really dislikes the expression “f *#*t in a whirlwind” but that’s how I feel the month went!  Many things going on between the house, woodwork, and becoming pre-marital counselors for our church.  One good frame commission came to me from Devon Kearny who needed 3; 11″ x 14″ frames.  She’s a local artist, friend, and instructor at the Scottsdale Artist School.  These were about 3″ wide and made from the 1 1 /8″ Basswood I like to use from Peterman Lumber.  Finish was satin black over planed wood then rubbed back a bit to replicate age and give that hand crafted look you won’t get from a mass produced frame.    Basic process used on all custom frames to create these for her, always enjoy the progression from rough material to finished frame!

Also had things to address around the house.  One that didn’t get accomplished in March was to rebuild our berms.  We use flood irrigation and need to raise the height of a few berms in the back yard — well, there’s always April for that manual labor!  Basically there are some areas that have compacted so the water doesn’t quite go where we want.  A couple loads of dirt, wheel barrow, shovel, and tamper should take care of that.

Attic Fan

Something  that took more time than anticipated was putting a powered exhaust fan in the attic.  Our house has been added on to a number of times since it’s original build in 1951.  One of the additions is our master bedroom and it’s much warmer during the summer than the rest of the house.  After cutting an access hole to get to that area in the garage, I discovered that the original roof had been left under the new addition.  This would seem to prevent good air flow in the attic creating a hot spot right above our bedroom.  First thing was to go remove as much of the old roof (shingles, tar paper, and sheeting) as possible, space is limited since the roof is a very low pitch.  Once done, I was able to make my way to the backside of the house to locate and install a thermostatically controlled, electric exhaust fan through the roof.  Here’s a video of  it taken from inside the attic!  Purchased the fan from JetFansUSA and must admit I was really impressed with the reviews and customer service from Jeff who I contacted several times via email.

Something that’s taken a good chunk of time this this month is my quest to become more proficient at water gilding gold leaf.  The process is quite exacting and time consuming.  Begins with making rabbit skin glue, then gesso, then bole (clay) before the gilding process can even begin.  Then picking up your precious gold leaf with a gilders tip to place correctly on the frame — pictures speak volumes!

Knowing that this is a skill that will take time to become proficient at is okay — although frustrating.  In the works is a box made from the wood salvaged from the Chickering & Sons piano.  It’s coming along nicely and the client had input on the design of it.  That’ll be my next blog!

Posted in Uncategorized | Tagged , , , , , , , , , , , | Leave a comment

Chickering & Sons Piano Box

Quite some time ago, a friend contacted me and asked whether or not I’d be interested in a piano that had been in their family for a long time but was now relegated to the garage.  I had visions of fantastic, old growth Cherry, Mahogany, or Walnut so of course, jumped at the chance!  It was an upright that had definitely been well used so, with her permission we proceeded to take it apart.  The maker of it is Chickering & Sons which she dated to approximately 1917.  Here’s a LINK to some history about this particular brand of pianos if you’re interested.  As it turned out, the piano was veneered and after running it through the planer discovered some interesting Chestnut and also Poplar.  I also kept some of the keys for the Ebony — the other keys and ivory went to a local luthier school.  In any case, here’s what was made from some of the wood:

It’s a basic hand cut, dovetailed box which could be used for pencils, remotes, keys, or decorative item.  I like the grain patterns of the wood and used an Ebony key for the lid handle.  Dimensions are 3″ high by 4 3/8″ wide and 9 1/4″ long.  The inside is lined with a red velveteen material and the finish is hand rubbed PolyX oil.  This box will be added to my inventory at the Store at Mesa Art Center.  I suppose this would fit the current movement of up cycled, recycled, re-purposed stuff but to me it’s just using and showing the beauty of wood regardless of where it came from!

Marked for proper grain alignment

Construction details are pretty straight forward and all hand tool with the exception of cutting the board to width and length which I do on the table saw.  It’s important to me that the grain continues around the box so the box is cut from one piece of material.  That means only one corner will not have a perfect grain match.  I’m making two of these boxes but you can see how they are marked on the inside to ensure proper alignment.

Stanley 140 Trick

The first step is to cut a slight rabbet at the end of the long sides.  This is referred to as the Stanley 140 trick and one I use in any dovetailed construction.  The purpose is to give a tight inside corner.  If you make it deep enough it will also conceal the groove needed to insert the bottom of the box or drawer.  Not having a set of skewed block planes means I use a Veritas skewed rabbet plane which does the job nicely and, unlike the Stanley 140 has a depth stop.

Plowing groove for bottom


The next step is cutting the groove to insert the bottom.  In this case a piece of 1/4″ Baltic Birch plywood.  Plow plane is used for that process.  Cutting the dovetails is a process I’ve written about many times so won’t bore you with that again.  Just a side note, as a member of the co-op at the Mesa Art Center I’m required to give demonstrations at the store.  The first box was demonstrated previously but I’m scheduled to demonstrate  again today from 2-6:00 pm.  Today being March 16, 2019 so if you’re out and about stop by and see me!

Posted in Hand Cut Dovetails, Hand Planes, Hand Tool Woodworking, Mesa Arts Center Store, Recycled Wood Furniture | Tagged , , , , , , , , , | 4 Comments

Tabernacle Frame #157 Complete

I always have mixed feelings at the completion of a project.  Seeing what I imagined in my mind progress from pencil and paper to 3D completion is always great but sad in its own way.  Maybe you’ve heard of those postpartum blues, heck; I used to experience those myself after months of preparing for an ultra-race. Finishing always gave me mixed emotions; glad to have completed the challenge but sad that the training and preparation is phase is over.

The last blog detailed the main construction details and forming of the parts.  All that remained was fitting the molding for the frieze.  Seemed straight forward enough but it was important that the vine matched as it returned around the corner.  After making the miter cut it was refined and trimmed using a block plane and miter shooting board.  It took a bit of finagling  to get the vine to match as it returned, one side needed to be cut from the remaining piece.

The purpose of the arrow on the backside is to indicate which side goes up.  These pieces will be oil gilded and glued in place after all of the finish work is complete. After some final planing it was ready for the red burnisher/sealer undercoat.  The frieze area was taped off, wanted to make sure no paint got in that space, the molding will be applied with glue and a few pins.  The final finish is Japan Drop Black by Ronan.  Other than glue-up, the finishing step is the one that causes me the most stress.  Using paints is temperamental, so many variables such as the temperature in the shop, reaction to the undercoat, and thickness of the application.  I’ve developed a way to burnish the Japan Black to give it a low luster which includes wiping back to expose some of the base coat. The goal here is to replicate normal wear and tear the frame would normally go through.  You’ll notice that Julian’s painting has a bit of red in it and my goal was for the frame to also accent that in an understated way.  Here are some images so you can decide for yourself if I succeeded!

The oil gilded frieze was sealed with shellac and then toned with a casein wash.  The final layer on the entire frame is Liberon Black Bison wax.  My mind set during this process is to  add unexpected nuances to the frame finish that are discovered over time.

Posted in custom profile, custom profile, Hand Planes, Hand Tool Woodworking, Picture Frames, Tabernacle, tabernacle picture frame | Tagged , , , , , , , , , , , , , | 2 Comments

Tabernacle Frame Progress Report

Clamped Up

I’m not sure if all artists and woodworkers get as excited about the progress of their projects as I do but my guess is that they do!  It’s just plain exciting to watch something take three dimensional shape after drawing it and “conjuring” it up in your mind.  That’s where I am on the Tabernacle frame # 157.  After some time, things are really starting to come together as this picture shows.  The final top piece won’t be installed until later, I need to miter and fit the embossed piece of molding first.  It’ll be a challenge matching up the pattern so stay tuned for that one!  Pin nailers are great tools but as particular as I am, find that the hole they make still needs to be filled prior to finishing.  They are valuable though to secure the piece in place prior to clamping.  Trying to glue and clamp the piece like the column is crazy — they just move all over!  My technique is to apply the glue, shoot in a couple of pins, and then clamp it and watch the glue ooze out of the joint so I know I’m getting a good bond.

For the stepped molding it was rabbeted so that is used to register the  location so no clamps needed.  For the plinth blocks though I found it necessary to pin it in place before clamping.  Those blocks were chamfered at the tops with a block plane prior to assembly.

Wanting to keep the chamfer on those plinth blocks as angular as possible I decided using a block plane was the best bet.  Only about 1/8″ and an eyeballed 45°.  The columns needed to be sanded to smooth a little bit of tear out left by the beading cutter, tadpole sanders and some 220 grit paper took care of that little detail.

Embossed Molding

Top glued, ready for molding and final piece

The top of the frame will have an embossed molding, this is what it looks like.  The trick will be figuring out how to match the pattern as it miters back towards the sides of the top.  I’ve ripped off the rounded edges as it seemed too tall.  Here’s the bottom/top piece with a chamfer cut which is designed to draw your eye up.  This piece was pre-drilled and is now attached with glue and screws to the top of the tabernacle frame.  Once that embossed molding is fitted I can install the top piece.  The molding will be oil gilded over a red base and then antiqued to add that much needed patina and age — yep, I already  have some thoughts on how to go about that one as well.

That’s it for this update, I’m starting to understand that brushing on the red burnisher base coat and then the Japan black will be yet another challenge since the pieces are going every which way.  There’s a lot of ins and outs and pieces going in opposite directions.


Posted in Artist, custom profile, Design Process, Hand Tool Woodworking, Picture Frames, Tabernacle, tabernacle picture frame | Tagged , , , , , , | 2 Comments

Tabernacle Frame # 157

I’ve always had the urge build a tabernacle style frame and was able to satisfy that urge not too long ago.  Another artist and friend, Julian Miranda and I had talked about a tabernacle frame as well for one of his pieces.  As we were talking about it I became pretty enthused at the prospect of designing and building another like this; for me it’s more about the challenge of an exciting project than making a bunch of money.  His painting is based on the angel of death sent in Exodus as one of the plagues of Egypt.  That Biblical reference led me to Solomon’s Temple for inspiration.

Full Size Drawing

After showing him a 1/2 scale drawing which he approved I stated in the bid that artistic license was needed as I designed and built this frame.  Sometimes what looks good on paper may not transfer to 3D.  I ended up making a full scale drawing to really visualize the project and made some changes.  The painting is 11″  x 14″ and the first design was too “squat” so changes were made to elongate it.  During the design process some of the elements were roughed out to make sure that what I drew could be made.  My preference is to use hand tools as much as possible so the elements of the frame were designed with that in mind.


Columns, face planed prior to cutting beads.


The columns sit on blocks which are referred to as “plinth blocks” and these will wrap around the corner of the frame.  The columns are made with the Veritas small plow plane equipped with a 1/4″ bead cutter.  These are very similar to what was created for the first Tabernacle frame.

An architectural detail that showed up on many of the images of Solomon’s Temple was stepped stonework around the entrance.  I was able to form these with the plow plane and a 1/8″ wide cutter.  This was a challenge since the part is quite small and after making it decided it needed to be even narrower!  Since the steps on this were small the depth stop and the fence had to be adjusted for each one.  Holding stock this small is an issue as well, there’s something called a “sticking board” but I was able to clamp the piece between the bench dogs so didn’t need that.  To separate the two pieces and cut the rabbet I used successive cuts with a rip blade to leave a flat surface.  Finally cutting the piece in two was accomplished with a filler piece so that it wouldn’t fall into the blade as the cut went through.

This slideshow requires JavaScript.

The final piece completed was the stairs that form the bottom of the frame.  I’m really taking this literal.  A skewed rabbet plane did the trick and in this instance the depth stop fit on the step cut before so the depth on each tread is the same.  Metrics came in handy here, the piece is 1-1/16″ which isn’t so easy to divide by 3, turned out to be 27 mm and gave a step height of 9mm.  After planing a piece of wood to that dimension it was used to set the depth — hard to get a ruler in there!  Cross the grain cuts done first then the edge — plane worked great!

Parts ready to go!

The main portion of the frame is butt joints reinforced with biscuits.  The top and stair section will provide enough long grain glue surface to long grain surface for strength.  Anxious to see how this project progress along!  The top section of the roof  has a piece of embossed molding that will be oil gilded over red clay then burnished to replicate age.

Posted in custom profile, Hand Tool Woodworking, Picture Frames, Tabernacle, tabernacle picture frame | Tagged , , , , , , , , , , | 1 Comment

Picture Frame Time!

Basic Profiles

The client I recently completed the Tabernacle frame for, Christine Vallieres; contacted me and needs a number of frames for an upcoming show she has in March.  She’s a very good client and her show will be held at The Sagrado in Phoenix.  For this job there are 7 different frames so it’s important for me to organize the work flow to stay efficient.  One starts out with 1 – 1/16″ Basswood, the others are smaller and for panels so were made from 4/4 Basswood.  All are created using a combination of tablesaw, router, and hand work.  Shown above are the profiles for the smaller (4×6 and 5×7) frames which are what I call The Christine Profile. These are 3 1/4″ in width.

I’ve been contacted by several other folks who make picture frames asking about my process.  I buy my Basswood in S2S with one fairly good edge.  After cutting to workable length (depends on frame sizes) the first step is hand planing a perfect edge to guide against the tablesaw rip fence set to the required width.  After cutting, that edge is refined with the hand plane.  The larger frame features a beveled profile so these were cut on the tablesaw first and then refined with a smooth plane.

Fence for dust control with router edge work.

One of the frames had the outer edge formed by using my plow plane with a beading cutter — that I like!  Others required the router which; although it’s essential, isn’t one of my favorite activities.  Why — dust and noise!  To combat the dust this is a fence I made years ago that captures about 90% it.  That works fine for profiling an edge but there are also coves cut into the face of the molding.  All of the dust goes down the bottom and everywhere else.  There are various after market dust buckets you can buy but I really haven’t researched them fully, I did know that if you enclose the entire router there’s the danger of heat build-up and possible tool damage.  My solution was an $8.00 rubbermaid container and a couple of bucks worth of plumbing fittings — captures about 75% of the dust I’d guess so a definite improvement.

This slideshow requires JavaScript.

Adjustable stop for small moldings

After all of the molding is profiled it’s time to cut them to length.  There are two critical requirements for a good frame, first the miter has to be exactly 45° and the lengths of opposing pieces have to be exactly the same.  Since these frames are so small, I needed to modify the miter jig and add a new stop to it. After cutting a slot in a piece of plywood a threaded insert was put into the jig.  The stop is slid where needed and then tightened with a thumb screw.  I’ve been asked about making this jig, here’s a LINK to the blogpost of the first one I made.

Ready for Finishing

All of the frames have been assembled (#20 biscuit, glue, clamped over-night), signed and numbered, and the backs have been sealed with shellac.  Probably an extra step but worth it in my opinion.  Finishing is next although it’s been kind of cold and windy for Phoenix anyway so my “whole world” spray booth conditions aren’t optimum!

Posted in custom profile, custom profile, Design Process, Picture Frames | Tagged , , , , , , , | Leave a comment