Assembling the Treble Clef Box

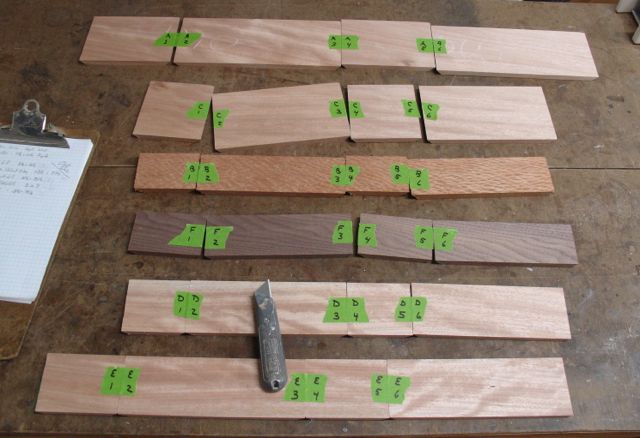
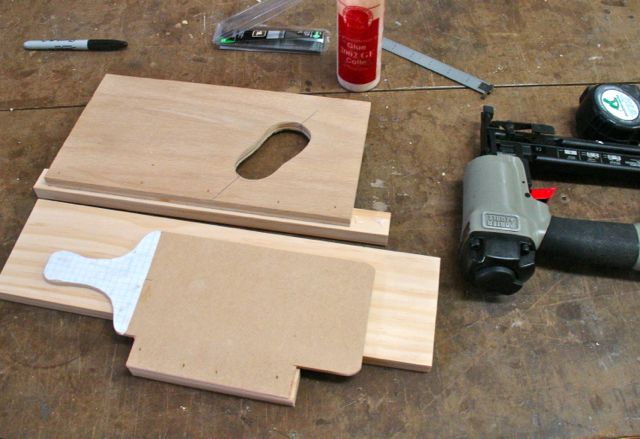
Work continues on this custom order from an Etsy customer.  In the previous post I mentioned that I’m making 5 additional boxes using the same techniques as the custom one.  Doing a series of boxes is more efficient, especially when it comes to machine work and setting up the required tools.  Thankfully, the bulk of the noise and dust created by those machines is over and it’s now time for some quiet handwork.  Cutting the mitered pieces on the tablesaw with the sled is an excellent way of getting pieces that are the exact size.  You can’t make a square, miter cornered box if opposing side pieces aren’t exactly the same size.
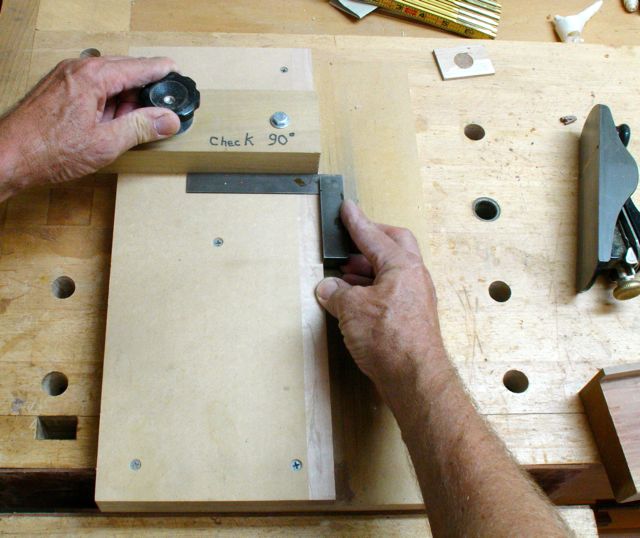
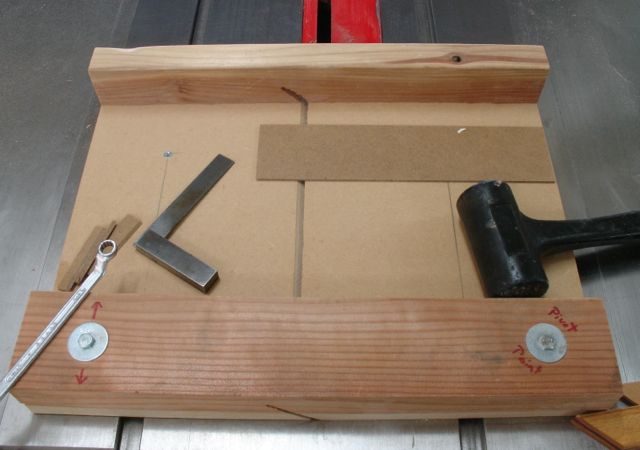
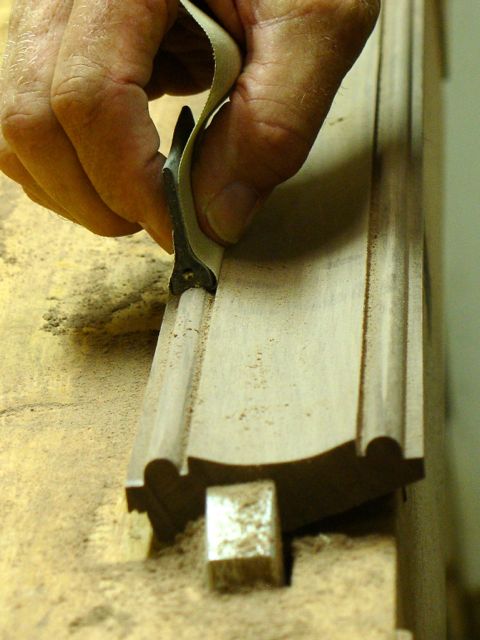
Shooting Board

Shooting Board

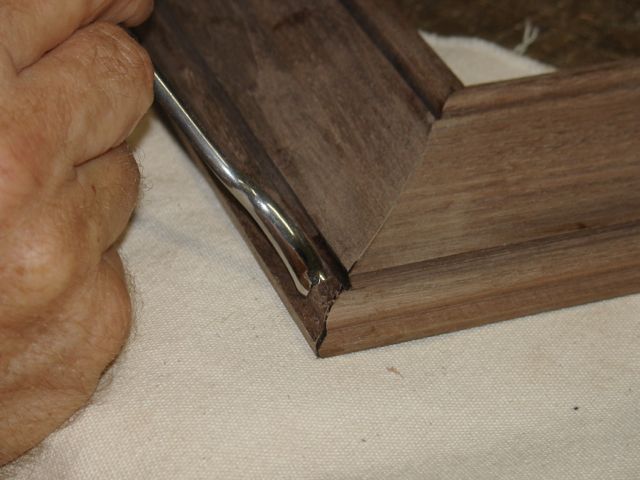
The tablesaw also tends to leave a somewhat uneven cut due to the way it operates.  Smoothing that cut out is best done with what’s called a Shooting Board.  In its simplest form, a shooting board is a ramp that guides a hand plane.  In this picture, I’m adjusting the fence to be a perfect 90 degrees to the ramp.  Like the miter jig for the tablesaw, this shooting board was made so that the fence is adjustable.  It is sized for small work and  set up to use a block plane.  Lie-Nielsen makes a dedicated plane for this purpose based on the original Stanley #51, here’s LINK to that plane — as you can see it’s rather pricey!  Using a block plane for this serves my purposes well, here’s how each end is trimmed up:

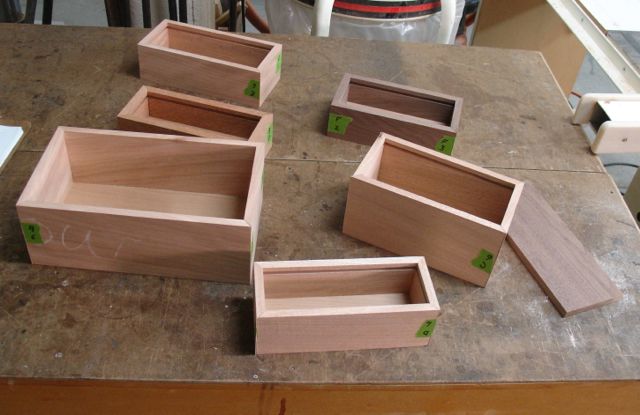
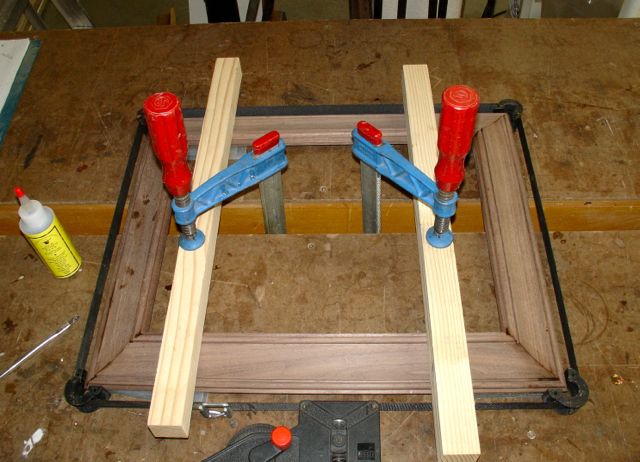
The boxes in this series destined for Etsy store inventory are rather small so can be assembled using packing tape only.  The Treble Clef box is larger so I begin the process with tape but added two band clamps to insure a good bond.  The process began after the miters were trued up with the shooting board/block plane technique and the insides were sanded.  The bottom is fitted as well.  Picture #1 shows the box sides put in the proper sequence and  the packing tape is applied to the outside of the box.  After flipping the pieces over, for this box I also put tape on the inside corners to make clean up easier in case of glue squeeze out  (picture #2).  After applying glue to the miters, the pieces are closed around the bottom and band clamps are added  (picture #3).  There’s enough tension and stretch to the packing tape to close and hold the joint while the glue sets.
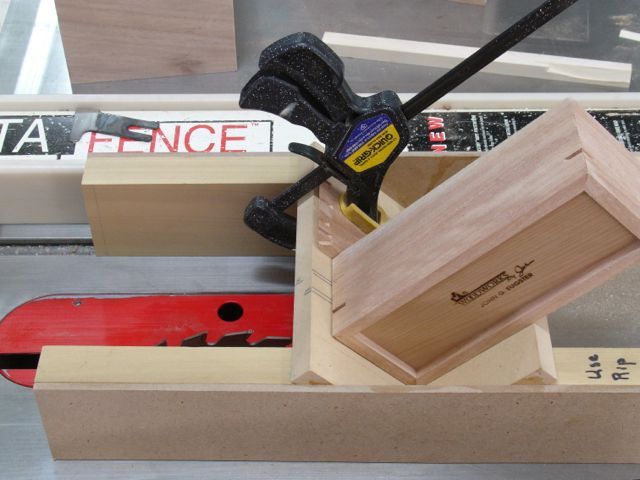
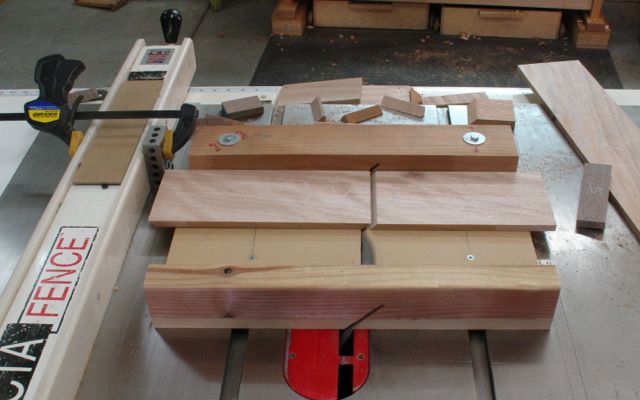
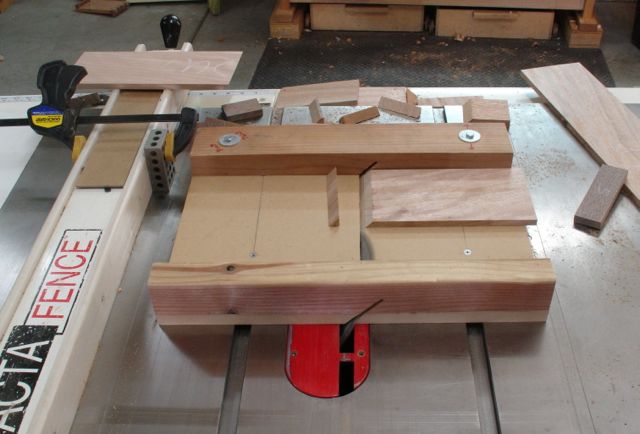
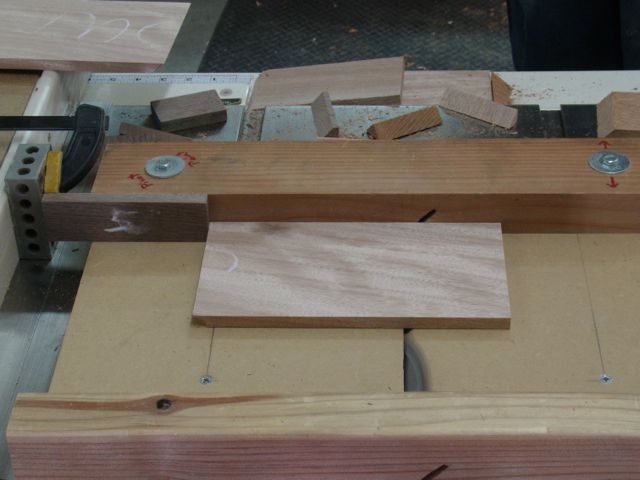
Tablesaw Jig

Tablesaw Jig

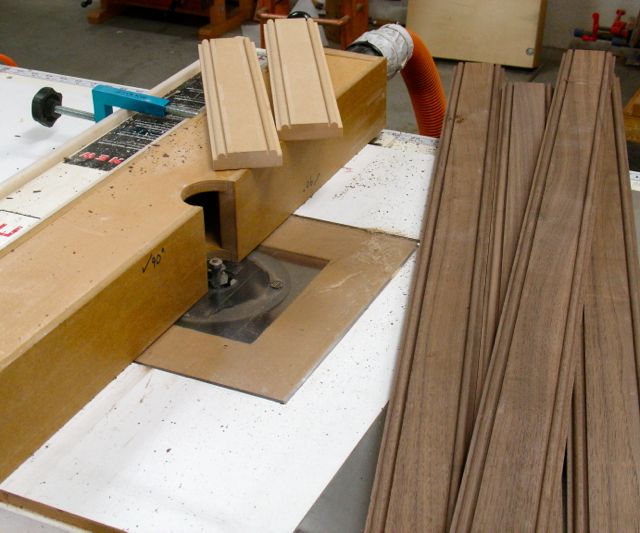
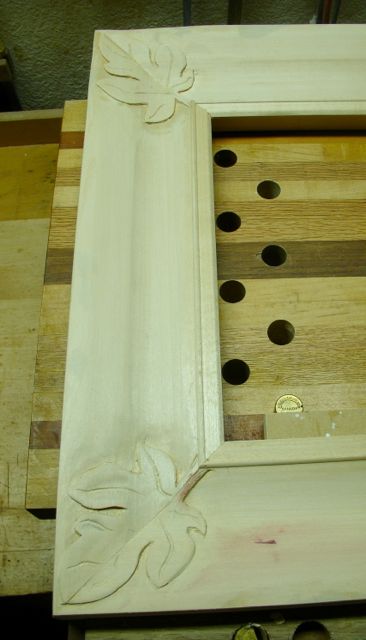
The final step for the construction of these boxes is to cut slots to put keys in the mitered edges.  The beauty of a mitered joint is that the end grain of the wood is hidden.  The downside is that having end grain to end grain as your gluing surface there isn’t a lot of strength.  To compensate for that, a slot is cut across the corner.  This exposes the long grain of the wood so by gluing in a key of long grain wood the corner is now reinforced.  Usually this key is of a contrasting wood which adds a decorative touch to the box.  This process is accomplished with the tablesaw jig shown in this picture.  You can see the cut already made on the box.

The remaining boxes need to have the lids fitted into them but we’ve recently had some massive monsoons here in the desert.  Where the humidity level in my shop is usually less than 10% it’s not closer to 100%.  Not a good time to fit sliding lids as the wood will no doubt shrink once the relative humidity stabilizes.  The carving of the treble clef on the box lid is almost complete so that will probably be the subject of the next blog.

Posted in Etsy custom order, Hand Planes, Hand Tool Woodworking, Mitered Box, Uncategorized | Tagged , , , , , , , , , | Leave a comment

Etsy Custom Order: Treble Clef Box

Screen Shot 2014-09-03 at 7.24.01 AM

Treble Clef Motif

A week or so ago, I received a request for a custom box based on the design of my Gilded  Cats series.  Rather than having a cat though, they wanted a treble clef carved onto the lid and the box made much larger to hold remote controls.  After a few conversations we came up with a design and price so I have now started on this box.  This is just the incentive I needed to make a few more boxes to add to the inventory.  Traditionally, sales on Etsy are slow during the summer time and will ramp up again as the holiday season approaches.  Although my work has a lot of hand operations there are certain steps where the machines perform the grunt work for me to refine later.  I’m going to take advantage of that and make some additional boxes as well.  The motif for the box will look like this image.

We decided on using a light colored wood which gave me the chance to use a piece of figured, African Okoume.  Since it was slightly thicker than an inch I was hopeful that I could re-saw it and yield pieces that were 3/8″ – 7/16″ in thickness for the box and it worked out as I had hoped.  I’m using a 1/2″ Wood Slicer blade from Highland Woodworking which, as you can see; does a great job.  This board is about 6″ wide and the cut was straight and true.

Table Saw Miter Jig

Table Saw Miter Jig

Whenever I cut miters on the tablesaw my choice is to leave the boards wider than they need to be by about 1/2″ to compensate for any tear out that tends to occur when cutting. My jig has two runners on it so is pretty stable.  It seems that jig fences never stay 90 degrees so I learned a long time ago it’s wise to engineer a way to adjust them.  In the jig, the hole for the bolt on the left side is oversized.  This allows me to loosen them both and make trial cuts to check for 90 degrees, once it’s dialed in both bolts are tightened and we’re ready to begin cutting the various required pieces.

I have simple method of cutting the pieces for mitered boxes I’ll share with you.  It’s important to plan your work so the grain of the wood will have a continuous flow at the corners.  Visually it just looks better and shows some craftsmanship.  It begins by cutting one end at 45 degrees and then marking the longest box side.

Measuring First Piece

Measuring First Piece

A stop block is clamped against the fence to allow for clearance and the first piece is cut.

First cut to length

First cut to length

The long side is set aside, the piece on the sled is flipped over and cut near the end.  This is done so the outside of the board will be correct.

Trimming miter end

Trimming miter end

Next, I’ll use a stop block that is as long as the difference of the box sides.  For example, this box is approximately 5″ wide and 10″ long.  A 5″ spacer is put between the stop block and the board and the shorter side can then be cut.

Short side cut with spacer

Short side cut with spacer

Flip and trim, remove the spacer to cut the longer side; flip, trim, and repeat.  It’s important to keep the pieces in order as you cut them to ensure continuous grain flow.  Marking them with tape is the most fool proof way for me to keep things organized.  As I mentioned, I’m also making several other boxes to add to my stores inventory so at the end of this phase here’s what I had:

Box Parts Galore!

Box Parts Galore!

The parts for the custom box are at the top.  The next one down will be a hinged lid box while the rest will be sliding lid boxes.  After cutting the pieces to final width and also putting dados in them for bottoms and lids I managed to get all of the bottoms cut so as this picture shows, things are coming along well!

Plethora of Boxes to Be!

Plethora of Boxes to Be!

As a general rule, table sawn miters need a little bit of truing up which will be my next step.  This is done with a block plane and a shooting board which I’ll show in the next blog.  For the sliding lid boxes, one end will need to be cut down so the lid can be slid into position.  Each box will have corner splines of a contrasting wood to strength as well as adding a decorative element to them.  It’ll be time to start carving the treble clef and right now the piece of Basswood for that is being laminated.  This lid is about 6 1/2″ wide and the only Basswood I had was 6″ — darn, an additional step!

Posted in Etsy custom order, Mitered Box, Tutorial, Types of Boxes | Tagged , , , , , | Leave a comment

Custom Picture Frame Molding: Part 2 — Finished

Nuns at the Fountain by Diane Eugster

Nuns at the Fountain by Diane Eugster

Before I do the continuation of creating the custom picture frame molding I just have to show you the completed piece.  As I mentioned in the first installment of this blog, my wife Diane; painted this from a picture she took on our recent vacation to Rome.  I love the quiet, yet dynamic way she captured the nuns bending over the fountain.  The way she used the cobblestones as an eye path plus the light on their habits leaves you with no doubt as to what the center of interest is in this painting.  When I saw it in her studio I thought their world needed to be contained in a quiet, elegant frame so that was my goal.  Do you think it was met?

In Part 1 of this blog I worked through how to create a molding with depth out of 4/4 stock.  Basically cutting one side at an angle after doing whatever profile work you desired.  Then the area between these profiles was coved on the tablesaw.  There are a number of ways to smooth out this cove.  If you make your final pass at a slow rate of speed and a very light cut sandpaper is usually enough.  If not you may want to try using a goose neck scraper.  My favorite sanding block for things like this is an old school, chalkboard eraser:

CustomPictureFrameMolding-Final Sanding-Chalkboard Eraser

Tadpole Sander

Tadpole Sander

It has to be the original chalkboard eraser, not a cheap imported one because these really hold up well.  I started with 100 grit paper then progressed to 150 and 220.  The only precaution here is to make sure you don’t flatten out the beads at the edges of the molding.  Prior to mitering the pieces to the required size I use an appropriately sized tadpole sander to finish it off.

I prefer to use biscuits when joining picture frames that are only mitered.  This gets tricky since the back of the frame has a beveled edge.  You’ll need to hold the biscuit joiner flat against the non-beveled surface to join them properly.  Experiment first on your MDF sample pieces to make sure of the correct surface and location of the biscuit.  The beveled surface also makes it difficult to clamp the frame together.  I raise the frame up about 1/2″ with non-stick plastic spacers to center the band clamp on the corners.

Clamped Up

Clamped Up


Since there is a tendency for the center of the frame to raise up as the clamp is tightened that problem needs to be addressed as well.  My solution for that was to separate my assembly table so a caul could be placed across the frame and snugged up slowly to line up the mitered corners.  Liquid hide glue was used for this.

WalnutPictureFrame-CustomMolding-LasVegasWoodworker-1

Blending in corner profile

One of the things that happens pretty commonly when making your own moldings is that there will be some inconsistencies in the profile.  Perhaps if you have a power feeder this wouldn’t occur but it’s usually not too big of a deal.  One corner had some noticeable inconsistency that was fixed with a #6 back bent gouge for the bead and a flat chisel for the outer edge.  Putting this at the bottom corner of the frame will conceal it from 99% of the viewing public — after all it’s the painting they’re looking at, not the frame.

The finish on this frame is natural Watco Danish Oil followed by a few coats of my sanded in topcoat.  Keeping with the old school methods a simple gimlet is used to pre-drill the holes needed for screwing the clips to the frame and also attaching the wire.  I number all of my custom frames and this is #72!  I’m pleased with the finish even mounted in front of the sawdust collector.  You can see that by using this process you’ll be able to transform a 3/4″ thick piece of wood into a custom molding with an increased depth.


Posted in Picture Frames, Tutorial | Tagged , , , , , , , , | 4 Comments

Custom Picture Frame Molding: Part 1

My last post had to do with the process of carving and gilding the first picture frame I’ve made for my wife in several years.  That frame used a custom, basswood molding we had ordered from Foster Planing Mill several years ago and modified to accommodate the fig leaf carve at the corners.  I received a number of positive comments for the frame and the tutorial on how to use Dutch gold to leaf a frame.  Here’s a LINK to that post if you missed it and would like to see it.

Diane and I really enjoy working in our perspective spaces/studios and that seems to be where we seem to spend the bulk of our time.  Walking past her open door one day,  I spied this really cool painting of two nuns at a fountain in front of the Pantheon which was taken on our recent vacation to Italy.  It really caught my eye so I immediately asked if she’d like a frame for that —- predictable answer was “yes”!  In my opinion, this painting needed a quiet, dark frame to contain the subject rather than a gilded one.  I decided to make some custom molding out of Walnut.  Although not as easy as ordering molding on-line, it is possible to make your own from raw materials.  Your challenge is to give the molding depth, not only for visual effect but also to contain the painting.  This painting is on a 1/4″ panel but stretched canvas paintings will have a thickness of almost 1″ so your molding needs to be made from 6/4 or 8/4 material.  The other option is to use this method that I’ll explain here, it’s similar to cutting a crown molding for a cabinet.

First step, routed bead on both outer edges

First step, routed bead on both outer edges

The first step to create this frame was to cut my 4/4 stock to a width of 2 5/8″.  Once the edges were planed smooth and square a single bead cutter was used to form both of the edges.  This is my router table, mounted on the extension table of the tablesaw.  The cut was made in two passes and you can see the pieces of MDF used for set up and trial cuts.


Now, to give the frame depth you need to bring one edge of it away from the wall.  It’ll be tricky to explain but maybe you can visualize it.  Hopefully, these pictures will help.

  •  Picture #1:  The blade is tilted to 15 degrees, more tilt will bring the frame out further.  I drew the line on the end of my MDF trial piece.  To give enough support you’ll want to make a temporary throat plate, set the molding on top of it and adjust the fence to your line.  Lower the blade and clamp the temporary throat plate to your table top.  Start the saw and cut through the temporary throat plate to the required height.
  • Picture #2:  With the beaded edge against the fence, cut the bevel on one side of each piece.  The cut off piece will fall safely to the side, no danger of kick back here.  Even though this is the back of the frame, I plane it to have it blend smoothly and also remove the saw blade marks.
  • LasVegas-CustomWoodworker-PictureFrameMolding-Walnut-Tutorial-WoodworksbyJohn-5Picture #3:  This one is tricky!  The rabbet needs to be 90 degrees to the beveled edge.  You can accomplish this by leaving your blade tilted and run your molding so that the flat side is on the table.  It would be unsafe to set the blade back to 90 degrees and hold guide the wood on the angled piece.  You’ll need to make two cuts and adjust the depth as you go.  To smooth that rabbet out I have an old Stanley #78 rabbet plane that works for this operation.  Since this is where the painting will sit a perfect edge probably isn’t too critical.
Setting up for the cove cut

Setting up for the cove cut

Now comes the fun part! Cutting coves on the tablesaw.  If you’ve never done this it’s an interesting process.  The premise is that you attach a fence diagonal to the blade to guide your boards at an angle which results in a cove.  In furniture work this is used so that you can make crown moldings out of the same material that your furniture is made of.  For large work you can use your regular table saw blade.  I’ve found that using two, 6″ diameter dado blades give a smaller radius.  In the picture you see a bevel, a parallel contraption, and the board used for the fence.  In practice you first draw your profile on the end of your board.  Then, set the blade for the depth of that cove you drew in.  Here’s where the parallel contraption comes in to play.  It is adjusted to the width of the cove, the screws on the arms are tightened to hold that distance.  Next, you play around with this by angling it until a tooth on the blade comes up at one leg and down at the other.  Once you’ve found that angle, set a sliding bevel to it.  This will give you the proper angle to clamp down the fence.  Slide your molding towards the blade to position the cove and clamp down the fence.  I think the technical term is “fiddle fart around” but it’ll take some trial and error to dial it in just right.  Here’s where to use the MDF rather than your good material.  The key is to raise the blade a very small amount for each pass and use a push stick to keep the wood firm against the blade.  Just like using a router or shaper, a light cut and slow feed will yield the best possible cut.  At the end to the day, here’s what I came up with:

Beaded, Coved, and ready for Final Work

Beaded, Coved, and ready for Final Work

I’ll follow up with how to finish and assemble this frame in my next post.

Posted in Picture Frames, Tutorial | Tagged , , , , , , | 1 Comment

Fig Leaf Frame Complete — Gold Leaf Tutorial

FigLeafFrame-VerigatedGoldLeaf-Sequence-5This painting and frame is the first collaboration Diane and I have had in almost three years!  She took a hiatus from painting during the downturn of the economy and pursued other artistic endeavors.  I always enjoyed creating frames for her work, it brought us together since we spend a lot of time in our shop/studio pursuing our passions.  Although she is not ready to get back into the brick and mortar gallery scene, she has been juried into an on line gallery called UGallery, here’s a LINK to their website.  You’ll see this painting without a frame on it; 5 am is its title.  In previous posts I elaborated on why I chose fig leafs for the frame and I’d always wanted to try gilding with the veriagated gold leaf, this is a red one from Sepp Leaf and although I was concerned that it would really be garish and over-power the painting we’re both pleased with the final results.

Bondo to repair minor blemishes

Bondo to repair minor blemishes

This is an oil gilded frame and although I’ve done traditional water  gilding using 22kt. gold leaf this is much easier and affordable.  This leaf is referred to by a few names; metal, composition, and Dutch gold among them.  Being born in Holland I prefer the Dutch Gold label!  This comes in 5 1/2″ square sheets and it’s possible to lay an entire sheet once your skills allow you too.  You can also handle it with your fingers if you’re careful.  Finger nails and callouses will tear it and you need to be very gentle or it will rip;  practice, practice, practice!  Once you’ve gotten your frame ready for the process, you need to apply a coat of burnisher/sealer.  It’s a very heavily pigmented paint that comes in the traditional red and yellow colors used for water gilding.  It’s purpose is to seal the wood.  However the finish of your frame is after the burnisher/sealer will determine the surface of your gild.  You can apply several coats and sand to get a perfect base or allow the brush marks to stay to give the leaf some under-lying texture.  A trick is using Bondo glazing putty to patch any small defects.

Burnished with 4/0 wool

Burnished with 4/0 wool

After the burnisher/sealer is the way you’d like it to be it needs to be burnished.  In this picture you can see that the bottom leg has been burnished.  This is done with oil free 4/0 steel wool or a nylon scotch pad.  I prefer the Liberon brand of steel wool for my work.   You’ll need to remove all of the dust prior to putting on a coat of  gilding size, I’m traditional and use Rolco oil based products,  not water based.  Dust removal is best with an air hose, it’ll get any of the small steel wool particles out of the carving.

For a project of this size, my preference is to use slow set gilding size.  This needs to set up for 10-12 hours before you can lay the leaf but allows up to 24 hours of working time.  Quick set size is okay for smaller projects but my opinion is that the slow set has more lasting strength.  This creates a potential problem with dust — any dust that settles on the frame during the drying time will telegraph through to the leaf.  Here’s my solution:

Gilding Slide Show

Diane took a series of pictures which I hope will illustrate the process.  It begins by cutting one sheet diagonally to start a corner of the frame.  Not having used this type of leaf before I wanted to be sure to match the pattern of the variegation, use a fresh razor blade whenever you cut the leaf.  Notice in the slide show how the leaf is first anchored on the inner, sight edge of the frame.  I use my finger to gently press it onto the size.  Once it’s anchored you slowly move the leaf layer (waxed piece of MDF) back as you press the leaf onto the curves of the frame.  All I can suggest here is to practice the technique, it’s something you’ll get a feel for.  The final step, once the entire frame is covered, is pressing the leaf firmly onto the frame.  I start this with my finger at the overlaps of the leaf and end up with a micro fiber towel.  The entire frame needs to cure for at least 24 hours before the toning process.

This slideshow requires JavaScript.

Toning Slide Show

Last of all, you’ll want to tone the frame down because Dutch gold is pretty garish looking.  If you get into frames, the difference between metal leaf and the real gold are quite obvious.  This is an area I struggle with because all of your hard work can be ruined with one bad layer of toning.  To cut the initial glare of the leaf, lightly buff it with 4/0 steel wool, again an oil free variety.  For this frame I used a wash of Asphaltum thinned with Naphtha to mellow out the gold.  Works well as you can see in the third picture.  I try to keep it simple, bottom line though is that any form of Dutch gold has to be sealed to prevent tarnishing.  Shellac is an easy choice for that.  I took this series of pictures in the same location and camera set up so you can see the subtle change that took place.  Enjoy!

This slideshow requires JavaScript.


Posted in Carving, Gilding, Picture Frames, Tutorial | Tagged , , , , , , , , , , , , , , , | 5 Comments

Fig Leaf Frame

In between working on the Selig chairs and the beer server/paddle I’ve also been doing the carving on the picture frame for one of Diane’s pictures.  By the way, she has started a new blog on WordPress, here is a LINK to her blog.  I’d love to have you check it out.  The painting she’s featuring is of a photo she took in Italy and one that I plan to make a Walnut frame for.  Anyway, back to the Fig Leaf frame in progress.  Carving is a very challenging aspect of woodwork for me.  On a picture frame the curves of the profile add a level of complexity and then since they are mitered at the corners, you have yet another challenge of working the grain.  We have a wood carving club that meets once a month here in Las Vegas.  Clubs are valuable in that they give you the opportunity to share information — sometimes you give and other times you learn!  Well, one of the guys who’s quite an accomplished carver (Dennis Patchett) gave me some advice that proved to be valuable for this frame.  Rather than using a parting tool or V-chisel to outline his work, he showed me a technique of using the tip of a gouge to accomplish the same thing. Holding the chisel this way allows you to pivot it around the curves and compensate for the profile shape at the same time.

He and another member also suggested that I don’t try to cut as deep in one pass but rather remove thinner sections of the background to achieve a crisper edge.  By holding the chisel vertical I’m able to use just the point of it to outline the leaf.  With the curves of the profile using a V-chisel is for this is difficult.  This was my first success!

One leg, ready for burnisher/sealer

One leg, ready for burnisher/sealer

Next was how to blend the leg of frame into the corner where the fig leaf had been carved.  You can see the final result in this picture.  You may notice some irregularities in the carve where it meets the frame.  This is a difficult area to smooth but at this point, with so much happening with the variegated leaf I don’t think it will matter.  I do have a way to smooth this out after the burnisher/sealer is applied.

What I ended up doing was to set the table saw fence so that the blade removed about 1/4″ from the thickness of the frame.  However; this cut can’t be made on the entire edge so after marking where the saw blade started and stopped I carefully dropped the frame on the mark, feed it along the fence to the end mark, and then lifted it straight up.

After all 4 sides were cut a line was drawn at the same measurement on each leg to give me a visual point to blend the curve of the profile towards the corner and the carving.  I did what I could to refine the leaf and added lines and curves as possible to give it life.  Something magical about carving a life like object onto a chunk of wood — don’t know if I’ll ever achieve on wood what I visualize in my mind but that’s what sparks the motivation to continue doing these types of things.

The final steps to this process will be to apply the burnisher/sealer, polish or burnish that out and then comes the oil size.  For this one I’ll be using slow set size which sets up in about 10-12 hours and will let me work it for almost 24 hours.  Usually I do this in the house but will do this frame in the garage which adds a bit of the “unknown” to the process and drying time at 100 degrees vs. 80 degrees in the house.  Thought I’d give it a try out there rather than have the gold leaf floating all over the room where we store paintings and boxes.  As always, life stays interesting!

Posted in Carving, Picture Frames | Tagged , , , , , | Leave a comment

Selig Chairs: My Learning Adventure

Refurbished, Re-Strapped, & Ready to be Returned

Refurbished, Re-Strapped, & Ready to be Returned

In my first post regarding these Danish Modern chairs made by the Selig company I gave a little bit of the company history.  This set, consisting of a recliner, chair, and ottoman were entrusted to me for refurbishing and they are now complete.  When you think of how long ago these chairs were originally made in Denmark and the fact that they’ve been in use since the 1950’s their condition is amazing.


During the time I had them I learned quite a bit about their construction that I’ll share with you now.

The first unique thing about these chairs was the webbing system.  The initial plan was to make a wooden frame to insert into the recess and then use conventional webbing to make the seating more comfortable. They had currently had plywood pieces tacked into the openings.  After some research I discovered the Evans Company that still imports the original, Fagas Straps used by the Selig company from Denmark.  Of course, when I first started doing the research I had no idea of what a Fagas strap was.

Ottoman

Ottoman

The Evans Company imports many different sizes and each strap is marked with their item number.  Wisely, when I made out my order I noted which straps go to which piece of furniture.  I was anticipating a lot of arm work but it wasn’t too difficult pulling them tight and snapping the angled clip into the slots.  There was some friction to overcome as they became interwoven, the rubber tending to grip together.  Marks were made on some tape to get the spacing as even as possible.


Chair Joinery

The way this chair is put together is pretty interesting!  First of all, the curved back on the recliner is laminated.  I would have expected to see thin pieces laid up following the width (2″ or so) of the chair but instead it appears that pieces were cut from some 1/2″ thick material to the shape of the back.  These were then laminated together to form the curve, five of these are used for each side.

Reclining Mechanism

Reclining Mechanism

The reclining mechanism is interesting as well.  We’re used to seeing recliners with springs to move them into a position that’s comfortable.  This chair has a lever on one side, when you move it a pin retracts out of a series of holes drilled into the bottom of the seat.  The holes are on both sides of the chair bottom and tied together with a rod attached to the inside of the front stretcher.  The chair is able to slide back about 6″, you can stop at any position.  The back pivots and is connected to the seat with a piano hinge and that’s how you adjust the angle of the chair.  The mechanism works only when you’re sitting in the chair, it seems to need the weight to operate smoothly.


I was trying to understand how this chair was assembled.  Traditionally I would have guessed mortise and tenon — that would be my approach.  However, the members are so thin and delicate that strength could be an issue.  Add to that the fact that there isn’t a square surface to be found and mortise and tenon joinery becomes more of a mystery!  I found the secret somewhat accidentally.  The only looseness I found was on the recliner which would tend to make sense because of the moving parts.  What was strange though is that the loose movement was up and down rather than in and out.  You would think that a loose joint would move in and out, not up and down!  What I discovered can be seen here in these photographs:


As you can see, these chairs are put together with keyhole brackets, something still used today.  A common application would be to attach wall brackets, shelves, mirrors, and even cabinets.  Here’s a LINK to Rockler Hardware which carries them to this day.  The one side that was loose on the front stretcher was the one I wanted to tighten up since it affected the operation of the reclining mechanism.  I was able to lift it up just enough to get a screwdriver in there to tighten those two screws slightly.  It did take a  bit of trial and error to have the screw protrude just the right distance and achieve a tight fit.  The rear is a different story, the screw hole itself is worn out so the screw wouldn’t tighten properly.  I suppose it could be completely removed so you can drill out the hole, put in a dowel, and then re-drill for the screw.  I imagine that assembling these chairs is somewhat like that proverbial Chinese Puzzle, the pieces probably need to be loosely assembled to one side then carefully aligned with the other side and nudged into place.  Probably take a couple of people to do that properly so my choice was to “leave well enough alone”; the chair is pretty solid as it sits so I’ll leave it be.

Glad I took on this commission although it’s not in my area of expertise.  I’ve found that no matter what you take on you’re bound to learn something along the way and this project proves that out.

Posted in Uncategorized | Tagged , , , , , , , , , , , | 3 Comments

Beer Boot Server/Paddle Done

How about a cold one?

WoodworksbyJohn-LasVegasWoodworker-BeerBoot-servingpaddle

My production run of the five serving  paddles for the beer boots is done.  Now it’s time to deliver them to my client to see where they go from here!  This type of work is definitely best suited for a production shop with CNC equipment so now he has a sample to show.  My design concept turned out as I hoped it would, by using a lighter colored wood than the Cedar server he gave me the rich color of the beer (Fat Tire in this one!) is a nice contrast.  Also, the shape of the boot shows up better; with the darker wood and dark amber of the beer everything appeared the same.  That effect that would would only get worse in a darkened bar after a few cold ones too!

These are made of clear Pine and finished with  5 coats of General Finishes Enduro-Var. This is a water based, polyurethane that should hold up to this use.  The initial coats were sprayed on then lightly sanded with 400 grit paper.  After drying thoroughly, a final buffing with a white, extra fine, scotch pad completed the job.  Now to get them to my client and on to the next project.  Currently working on re-webbing the Danish Modern chairs and a carved picture frame.

Posted in Uncategorized | Tagged , , , , | Leave a comment

Refurbishing Danish Modern Selig Chairs + Ottoman

Danish Modern Selig Chair

Danish Modern Selig Chair

Here is an image captured from the internet of a Selig Chair. I mentioned in a previous blog that an interior designer contacted me to see if I’d be able to make a seat insert for a chair, recliner, and ottoman for a client of hers.  They now had pieces of plywood in them and, needless to say, were no longer as comfortable as they should be!

SeligButtonUpon meeting at the clients house and inspecting the chairs I thought it was a doable project but we also noticed this badge which led me to do some internet research.  These chairs were produced in Denmark and this particular style is from the early 1950’s.  Those of you who are woodworkers can probably see some Sam Maloof  design characteristics in this chair.  The sculpted arms and joinery is a signature feature of Maloof’s work. Having read quite a bit about the history of Sam Maloof and his evolution in furniture making I’d suppose that this chair could have influenced his work too.  Here is a LINK to Sam Maloof  if you’re unfamiliar with him.  I would say that he’s among the top 10 contemporary furniture makers.  Although he has passed on his legacy continues with his family and co-workers and there is a museum  dedicated to his work in So. California.  As for the Selig chair,  here’s a LINK with some information about them as well.  They are now collectable examples of fine furniture, made with quality materials and joinery techniques that have them last for decades.  Unfortunately we can’t say the same about the furniture offerings in most so called furniture stores today but I don’t want to get on that soapbox!

One of the best things that came from my research is discovering that these chairs used a webbing system called Fagas Straps.  These are a rubberized strap with brackets attached at either end.  This bracket will attach to a groove cut in the seat bottoms.  There is one company I found that still imports theses directly from Denmark so I ordered enough to do both chairs and the ottoman.  I was a bit leery of how long it may take but received shipping notification this weekend that they’re on the way via USPS, 2 day shipping.  I suspect that the company I ordered them from makes these up as people order them cutting the  raw strap material to length and then attach the brackets.  If you’re reading this and need the straps they are the Evans Company out of San Diego.  They don’t have the spiral bands for the backs though, these are in good shape and all there.  Finding these straps will make the job much better, restoring the chair to its’ original condition rather than modifying it with an insert and conventional chair webbing.

I’m going to use the word “refurbish” rather than restore because I feel that’s what I’m doing with these chairs.  I don’t consider myself qualified to be called a furniture restorer and  I’ve seen enough episodes of The Antiques Roadshow to know that an amateur job on a piece of furniture can really affect the value of it in a bad way.  The client told me she wanted to have the chairs cleaned up but did not want to lose the patina and character they have.  After all, these chairs represent over a half a decade of family history.  She mentioned that the recliner is one where one of her relatives would have his nightly cocktail!  All in all, they are in very good condition.  There was some type of white paint spills on each of them and a few chips near the bottom of the legs, probably from vacuum cleaner collisions.  You can see normal wear on the front of the arms and backs but nothing real obvious, just a lifetime of usage.

Luckily, the plywood was only attached with screws and brads; not glue.  On the chair some of the plywood adhered to the frame but scraping it off damaged the finish so I choose to leave it as the seats and webbing will conceal most of it anyway.  I experimented on the bottoms first using Briwax and a fine, scotch pad.  This worked well for general cleanup.  On some of the heavier stains I experimented with various scrapers but the only thing that wouldn’t mar the finish was my thumbnail so that’s all I used.  Once the Briwax softened the stain, the thumbnail was sufficient.  Using a matching furniture touch up pen on any worn areas and then waxing and blending it in seems to work too.  Here’s a small montage of some of the work in progress:

I have the recliner to finish the refurbishing on and it’s really interesting how it operates. If possible I’ll attempt to photograph that and share it with you.  I’m confident that re-strapping the chairs will be a relatively simple procedure — time will tell.

Posted in Uncategorized | Tagged , , , , , , | 8 Comments

Production Mode; It’s all about the Process

Ready for final sanding and finish

Ready for final sanding and finish

The work has progressed nicely on the Beer Boot servers and although my preference is building furniture, this is a good experience!  I’ve often said that the process of making anything is what’s exciting.  That planning stage where you’re working out any potential problems in your mind and actually watching the project take form mentally — that’s the magic.  The icing on the cake is when you see that 3 dimensional object before you and you realize you’ve accomplished the goal of turning your mental image into a real item.  Here are my 5 prototype servers next to the sample I was given when I accepted this commission.

Templates for Boot and paddle ends

Templates for Boot and paddle ends

In the first post I concentrated on making the template to fit the shape of the boot.  There was a bit of a challenge since the boot is somewhat bulbous but after 4 attempts I had a pattern that had the right fit.  Putting them at an angle of about 60 degrees allowed me to minimize the width of the paddle (4 1/4″) and placing it at an angle also presents it as a boot more than a glass.  Once the template was made it was attached to a fence to insure that the cutouts would line up.  Another template was made for the shape of the handle as well as the opposite end.  After marking the center of the opening, lines were drawn on the paddle blank so the opening could be traced.  What followed was a production mode to make the blanks with three cutouts each.  Here’s where it would have been nice to have a Festool router and vacuum cleaner set up — routing is messy!

This slideshow requires JavaScript.

Making the recess this way may add another step on the drill press but in my opinion it’s easier and not nearly as messy as doing the entire process with the router.  Here is an application where CNC equipment would be ideal.  Next, I turned my attention to shaping the remainder of the paddle.  A 1/4″ hole was drilled in the end for hanging.  Once again, time for templates and pattern routing.  This time the pattern is an external route rather than an internal one used to make the cutouts.

You probably notice my “bench on bench” in these pictures.  That is such a back saver!  It’s always used for carving and joinery work but I found that for routing like this it’s equally valuable.  Bringing the work up so you’re not constantly bent over is a God send.  It’s not the bending over that gets tiresome, it’s trying to straighten up again!  You younger guys will appreciate that as you enter your sixth decade of life.

Posted in Current Commission, Uncategorized | Tagged , , , , , | Leave a comment