Summerlin Art Festival

SummerlinArtFestival-2Well, we did it — our first ever venture into the craft fair world and; over-all, it was a positive experience.  Our goal was to break even financially and we achieved that plus some additional profit.  Since this was our first time we had the cost of the tent, shelving, drapes, etc. but lucky for us these were material costs only.  So blessed with Diane’s sewing skills and my woodworking abilities.  So, what was the experience like you may wonder?

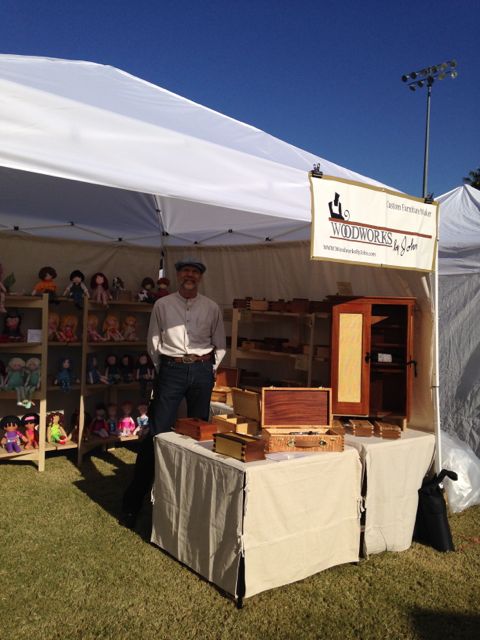
For starters it took us two trips with the truck to get everything set up.   The site is less than 5 miles from our home so that’s one of the reasons we chose this fair.  The first load was the tent, tables, and shelves.  We were able to set up on Friday and started the process after lunch.  The second trip brought all of our wares to the site.  I had taken a furniture dolly and bolted a piece of MDF to it.  Two holes and a rope for the handle and it worked.  You weren’t allowed to drive on the grounds so everything needed to be hauled to the site.  The weather was beautiful and the over-all atmosphere was friendly and just plain nice!   Everything was set up and we were done by 5pm or so.

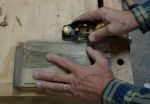
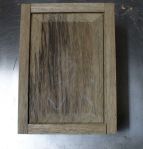
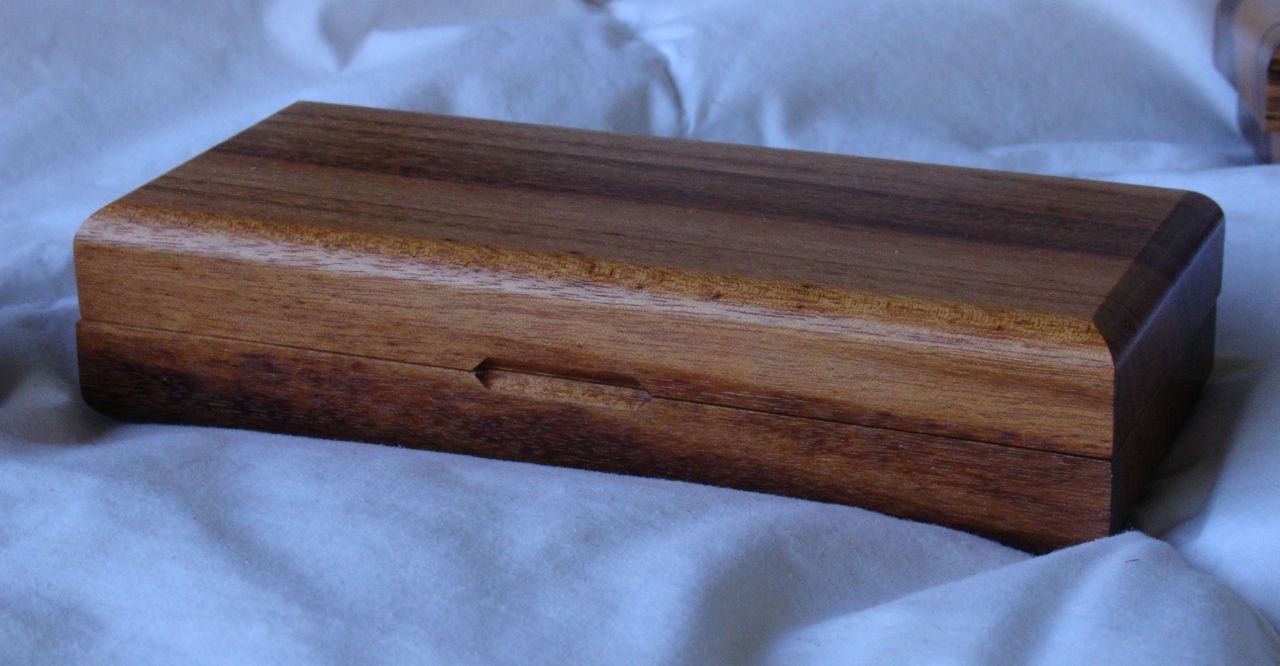
Saturday the festival opened at 9am and we arrived a good thirty minutes before that to do any last minute preparations.  The crowds were consistent all day and reacted very positively to our work.  I enjoyed seeing the kids eyes light up when they saw Diane’s dolls and of course she’d invite them to come in and feel how soft and cuddly they actually were.  As for my side of the booth people were complimenting the joinery and exotic woods that I use.  A big draw for me was the pistol case, if only 20% of the people follow through that said they had a pistol they would like to have a case made for I’ll be busy for quite some time!  The day ended, we wrapped a tarp around the front of the booth and headed out to Smashburger for dinner and a well deserved beer.

Sunday it was windy.  How windy was it?; well the back curtain would blow in hard enough to knock Diane’s’ display over!  Our first attempts were to move the display in but that wasn’t enough.  The man behind us suggested moving the tent instead and helped us do that.  Thankfully the 40 pounds of sand attached to each leg kept the tent grounded.  In spite of the wind there was a good sized crowd which grew after 11am or so.

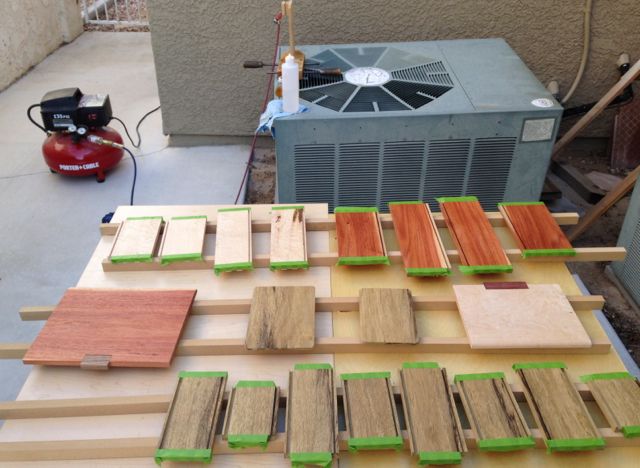
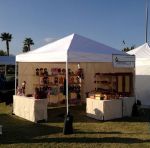
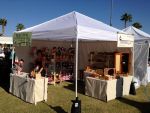
Our booth was situated so it faced south and east.  Around 3pm or so a few people started to mention the clouds building up but from our location the skies were blue and mostly clear.  Stepping out of the booth and looking to the west there was an ugly mass of black clouds coming over the Spring Mountains and the wind had a definite chill to it.  It did start to blow harder and rain just before 4pm and as you know, wood and water are not a good combination unless it’s a boat!  We pulled our stuff under the tent the best we could but the fair goers were headed to their cars so most of us began closing down for the day even though the scheduled time to quit was 5pm.  I made two trips to the truck, dragging the dolly loaded with boxes across this huge expanse of grass (soccer field actually) and luckily the rain let up.  We took the car and the truck so were able to get all of our stuff home in one trip.  Here’s how our booths looked before the rain and wind:

It was interesting talking to some of the more seasoned art fair participants.  Some have a schedule that keeps them on the road for weeks at a time.  One man has been doing this since 1977 and he sold outdoor fountains which aren’t all that easy to move around.  Getting first hand reactions to our work was priceless.  Based on peoples’ suggestions and requests I now have some ideas of items I could make.  Diane already has one custom order and another is in the works.  We couldn’t have had a better advertising campaign than being at this fair.  We made it a point to tell everyone that we’re locals, that generated a lot of interest for my custom furniture work which is what I really prefer to do.

The experience had its’ ups and downs but over-all was a positive one for both of us.  Will we do it again?;  definitely!  Not every weekend but maybe we’ll pick and choose a few local shows each year.  Thanks to all of you that came out to visit our booth and lend your support — we really appreciate that.

Posted in Craft Fair | Tagged , , | 6 Comments

Work Continues — Planes, Raised Panels, & Routers

WoodworksbyJohn-LasVegas-LieNielsen-SmoothPlane

Now, that’s what I like seeing — a pile of shavings made with a bronze smooth plane.  No dust or no noise (other than the radio) and a shimmering piece of wood!  What I’m doing here is smoothing both the inside and outside surfaces of the four boxes in this series.  The piece under the plane is the raised panel lid made of Black Limba, the others are the Macacauba and Birdseye Maple.

IMG_0033These boxes will be finished with platinum shellac which I mix fresh from flakes and the easiest way to go about that is with an airbrush.  Since several of the boxes are fairly large, plus the lidded finger joint style has the lid attached when it’s finished I decided to spray the insides before assembly.  After smoothing both sides of each piece tape was wrapped around the joints so they wouldn’t get any shellac on them.  That would tend to seal the woods pores and weaken the glue joint.  The day was an unusually cool one for us and even though we had some rain last night I decided to go ahead with the shellac anyway.  Diane and I went out to lunch and wouldn’t you know it, rain drops were falling on our heads!  Shellac and water don’t make for a good mix but I was blessed and it didn’t rain at all at our house, only at Panera’s about 3 miles away!  The interiors were given two coats of shellac and will be finished with wax after final assembly.  The picture shows how things looked when we left for lunch.

Other than planing the surfaces I also needed to raise the lids for the two, Black Limba boxes.  You may recall that I decided to make them traditional, hinged boxes rather than the more complicated lidded finger joint design.  This is another one of the processes done by what I refer to as hybrid woodworking.  It could all be done by hand but using a combination of power and hand work is more efficient.  Actually, the Wood Whisperer (Marc Spagnuolo) is writing a book by that title and I emailed him about it.  I mentioned that I thought I was  the one who came up with this term and I got a very nice response from him where he showed me how he’d used that term years ago in his writing.  The book is set to be released sometime before the end of the year and it just may go onto my Christmas list, here’s a LINK to it if you’re interested.  Okay, sorry for getting side tracked here’s the procedure used to raise the panel for the Black Limba boxes.

There was an additional step completed yesterday before the finish was sprayed on this afternoon.  That was fitting in the lid lifts for the lidded finger joint boxes.  Another  hybrid woodworking process.  It begins with locating the lift on the underside of the lid, scribing it with a marking knife and then outline that with a chisel.  I’ll use a small plunge router to remove the bulk of the wood and then finish with chisels and a Stanley #271 small router plane.  Using the plunge router eliminates using a chisel to mortise out for the lift and again, although I’m perfectly capable of doing that it is more efficient to use the power first since I already had the router set up with the required bit.  If there was only one required it would be quicker to simply go through the entire process by hand — I think, Macacauba is a pretty hard wood!

So, the day ended by assembling the Macacauba box.  I’ll leave it clamped over night and maybe assemble the Maple box before we go set up for the Summerlin Arts Festival.

Posted in Lidded Finger Joint Box, Lidded Finger Joint Box, Types of Boxes | Tagged , , , , , , | 2 Comments

Forgot about the Complexity!

Lidded FingerJoint Box-WoodworksbyJohn-LasVegasWoodworker-5Here’s where I am on the current series of boxes.  The custom order one is the reddish colored Macacauba with the clamp on it.  Next to it is a speculation project that is made of Birdseye Maple.  In the background you can see the two other spec boxes of Black Limba.  Due to the complexity of this style of box I’ve decided to make them more traditional with a raised panel, hinged lid.  I’m glad my client was agreeable to a 3-4 week delivery as there is a lot of work we need to do still in preparation for the Summerlin Craft Fair which is coming up this weekend.  Feel like Santa Claus — making a list and checking it twice!  We had quite a bit of coverage in todays View Edition of the Las Vegas Review Journal, it mentioned both Diane and myself.  Really looking forward to seeing how it will all pan out but we know we’ll be better for the experience.

Let me fill you in on some of the complexity of this style of box.  My habit is to keep notes on projects in a binder so that I have something to refer to when repeating the same general projects.  The cool thing about doing one of a kind projects is that there is the ability to customize my work based either on a clients request or how the wood “talks to me” which can dictate the design.  Irregardless though there are certain steps that are non-negotiable.  In the last blog we talked about cutting the finger joints, it seems the larger the finger the more chance there is for a bit of misalignment but now that they fit well, next up is cutting the dado’s for the bottom piece.  This used to be a time consuming step because you had to cut stopped dado’s on two of the sides to conceal it.  That’s all changed with Lee Valleys Slot Cutting Bit, here’s a LINK to it. It’s available to cut either a 1/8″ or 1/4″ wide dado of varying depths.  To use it you clamp the box together, mount the bit in a router table, and work you way around the interior of the box.  It does create a lot of dust so I hold a vacuum at the same time.  When cutting a 1/4″ x 1/4″ or 5/16″ deep dado my preference is to not make a full depth cut the first time around.  This seems to produce a better cut and put less stress on the tools.  The bottom piece needs to have a radius cut on the corners which matches the cutter.  I’ve found that a nickel is just about the right radius, after drawing it on you can file or sand to the line and you’re good to go!

There will be brass accents on the corners of the custom order box and the Birdseye Maple will get dowels of Purpleheart which is also the material for the handle.  This is done on the drill press and begins with marking the location on one finger then setting up a jig made out of a piece of scrap used to set up the finger joint jig.  Like most other things, the initial set up takes more time than the process.  Here’s how that set up looks:

Lidded FingerJoint Box-WoodworksbyJohn-LasVegasWoodworker-3One of the trickiest parts to this entire project is accurately locating and drilling the holes for the concealed brass hinge.  Drilling it into the side piece is not a problem, you just have to mark the appropriate corner and use the same jig with a different sized drill bit.  You may notice I highlighted the word appropriate; well let’s just say I’m glad I have a dowel making plate and can make dowels of any species of wood to conceal holes put in the wrong location!  Here’s the set up for drilling the hole into the lid.  It’s important to keep it square.  Once these were drilled it’s a matter of relieving the edge of the lid to allow it to open completely and stay open at 95 degrees or so.  Only way to go about this is the trial and error method removing a little material, assemble the box, try it, take it apart, until it works as it should.

The remaining work is some of the most enjoyable as far as I’m concerned.  Now is the time to plane all of the surfaces with a smooth plane prior to assembly.  The lid lifts need to be refined and mortised into the lids and then comes the assembly.  The Macacauba box will have brass screws driven into the pre-drilled holes.  Those will then be cut off and filed/sanded smooth before the finish is applied.  The Maple box will go to the drill press to drill 3/16″ holes for the Purpleheart dowels.  I mentioned the dowel plate and if you’re not familiar with what they are, here’s a LINK to Lie-Nielsens version which is what I use.  During my teaching career a dowel plate was standard issue for school wood shops.  At that time it was used to accurately size dowels you’d buy commercially because then they were over-sized.  The norm today is that the dowels you buy are undersized!  With the plate you can make your own from virtually any species of wood you like or need.

Posted in Lidded Finger Joint Box | Tagged , , , , , | Leave a comment

Latest Custom Order from Etsy

Just as I thought I was getting a break and could concentrate on the upcoming Summerlin Art Festival  I had a request from the Etsy store for a custom box.  Really, this isn’t a complaint — I love getting those special orders.  They always point me in the direction of my next bit of work and I’ve taken a page from my wife’s playbook to be more efficient.  Whenever she gets a request for a custom doll she’ll make an additional 3 or 4 of the same general pattern using different materials and embellishments.  Since the machinery part of any project in the shop requires a bit of set up time and adjustments I’m fallowing her lead and making three additional boxes of different wood species and sizes.  This order is for a box in the lidded finger joint style and is to be made from Macacauba.  Luckily I had just enough of this beautiful wood left to accommodate the size my client requested.  This box is to have brass accents in the fingers on the front and back sides.  This part of the box adds a lot of nice detail to the over-all appearance but also adds some time.  The final effect is worth the effort though.

Macacauba-WoodworksbyJohn-CustomOrder-FingerJoint-4 Cutting the piece of Macacauba will be tricky and really require that adage of “measure twice and cut once”.  I only have the one board of it and at $13.00 a board foot you don’t want to make a mistake!  Add to that I’d have to mail order more from Phoenix and pay additional shipping I really want to be on my toes.  The Macacauba is the board in the middle and it’s flanked by a piece of Birds-eye Maple on the left and Black Limba on the right.  Difficult to tell but the process begins by roughly marking the boards with chalk to differentiate between the sides and top of the boxes.

Macacauba-WoodworksbyJohn-CustomOrder-FingerJoint-bAfter running the boards through the planer to get them to a uniform thickness of just over 1/2″ it was time to cut them to size.  This begins with planing a straight and square edge as a reference point.  For that a trusty old Stanley #7 corrugated sole jointer plane in put to work.  Here it is with a 24″ straight edge on making sure that the surface is flat.  This is the edge that will run against the rip fence.  You can see one of the challenges I have on this project.  I’m certain my client chose this wood for its red coloration and there is some sapwood streaking that I want to minimize by keeping it on the interior of the box as much as possible — ah yes: measure twice, cut once for sure!

Whenever possible it’s desirable to cut the required pieces for any box in the same sequence it will be assembled.  This will  maintain the grain pattern all the way around the box perfectly on three of the four corners.  A table saw sled and spacer is my technique.  A stop block is clamped to the fence for the length of the longest piece.  After that piece is cut I’ll put a spacer next to the stop block equals the difference between the two measurements.  For example, if the box is 5″ x 7″ I’d use a 2″ spacer.  You can see the spacer under my little finger.  I keep the pieces in order then identify them with tape on their lower insides for re-assembly.

This is one of the tricky steps to this project; setting up the finger joint jig on the table saw to cut exactly sized and spaced fingers.  Everytime I do this I tell myself I’m going to come up with a better jig that holds its’ accuracy but for some reason it’s one of those things I never seem to get around to.  I’m using polyethylene runners and Baltic Birch so it’s about as stable as can be.  In any case there always seems to be some hand work required to fit them.  When I do a single box with variable sized and spaced finger joints I find it’s easier to do the entire operation using hand tools.  The photos below shows the jig and process I use for this job.

After all the noise of the tablesaw today will begin with quiet chiseling to fine tune the joints as needed.  With the Macacauba box getting brass accents on the finger joints a jig will be set up on the drill press to accomplish that.  If I have enough Ebony to make dowels for the finger joints of the Maple box I may use that as a strong accent for it.  Well, it’s time to go out and make some sawdust or at least shavings!

Posted in Lidded Finger Joint Box, Lidded Finger Joint Box | Tagged , , , | 1 Comment

Gimlet’s and SOSS’ed!

CustomEyeglassCase-WoodworksbyJohn-FurnitureMaker-LasVegas-1Thought I’d share the final assembly steps to the custom eyeglass cases that were just completed.  The title of this post is worded to hopefully catch your attention!  I get kidded sometimes in our local woodworkers group about my penchant for using hand tools.  That’s fine with me because in my opinion, quiet work processes that don’t create a lot of dust and allow me to hear the radio are just fine.  Shown here is a set of gimlets and they’re just the thing for pre-drilling a screw hole.  Gimlets are tools that have been around for a long time; quick and easy to use to prevent the wood from splitting when using screws.

The hinges used for these cases are the barrel type of hinge from Lee Valley.  If you’re unfamiliar with them here is a LINK to that product page.  Since these do not allow for any adjustments drilling the 10mm hole accurately is crucial!  Although they’re fairly self explanatory, here’s a pictorial essay in case you ever decide to use them.  Not sure how to properly write the brand SOSS;  some are all caps and others only capitalize the first S — only a retired teacher would be concerned about that.

These cases use rare earth magnets to keep them closed.  They’re readily available and Rockler offers them in their catalog as well.  Here’s a LINK to that product page, note that you need to buy the magnets and washers separately.  They’re relatively easy to install into pre-drilled holes.  I suggest drilling these during the beginning steps of the project when everything is still square and easy to hold in a drill press fixture.  I’ll drill these holes with a forstner bit which also leaves a center point for pre-drilling screw hole needed to insert the washers.  Here’s a pictorial sequence of that procedure:

Allow me to clarify those last two pictures, you may find that the hole for the washer that contacts the magnet is a too deep and the holding power isn’t what you want.  In that case, simply raise that up by placing another washer of some kind under it, here I’m using a thin lock washer to accomplish that.

That’s it for now as far as woodworking goes.  The two, African Paduak cases need to be prepared for shipment to the U.K. and I really need to do inventory and make the tags for the upcoming art fair.  That’s October 12 & 13 which will be here quicker than I’d like!  I need to photograph these cases and the series of dovetailed boxes with the sliding lids.  These will all need to be placed into the Etsy store.  Although I’d much rather spend time in the shop these are important tasks that need to be done.  Had an interesting phone call today though for a potential job.  Not customized furniture but rather it’s a stair type unit needed by a physical therapy office.  Wouldn’t be my first “medical appliance” as I did a contact lens station for an optometrist many years ago!

Posted in Tutorial | Tagged , , , , , , | 2 Comments

Final Steps on Eyeglass Cases

ConnorSo, here’s my excuse for not being out in the shop lately — been visiting my daughter and family up in Spokane.  This is Connor and he’s the one I made the monster truck for, he loved it!  He’ll turn 3 this weekend but the other great news is that we also have another new grandson, Rory.  He was born on the 12th. so it was a great reason to visit.  Must admit I missed being out in the shop but getting the chance to visit family and relatives is priceless.

We’re on the final approach to our first ever craft fair, making the list and checking it twice!  The only projects I want complete are the eyeglass cases.  Then all that will remain, as far as the projects go, is to line the bottoms of the last series of boxes.  There’s also one additional box done in part as a prototype for the mystery box project that I need to hinge.

EyeglassCase-WoodworksbyJohn-CustomEtsy-2The work remaining to be done on the eyeglass cases was mainly the finishing.  Here I have everything set up, ready to do the final sanding on them.  I absolutely love my carving bench!  Every class I bring it to finds students asking for plans and several will make their own.  It’s a Godsend as far as I’m concerned.  For me, it’s the perfect height for carving and routing work.  Add chopping and cutting dovetails and other joinery too.  It just brings the work to a better level, my regular workbench is great for planing work where you need to put force down around waist level but too low for the types of work where you’d find yourself stooped over the work.  At my age, the stooping isn’t so hard it’s straightening back up that’s the problem!

fingergrip1Here’s one refinement I’ve made to the glasses cases, a finger grip.  The design concept I had for these cases is that they look like a solid block of wood, which they are.  I have trouble on the prototype case that I use knowing which side opens and which is hinged.  This may not sound like a huge problem but it’s surprising what a minor annoyance can do to your overall enjoyment of something like this.  I’m going to try to disassemble mine to add this improvement to them.

EyeglassCase-WoodworksbyJohn-CustomEtsy-1It was a fairly simple process.  The use of a small router mounted in the table along with a V-shaped cutter was all that was required.   As you can see there are stop blocks that limit the travel so once the box is positioned against the fence you move it both directions, from stop to stop and that’s it!  I’m pointing out the finger grip but you can see it quite clearly in the photo above.

All of the boxes were given several coats of shellac before we left for Spokane.  I mix up my own flakes which I purchase from Shellac.net and used a super blond platinum on these to give the clearest finish possible. These are applied with an air brush and sanded between coats with 400 grit paper.  They cured while we were gone and have now been rubbed out with a super fine scotch brite pad (white) and my favorite, Liberon Black Bison wax.  I should be able to assemble and have them on the Etsy store within a few days.  Also, two of them in African Paduak will be going out to my client in the U.K.

Posted in Uncategorized | Tagged , , , , , , , | Leave a comment

Monster Truck on the Road

Connor's Truck-frontHere we come moving through the desert on our huge off-road tires!!

Now I’m really excited to get this truck to Connor for his 3rd. birthday.  The truck was completed just in time to take it to our Sin City Woodworkers Meeting on July 17th. for our show & tell segment.  The truck got lots of positive comments from the other members which always makes you feel good!

The final phases of the truck included assembly and finishing.  I used a product made by Minwax called Helmsman Spar Urethane in a satin gloss finish.  It’s a spray can and should hold up well indoors and out as Connor runs this truck through its paces!  The tires were done separately from the rest of the truck so they could get adequate finish.  Once everything had about 4 light coats the truck was assembled.  I changed it a bit from the directions and have a 1/4″ axle going through 3/8″ holes which gives the illusion that there is a bit of suspension to the truck!

All in all, this was a great project to build.  Through the years I’ve discovered the most rewarding aspect of making things is the joy that it brings to others.  That supersedes everything else about it.  Problems and hassles while creating something seem to melt away when you see that it brings some happiness to someone else.  Here’s Connor’s truck, driving off into the sunset.

Connor's Truck-rear

Posted in Kids Wooden Toy | Tagged , , , , | Leave a comment

Monster Truck Continued……

ConnorsMonsterTruck-WoodworksbyJohn-1

This is getting exciting!  Connor’s truck is actually starting to look like a monster truck and resemble what the cover picture looks like.  Of course, it has a few changes to personalize it.  Here you see it posed in front of the book and so far things look pretty much the same.

ConnorsMonsterTruck-WoodworksbyJohn-2


I really like how it has the huge “cow catcher” type of bumper/push bar on the front.  It’s secured with a couple of dowels into the frame piece.  Now that they’re sanded they have an oval appearance.

ConnorsMonsterTruck-WoodworksbyJohn-3


At the rear of the truck, the plans called for simply gluing a dowel above the frame which seemed to block the tailgate.  Not that it is hinged or anything but to me it just didn’t look right.  I mimicked the dowel into the frame method so it looks like this.

ConnorsMonsterTruck-WoodworksbyJohn-4


Underneath the frame the plans also called for making a transfer case in the center and then running a couple of dowels that resemble the driveshafts.  Although I really like the looks of that there’s hardly any strength there and I’m guessing it would be the first thing to break so decided to leave that detail out.  I want Connor to be able to play with this thing!  Notice the tire tread,they are directional and incorrect in this shot — yeah, I had to sign it.

The final construction step was trying to figure out how to carve the tailgate.  Also whether or not I was capable of doing it justice.  I’d rather leave it blank then attempt to do it and have it look bad.

I tried a number of different ways to go about it.  The initial thought was to carve it, paint the entire tailgate black, and then scrap/sand the paint off to only leave it inside of the carving.  First attempt didn’t work, then tried to protect the area with glue (rubber cement) but the paint still bled through the wood and it just didn’t suit me.  Also tried a couple of different chisels to see how to control them in such a small space.  Finally settled on using a #11 sweep in a 2 mm size.  The area to carve is about 2 1/2″, the name is 6 letters so things were  evenly spaced out.

The piece of wood is longer than needed, the lines drawn all the way across the width indicate the required length.

ConnorsMonsterTruck-WoodworksbyJohn-Tailgate-1

My first attempts were using a stencil that had 1/2″ letters but it just didn’t space out correctly.  After dividing the space into 6 equal segments I drew a line to indicate the top and bottom of the letters.  Next up was to sketch them in and use the width of the chisel as the width of the letters — makes sense doesn’t it?  The first step was making all of the vertical cuts, starting about 1/3 of the way up  and stopping at the top of each letter.

ConnorsMonsterTruck-WoodworksbyJohn-Tailgate-2

Then the piece was flipped over so the rest of the vertical line could be chiseled to the bottom of each letter.  Lastly, the horizontal and angled lines were cut in to complete each letter.

You can see I had a “chisel slip” on the N’s so decided that was now the signature logo for the back of Connor’s truck.  After cutting the tailgate to length and gluing it on here’s the final results:

I Like It !!

I Like It !!

Posted in Kids Wooden Toy | Tagged , , | Leave a comment

Monster Truck Tires

Work continues on the Monster Truck for Connor’s third birthday and if this is the first post you’ve seen on it I’ll remind you that this was built in July but won’t be posted until after he gets the truck in September.  Had to get out of the shop, it’s now 100 degrees in there!

Connor'sMonsterTruck-WoodworksbyJohn-Wheels-1One of the most noticeable things about this truck are the huge tires — what kid wouldn’t like this thing!  They took some time to make, let me walk you through the process.  Mine are made out of Walnut and measure 3 1/4″ in diameter.  In the book he shows band-sawing them out, then rounding them on a disc sander which I don’t have!  Instead, a circle cutter was set for the correct size and 8 disc were made.  Next, four of them had a 1 1/2″ piece cut out of their centers; these will become the outsides of each wheel.  Now the fun begins.  First up was taking the templates I made and gluing them to the inside surface of each disc.  A glue stick is a good choice for temporarily attaching patterns to wood.  See the disc at the upper left?  Before cutting the slots the outside edges were rounded over on the router table to prevent tear out on the next step.

Connor'sMonsterTruck-WoodworksbyJohn-Wheels-2That step was to cut 24 grooves in each disc at about 15 degrees on the table saw.  That was easily accomplished with this quickie jig.  Since the wheels are directional that meant two inner and two outer discs needed to be cut with the fence tilted in one direction and then the others went the opposite way.   Lets see now; 8 discs times 24 = 192 cuts stooped over the tablesaw and yes, my back’s sore!

After flattening the backs of each and removing any traces of the glue or template they needed to be assembled together.  Starting to look like real monster truck tires aren’t they?

Connor'sMonsterTruck-WoodworksbyJohn-Wheels-3

Connor'sMonsterTruck-WoodworksbyJohn-Wheels-4Keeping them aligned was the concern knowing how once the glue is applied things get kind of slippery and hard to control.  After considering a few approaches this is the one I settled on.

Connor'sMonsterTruck-WoodworksbyJohn-Wheels-5

First off the 1 1/2″ hole saw was placed in the vise surrounded by some wax paper to keep the glue off the bench.

Connor'sMonsterTruck-WoodworksbyJohn-Wheels-6

Next up was to put an outside wheel over the hole saw and apply a thin bead of glue.Then the inner wheel was placed over the drill bit in the center.  Here you need to be sure the slots cut into the tires go in opposite directions to make a realistic looking tire.

Once the inner and outer tire were centered on the hole saw they were rubbed together to spread the glue.  That procedure was followed until four, huge monster tires had been assembled and clamped.Connor'sMonsterTruck-WoodworksbyJohn-Wheels-8

It worked!  There was a little bit of misalignment on some of the tires but they’re going to be just fine.  Did a little sanding to even up the tread in the center but they’re ready to rock and roll.

Posted in Kids Wooden Toy | Tagged , , | 2 Comments

Happy Birthday Connor

My grandson, Connor will turn three this September so as his Opa I really want to make him something special.  This little guy is absolutely crazy about cars and construction machinery so what better present than a monster truck with big tires for him to play with?  The problem I’ve run into though is that right now it’s July and I’m having a ball building this for him but can’t publish the blogs because they would be visible on Facebook and to his mother (my daughter) who subscribes to my blog.  Don’t want to ruin the surprise so I’ll blog the work but keep them as a draft until after his birthday.  It seems that blogging about my work has become such a habit that I find myself writing them as I work, almost as if on automatic pilot!  I hope that those of you that take the time to read them find them worthwhile and enjoy my ramblings.

It’s rare that I build a project directly from plans but I saw a book titled Tremendous Toy Trucks written by Les Neufeld.  The picture on the cover was a definite source of inspiration.  I’m a car guy anyway and it showed a late 40’s, fat fendered, Ford pickup truck complete with some huge tires.  Immediately I could see Connor having a blast with that one.  I purchased the book and although there were some problems with the drawings and dimensions which I feel shouldn’t have gotten to print but that’s the way things go.  Of course, the books plans and methods were modified to fit my methods of work and the tools I have available.  Not to sound like a whiner but building something like this is every bit as complicated as a piece of furniture would be to make.  One thing that concerns me is there is very little joinery so assembly relies on glue lines which are proven to be strong.

Here’s where things are now, let me explain this picture:

Connor'sMonsterTruck-WoodworksbyJohn-Parts

Although it seems like a collection of parts there’s an incredible amount of work that’s gone into this project so far.  The wheels were pretty involved so I’ll do a separate post on those.  Let’s start off with the bed you see in the center.  The books method was to make it like a bandsaw box from a rectangle of wood.  Since I wasn’t too keen on that idea I used some 1/2″ Maple for the bottom, 1/4″ for the sides and glued it together using a pinner to help align the pieces.  My goal is to carve CONNOR into the tailgate so it really has the truck look.  It’s pretty small so it’ll be a challenge!  Below the bed and to the left is one of the axles and a pretty massive grille and bumper guard.

The body started life as 4 pieces of Maple laminated into an approximate 3″ square block that’s just under 5″ long.  In the book it’s suggested that you enlarge the pattern but that wasn’t necessary since it seemed easier to lay it out from the measurements given. If you know my work, I’m not a big fan of sanding wood; my preference is to plane smooth and also to use scrapers.  Well, let’s say I’m really glad I purchased an inexpensive 1″ belt sander to use for sharpening a while ago, simplifies working all of the curves required for this project.  Once the body was roughed out it was time to work on the fenders.

It’s suggested to use a contrasting wood for them and I just completed a run of boxes using Macacauba.   Here’s a LINK to one of the steps in that box series.  The first step was to laminate some pieces together to get the 1″ width required for the front fenders.  I changed the procedure by using a forstner bit to create the opening in each fender rather than a series bandsaw cuts followed by a drum sander.  The patterns was attached and the piece cut.  Connor'sMonsterTruck-WoodworksbyJohn-Fenders-2Here again, I deviated from the plan.  The front of the truck has quite an angle to it as you can see in this picture.  I decided to cut the angle on the bandsaw but then before the profile of the fender is cut I used a block plane to get that surface smooth.  Knowing the bandsaw blade would leave a rough finish and not wanting to sand that smooth this seemed like the best option for my woodworking methods.

Connor'sMonsterTruck-WoodworksbyJohn-Fenders-1

The way I got the angle for this cut was to hold the cab squarely over the fender blank and  trace it directly to the piece.  Like I mentioned, this is a somewhat complicated project!

Connor'sMonsterTruck-WoodworksbyJohn-Fenders-3You can see the difference between the top piece which has been planed and the bottom one right off of the bandsaw.  The pieces were then cut out, sanded and formed, and finally glued onto the cab.

So at the end of the day (or maybe two) here’s what I have:


Connor'sMonsterTruck-WoodworksbyJohn-Fenders-4

Posted in Kids Wooden Toy | Tagged , , | Leave a comment