Custom Order for the U.K.

Reading Glasses
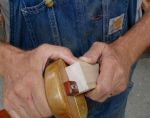
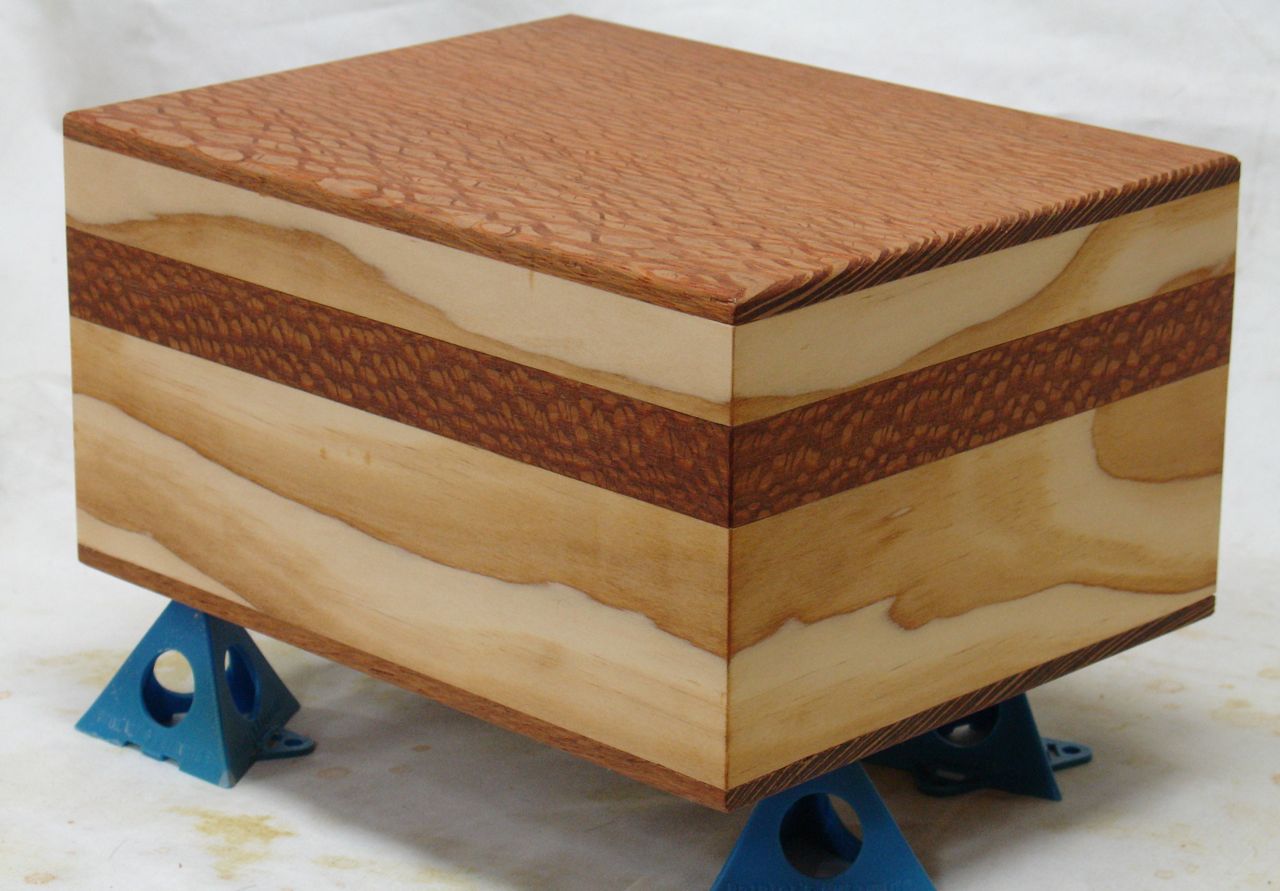
Allow me to give you the “back story” of this newest project I just received via the Etsy store.  There was a new, upscale shopping center that opened here in Las Vegas in 2011.  It’s called Tivoli Village and is designed to look like a Venetian center, really quite beautiful.  Well, to shorten what could become a very long story there was a shop there that featured unique and handmade eyeglasses called Obika.  Now my preference for reading glasses has always been the kind that have no frame on the top.  This way my vision of the students in class was unobstructed — very important when teaching construction at a boys prison!  Granted, it’s a matter of personal taste but I really loved the ones you see me wearing so dug deep into my pocket to buy them.   They’re hand made in Germany so you can imagine my dismay when they were given to me in a cheap, blown plastic carrying case, proudly labeled as Made in China!  I voiced my displeasure and told them I could certainly do better and they said they’d be interested to see what I could up with — the gauntlet had been thrown down!  Here’s the LINK to the final blog of that project as a sneak preview for you.  The story didn’t have the desired ending though.  When I showed them my initial case they asked to see some additional examples in different woods and although well received by sales and management at the local level,  corporate decided that it wasn’t in the budget at that time.  As with so many businesses they have since gone out of business!  That left me with  a number of cases which were in a gallery and also on my Etsy store.  Sales were okay so at least I felt the investment initially made was worth while.  In any case, my philosophy is that everything is a learning experience and as I’ve voiced before I’m all for anything that keeps me off the couch!

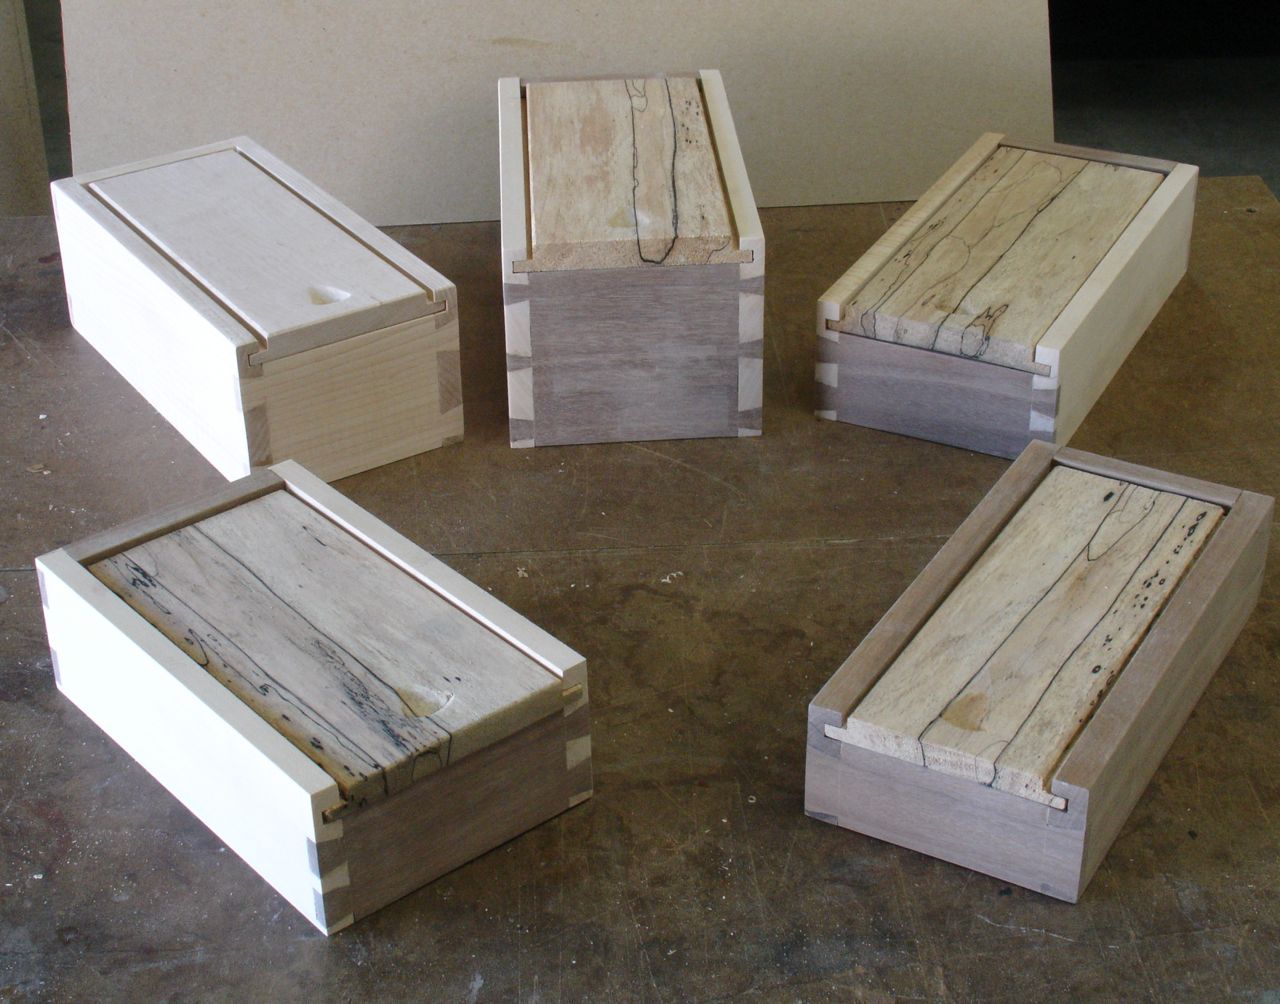
Fast forward to a few weeks ago with an inquiry on Etsy expressing an interest in two of them made of African Paduak.  I only had one in that species but after several emails I now have a custom order for two of them from a client in the U.K.  That’s inspired me to complete the other blanks I had made so now there are a total of seven of these cases in progress.  One of the challenging aspects to this project is creating the recess for the glasses.  The prototype was completely done with a plunge router and you know my preference is for hand tools.

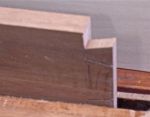
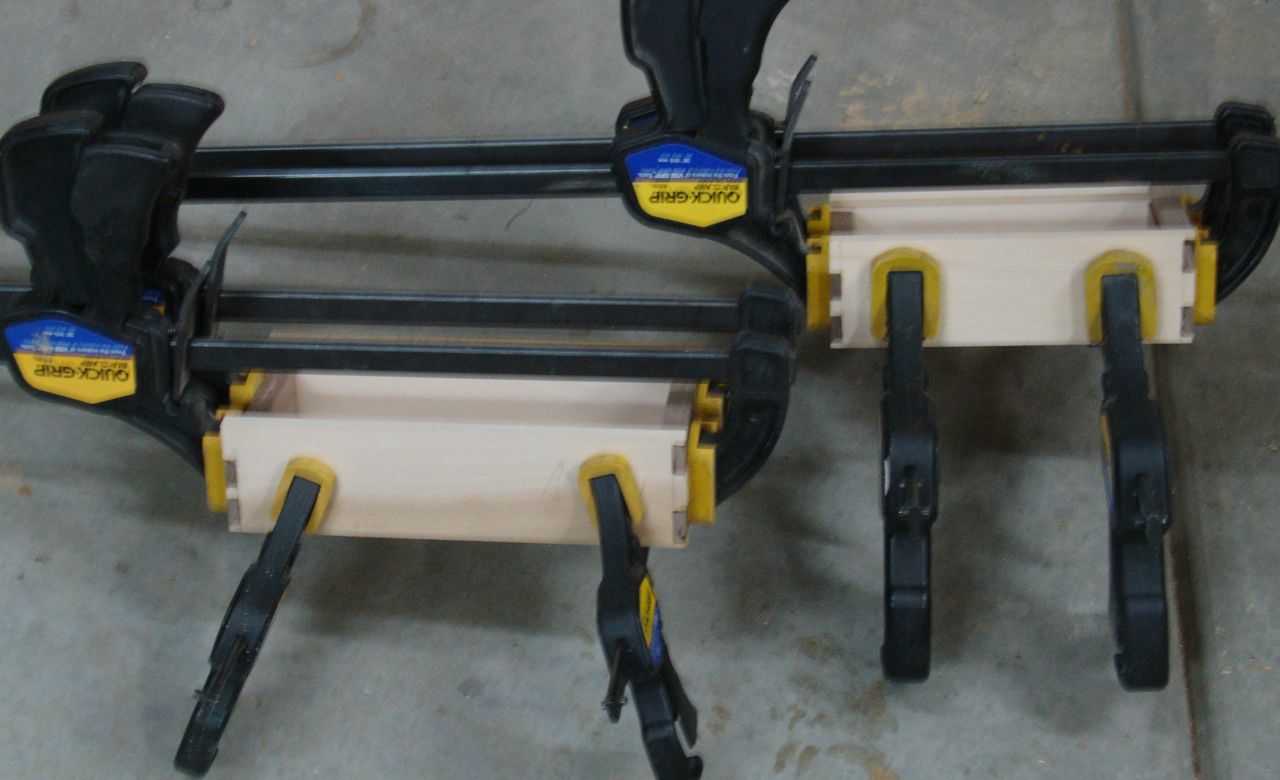
The first step was to prepare the boards.  These are made from a single piece of 8/4 material which is resawn to create the two halves of the case.  The goal is for the case to retain the appearance of a single block of wood.  Holes were then Soss barrel hinges carefully drilled into them.  A template is placed onto the blank and a shallow pass was done to outline the recess.  Next up is to remove the bulk of the waste on the drill press.

CustomEyeglassCase-WoodworksbyJohn-LasVegas-1
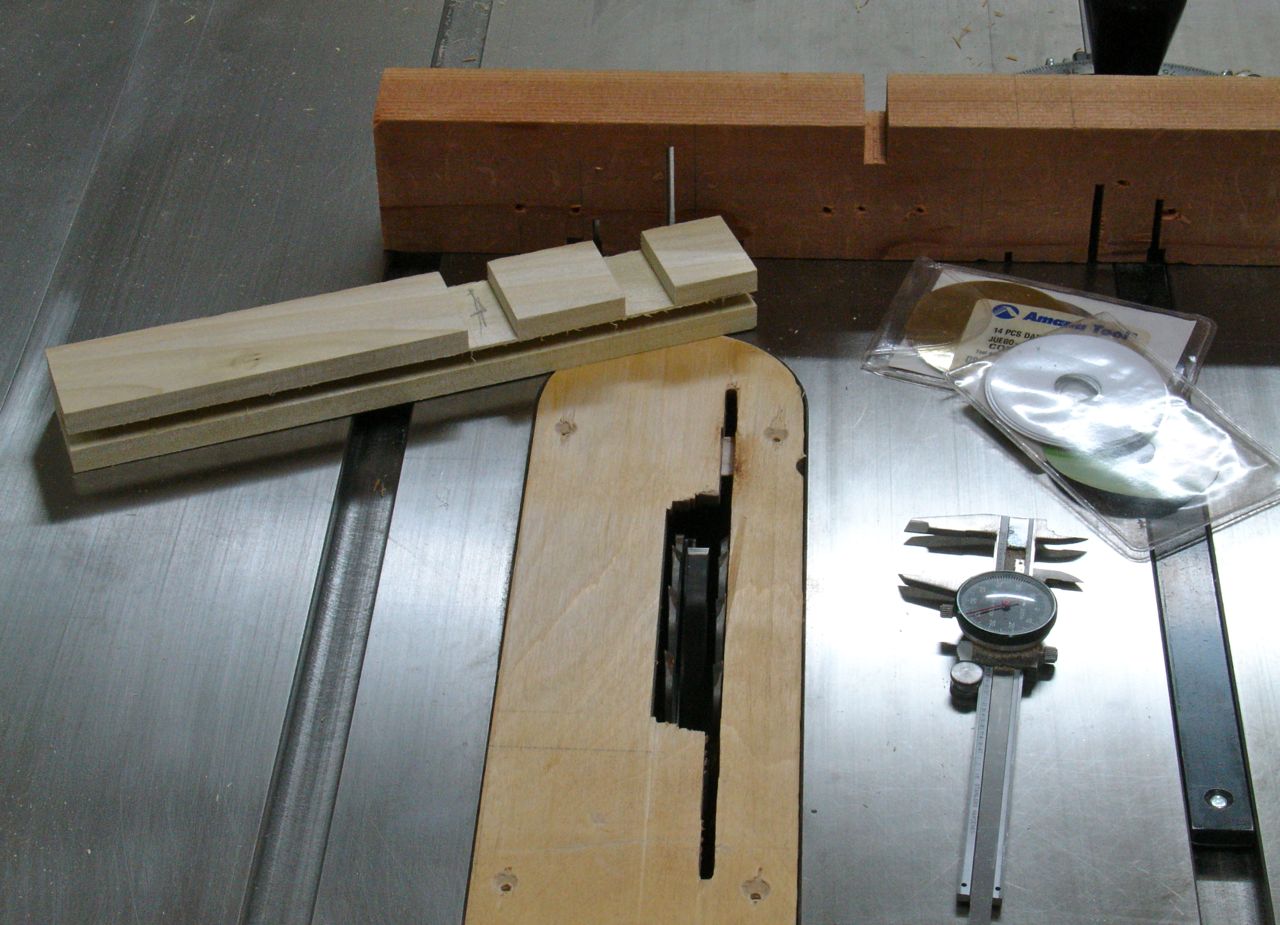
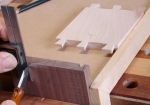
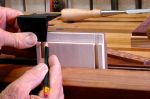
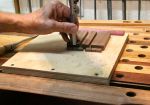
I’m using a large forstner bit (30mm) that I’ve modified by grinding off the center spur.  I want the bottom of the box to be as smooth as possible.  To set the depth, use a piece of scrap that is about 1/8″ thick and pass it under the bit.  Once it makes contact with the bit that’s where the depth stop is set.  I also set a fence to maintain the same distance all the way around the box.  For these, it took eleven passes to go around the  perimeter of the box.
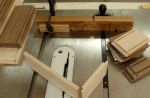
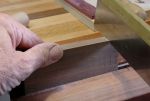
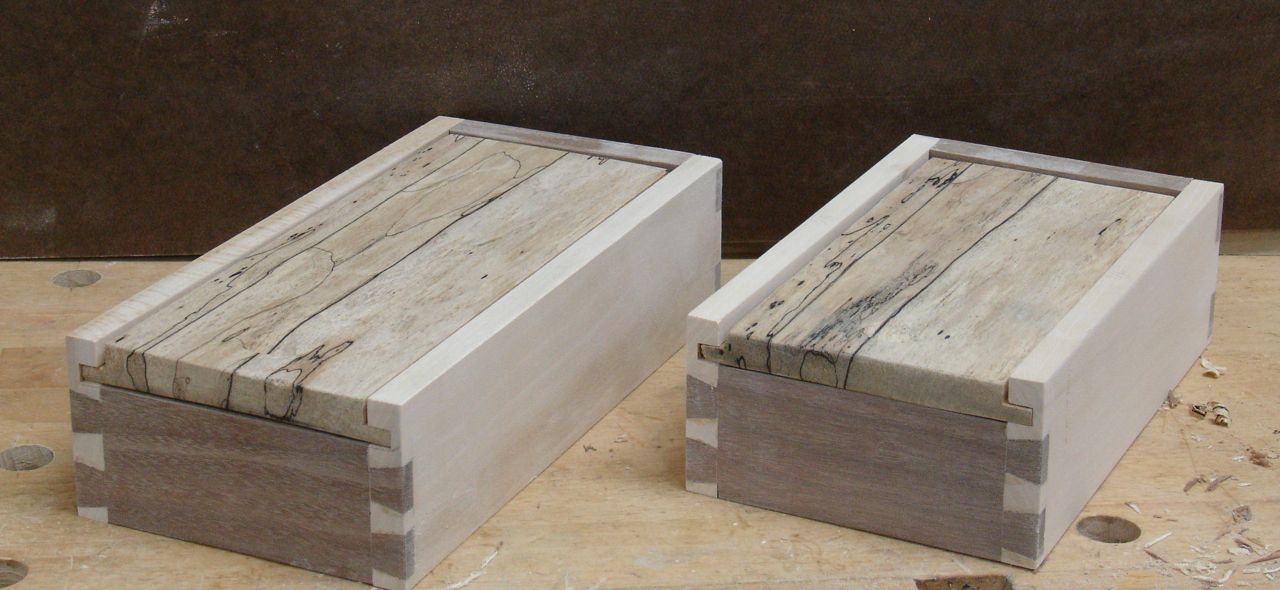
As you can see, it CustomEyeglassCase-WoodworksbyJohn-LasVegas-2
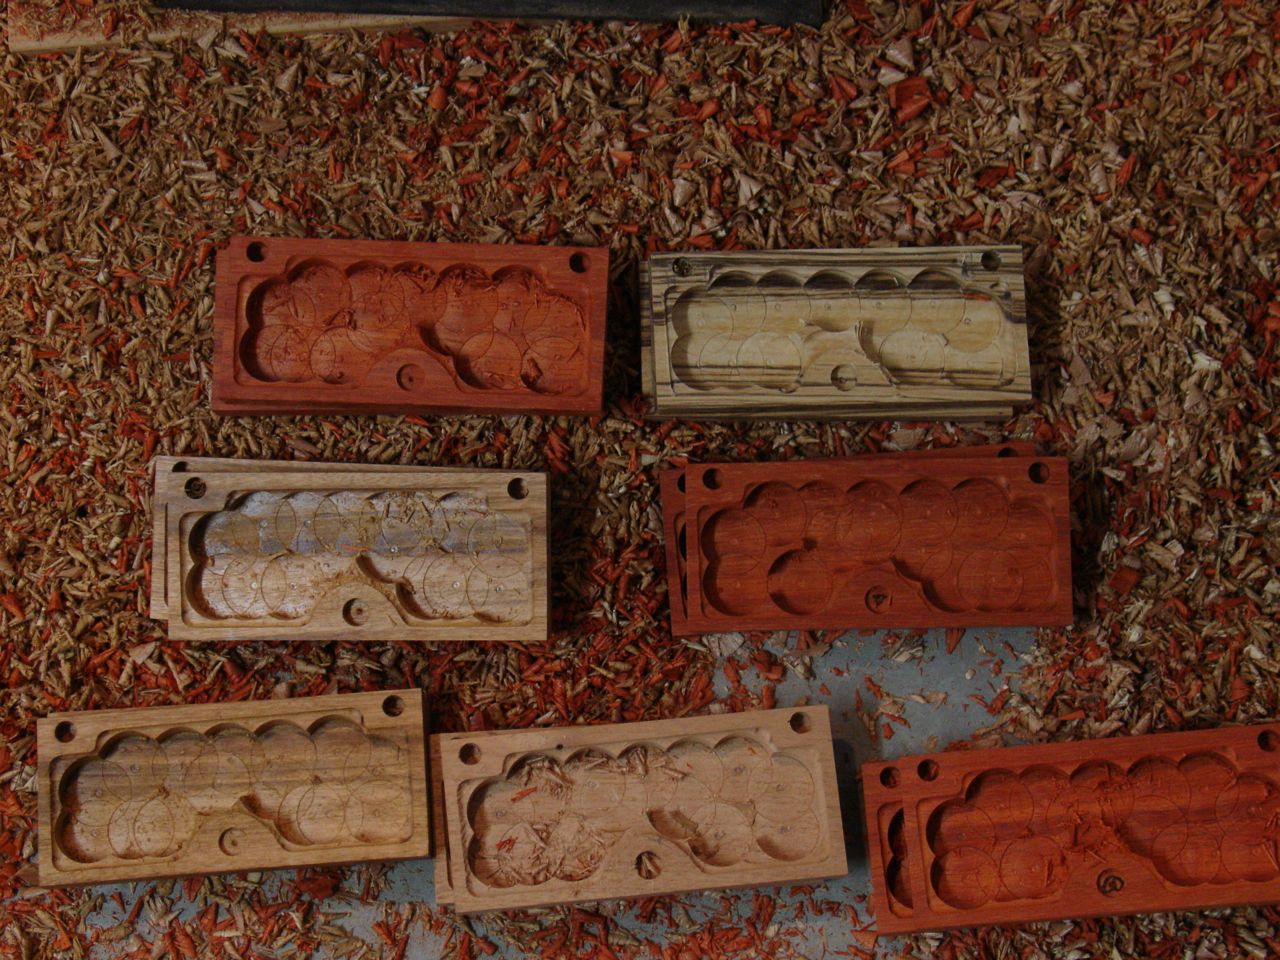
creates a lot of chips, here’s a shot of the completed pieces needed for the seven cases.  They are stacked on top of each other.  There are 3 of African Paduak, 2 of Goncalo Alves,  1 or Zebrawood, and 1 of Spanish Cedar.  Can you imagine the dust and noise there would have been if all this material had been removed with a router?

CustomEyeglassCase-WoodworksbyJohn-LasVegas-4
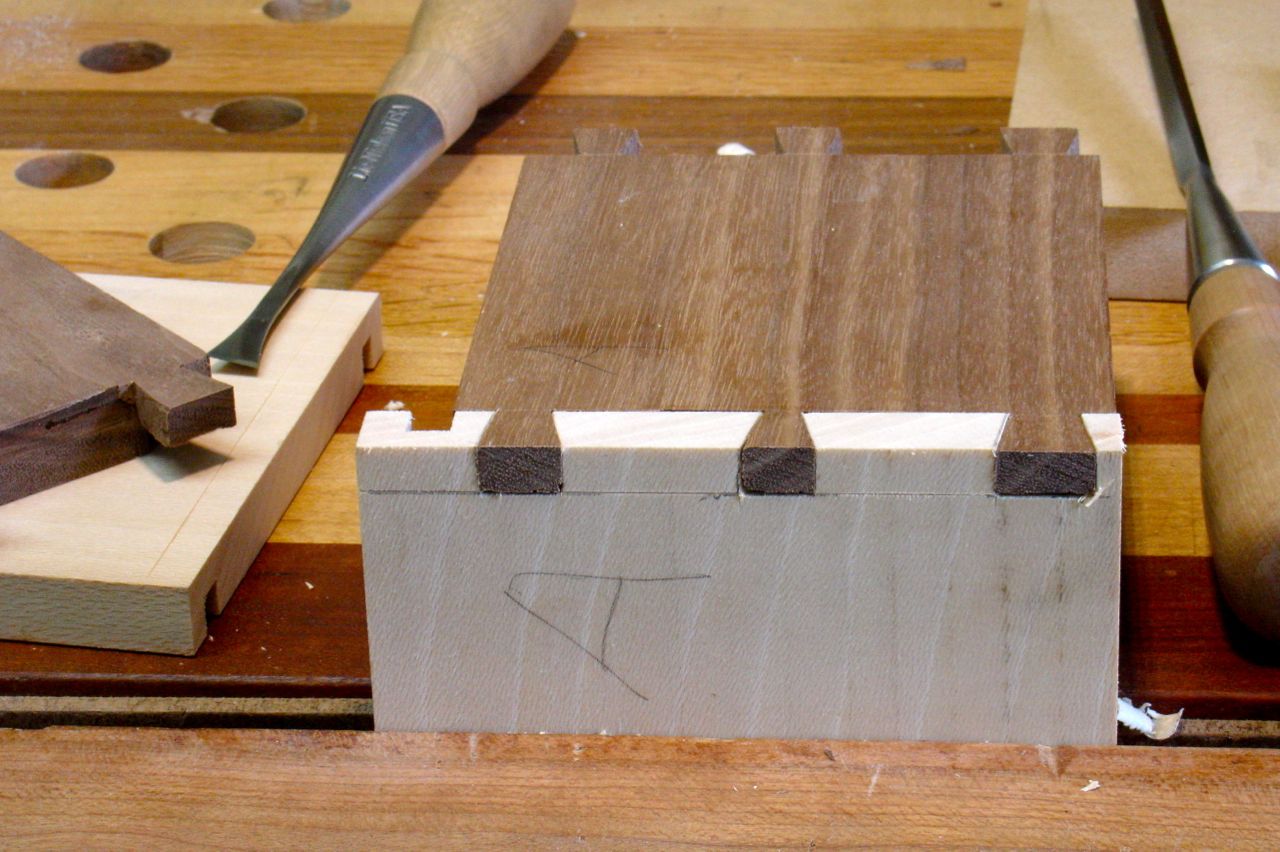
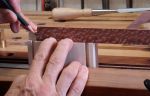
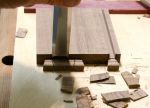
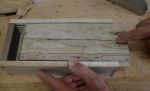
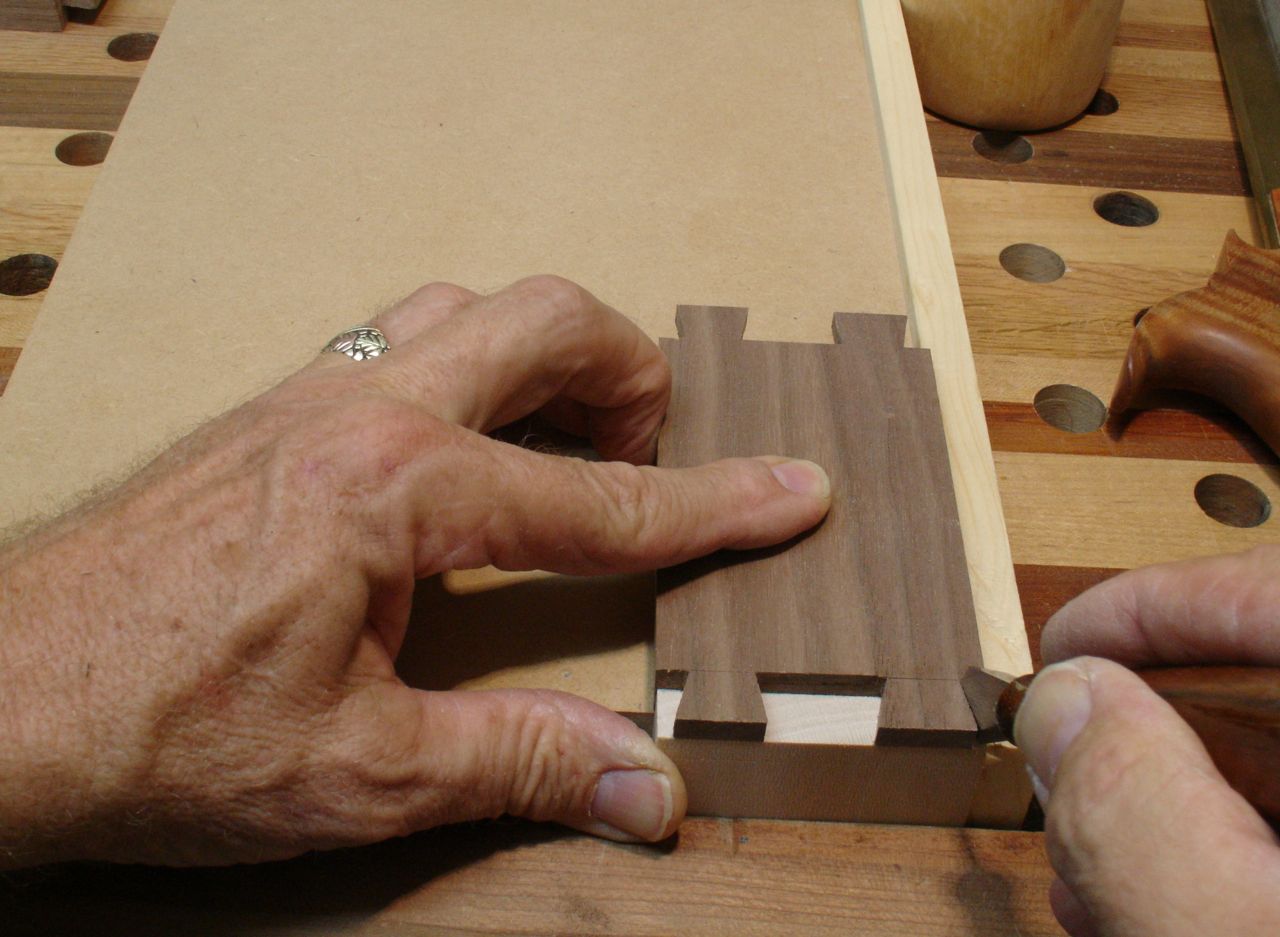
The next step was securing the piece back into the template.  This picture shows how it looks after the drill press process.  I use a small, Porter Cable plunge router with a cutter from Woodline, these are made in the USA.  It’s always better to take several light passes rather than trying to hog out a lot of material at one time, in this instance I used 5.  Most have equipment for this operation are ear protection, dust mask, and safety goggles.  I gave my wife a chuckle because I was covered in head to toe with the bright red dust from the Paduak!

CustomEyeglassCase-WoodworksbyJohn-LasVegas-5
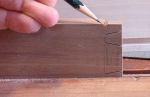
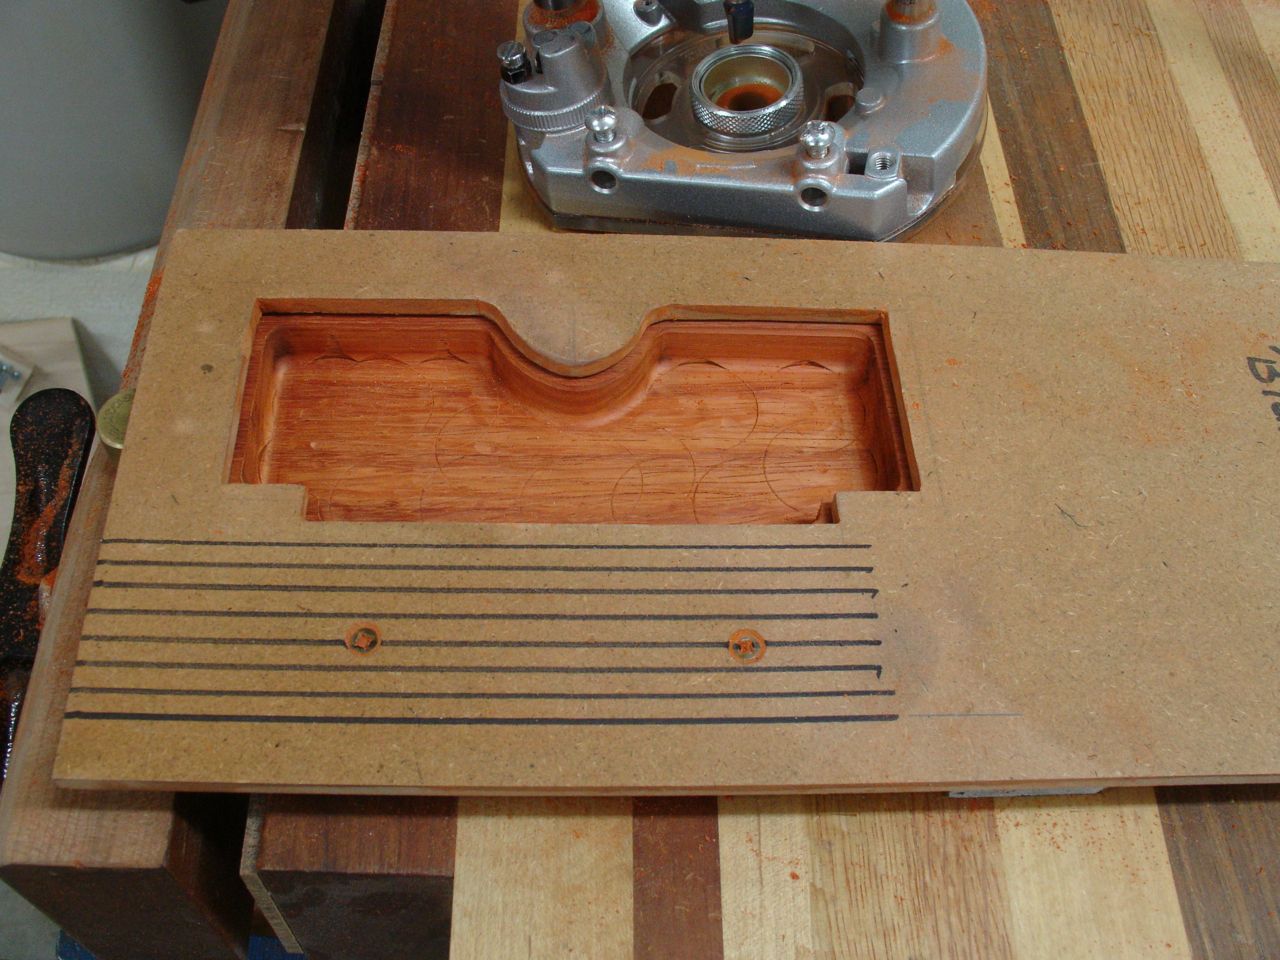
After the initial cuts around the perimeter I use those lines on the side of the template to guide the router and smooth the entire bottom.  It’s not nearly perfect yet but the lines give some type of order to the process.

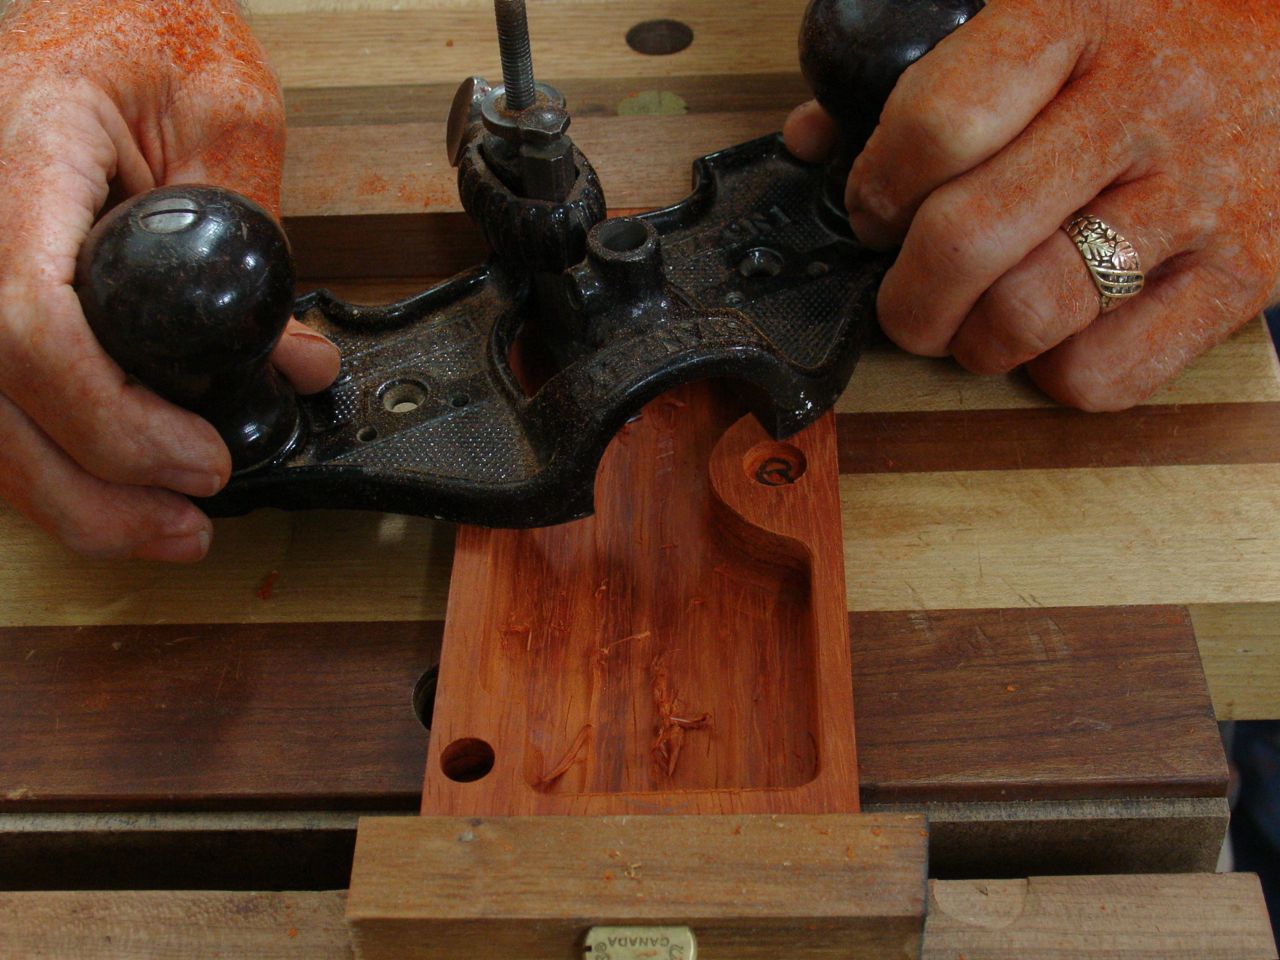
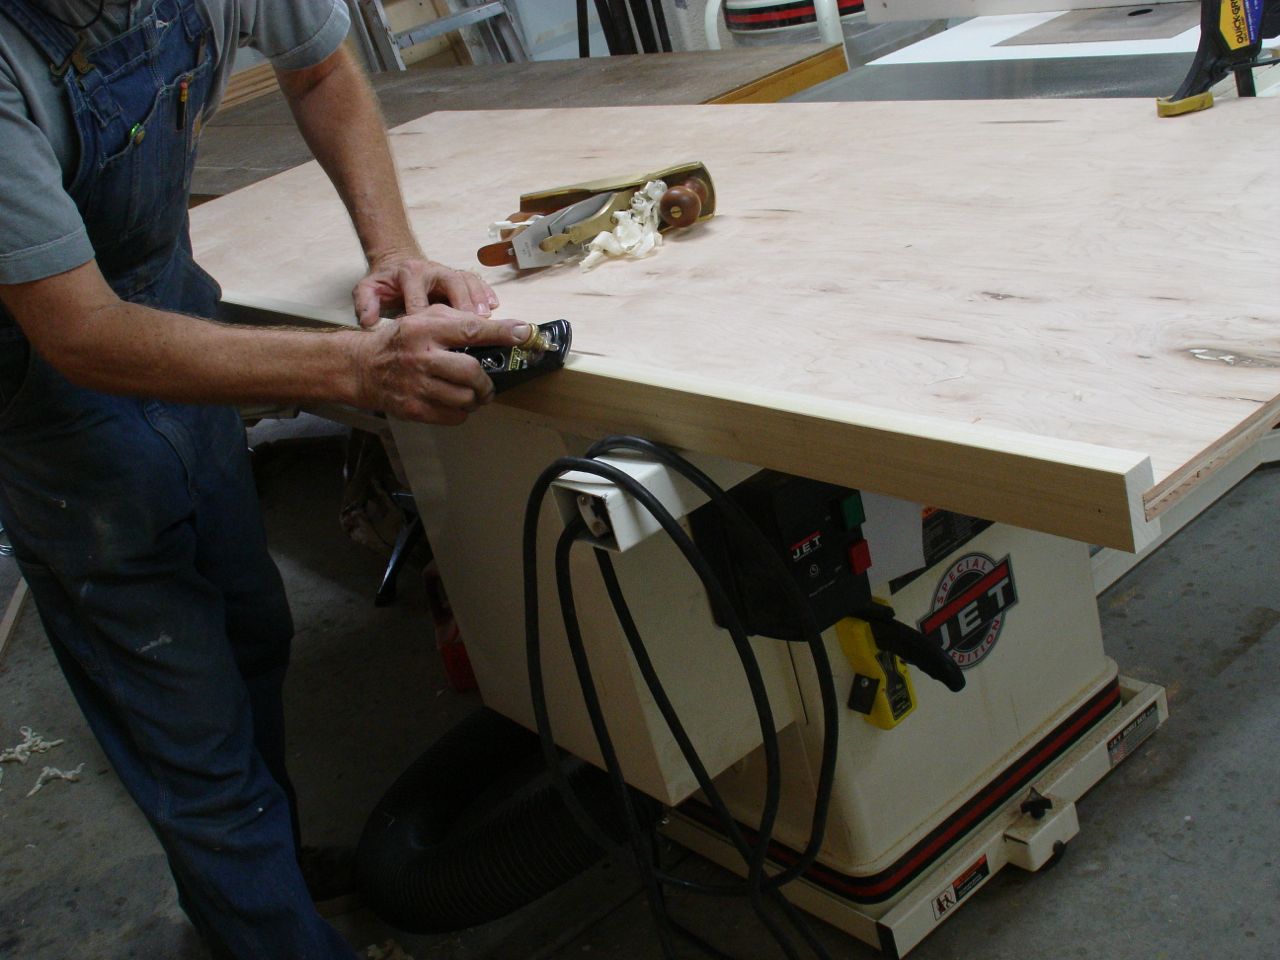
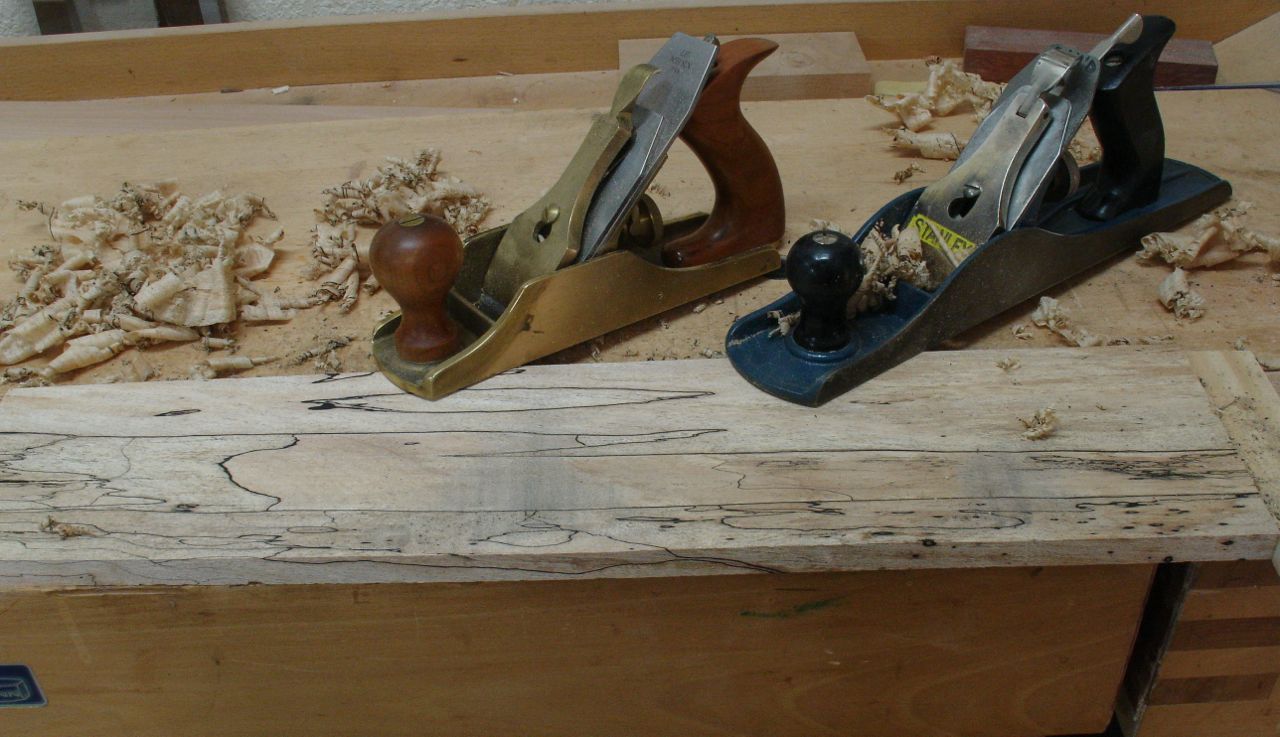
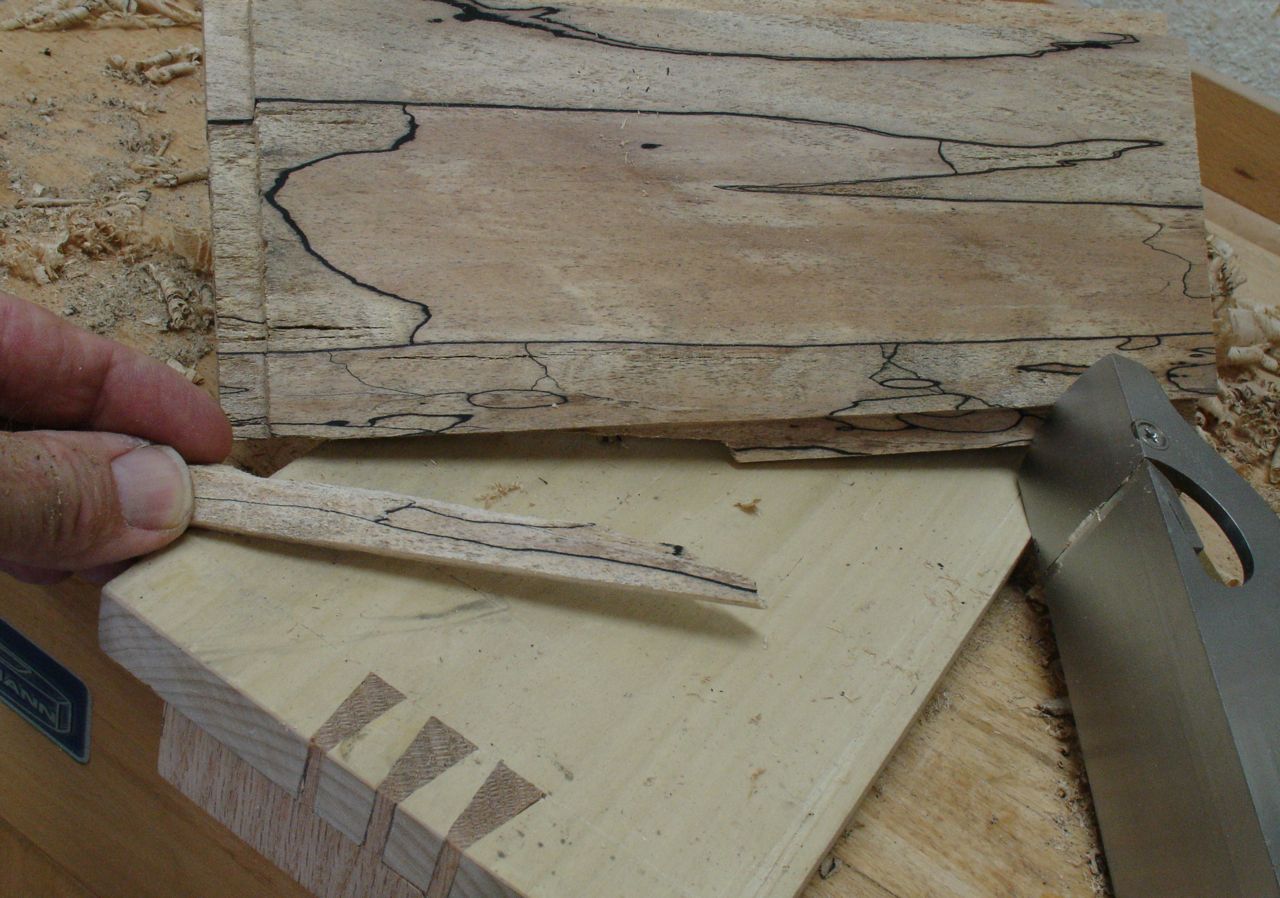
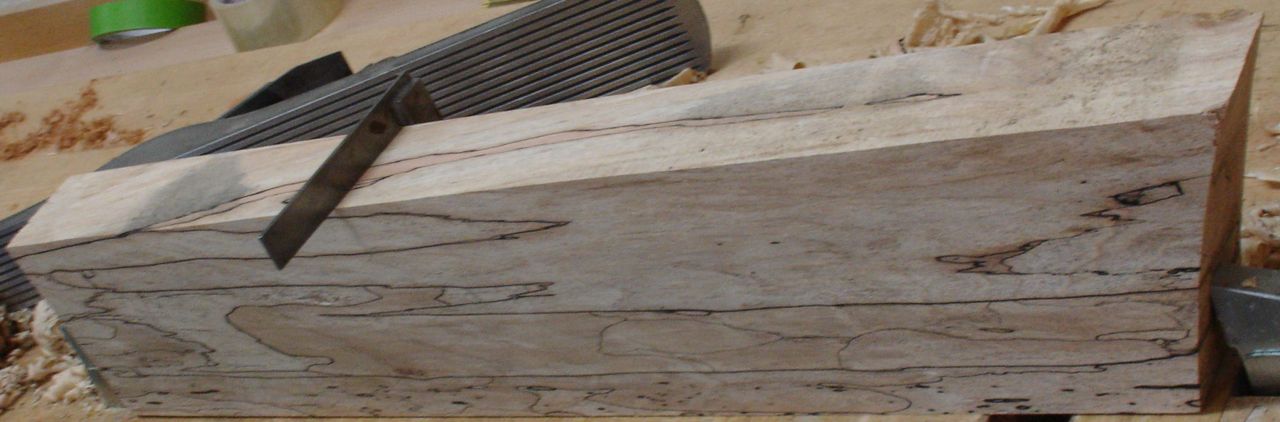
After all of the noise and dust created by the routing process I’m more than ready to use the grand daddy of routers, the almost antique,  Stanley #71.  It will remove any remaining inconsistencies.  Your best approach for a smooth cut is a sharp blade and then skewing the blade as you take light cuts.  After final smoothing with sandpaper supported by a tadpole sander they will be ready for finishing.  These get several coats of shellac to preserve the woods grain and coloration followed by wax.CustomEyeglassCase-WoodworksbyJohn-LasVegas-6

Posted in Craft Fair, Tutorial | Tagged , , , , , , | 2 Comments

Platform Bed Installation and Sleep Test

PlatformBed-LasVegas-WoodworksbyJohn-1Happy to say the bed went together as planned and after a good nights rest I can say the project was a success!  There’s always a lot of satisfaction for me personally when projects go as planned and the outcome is what I was after.  As I’ve mentioned before I don’t like to paint wood but the existing decor of our bedroom had that going on already.  Someday I’d like to replace the bedside tables which were purchased many years ago with my own design.  I really like it when tables are suspended from the wall with a French cleat.  It lightens them and from a practical point of view they’re easy to vacuum under but —- that’s for another time!  I do want to build an entertainment unit for our family room based on that.  Let’s get into the installation of this bed.

In our house we have a curving staircase which is pretty dramatic but somewhat tricky to bring things up and down on.  The two units of the bed are very light but their size makes them a little awkward.  The heaviest part are the two plywood pieces that make up the base for the mattress.  The older I get and the worse my ultra-marathon knees seem to get, the less I like stairs!  Getting all of the pieces up required a number of trips but I had a good sleep on the new bed.  Easiest way to share how it all went together is with this montage:

And then, my favorite part of this job — the final test:

PlatformBed-Custom-LasVegas-WoodworksbyJohn-Sequence-whew

Ahhh, it is Finished !!!

Posted in Uncategorized | Tagged , , | 1 Comment

Platform Bed, Next Blog and I’ll be in It!

Now that it’s almost all said and done this project went together pretty quickly!  It was last Saturday that we purchased the mattress and Monday when I purchased the Poplar and Maple (shop grade) plywood to make it.  I guess working on being efficient paid off.  In the previous blog the panels had been painted and all of the parts were assembled.  Friday found me tying up all of the loose ends with the goal of painting tomorrow.  The weather man promised that our unusually long monsoon season with rain and high humidity was over but guess what — yep a very brief thunder storm this afternoon.  Made me very happy that I was able to put all of the painted parts inside of the shop!

WoodworksbyJohn-PlatformBed-Framedetails-2The way this bed is designed is that there are two sections to that up the base of it.  These are panel and frame construction and very light in weight; something I’ll appreciate as I wrestle them up our spiral staircase as they go from the shop to the bedroom.  Here I’m pre-drilling the supports.  These are dado’d out to lock the two sections together.  Size of them is a full inch thick by 3″ wide.  After carefully marking them it was time to drill for the threaded inserts.  These can be problematic so here’s a quick tutorial on how I went about installing them.

WoodworksbyJohn-PlatformBed-Framedetails-Threaded Insert-1I would have preferred the type that are inserted with an Allen wrench but the only thing available locally were the slotted ones, they’re notorious for breaking off but here’s a cure for that.  After drilling the 3/8″ hole required for the insert; you use a fender washer instead of a screwdriver.  Screwdrivers are tapered and I believe that’s a big part of the problem.  With a fender washer, the curvature of it will go into the insert which gives you a better grip on the brass insert.  I find it easier to stay square with the washer vs. a screwdriver  because your fingers are down close to the insert.

WoodworksbyJohn-PlatformBed-Framedetails-Threaded Insert-2My next hint is to use a bolt (1/4 20 in this case) along with either a nut or a wing nut.  After getting the insert started squarely into the hole, thread the bolt into the insert and then lock it down with the wing nut.  With the wing nut you can do it by hand, if you use a regular nut you’ll need to also use a wrench.  Once they’re locked together as a unit you can now use a ratchet wrench to finish the job.  Adding some beeswax to the mix makes this process even easier.  Just run the threads of the insert over your wax and it’s much easier.

WoodworksbyJohn-PlatformBed-Framedetail-4So much for that, next up was to prepare for the paint.  Most of the bed will be under an overhang and barely visible.  Even though it’s a painted piece I wanted the surface to be as good as I can get them.  That means planing; a smooth plane for the flats and then a block plane to add a very slight chamfer to the edges.  Miscellaneous holes to drill, pieces to glue up, and parts to sand and I’m ready for the finish.  I’ll leave you with this shot of my open air spray booth.   I’ll let you know that I was able to apply three coats to everything and get it back into the shop to cure before the sun came over the house.  I’m happy!

WoodworksbyJohn-PlatformBed-Framedetails-Threaded Insert-5


Posted in Tutorial | Tagged , , , , | Leave a comment

Platform Bed Progress

WoodworksbyJohn-LasVegas-PlatformBed-Panel&Frame-6End of the day and this is what I have to show for it!  These will be the insides of the platform so there was no need to add the panels — just the frame for strength.  In my teaching days the term “mass production unit” always had a bad connotation for me.   Sure, I wanted my students to be able to transfer the skills learned in a junior high woodshop to the real world but thought it equally important that they develop their creativity and interests.  Luckily I always had a principal that shared my beliefs and never incorporated the dreaded mass production unit into my curriculum.

WoodworksbyJohn-LasVegas-PlatformBed-Panel&Frame-2That being said though, being efficient in your work is important.  Rather than being a mindless form of mass production where you do the same thing over and over, efficiency means planning your work out to be the most productive.  The panel and frame construction of this bed requires that.  Much of the time spent here has to do with setting up the saw.  If you recall, this project began with cutting the rails to size and preparing the stock for the vertical pieces.  These were then dado’d at one time so there was only one set up required for all of this step.  The dado head was removed, replaced by a regular blade to cut the vertical (stiles I suppose) to required size.  Nineteen of these were needed so I made something like 23 of them.  Instead of using a tenoning jig, the dado head will be used cut them.  This time, for efficiencies sake, the width of the dado is equal to the thickness of the 3/4″ plywood that will be used for the base.  This way the rails can be dado’d to fit the plywood and that same width can be used to cut the tenons to length, about 5/8″.  Here’s how that is set up:


After setting a stop block on the fence and making a trial cut a pencil line is drawn to mark the location of the stop block (center picture).  This gives you a visual reference so you can nudge the stop block one way or another to dial in the needed measurement.

LieNielsen-RabbetBlockPlane-WoodworksbyJohnAll that remained to complete this operation was some final fitting.  Whenever I machine joinery my preference is to leave the pieces slightly oversized.  This is an excellent place to use a rabbet block plane which is my preferred tool for this operation.  I can’t say enough about Lie-Nielsen’s version of this tool.  The reason I prefer it over a shoulder plane is because it’s wider, shoulder planes are great for the shoulder but for the tenon cheek the block plane works better for me.

I’ve managed to spray the panels this morning with a low sheen black.  It’s made by Sherman Williams and is advertised as an all surface, latex enamel.  Spraying and surface coating wood is not one of my strong suits yet but given enough personal projects to practice on I may be tempted to try it for a paying customer!

Posted in Uncategorized | Tagged , , , , , | Leave a comment

New Project: Platform Bed

Platform Bed

In my last blog I lamented a bit that I pretty much had my fill of cutting the dovetails to make the 5 new boxes.  Add some problems with the Spalted Maple grain structure, turning a clamp the wrong way and cracking an end, fighting the humidity while applying shellac, and I was primed for something different.  Well, this project is about 180 degrees from cutting dovetails by hand!

If you believe the advertisements for mattresses we should all be replacing ours after 7 years of so.  They like to play up the fact that we sweat and deposit all kinds of “things” into our bedding.  Add about 8-10 years to the life of our mattress so we thought maybe it was time to replace ours!  New mattresses no longer use a box spring, instead there is a solid wooden or steel plate in what we used to call a box spring that completely supports the entire mattress.  Similar to the style of bed I made for my daughter when she was two and my grandson sleeps in now.  The first idea was to include drawers underneath the bed but you know, we really don’t need that.  Here in the desert you don’t have lots of large, bulky winter quilts or parkas that take up a lot of room.  Adding 4 large drawers would have increased the budget too much so we opted to make a simple platform as shown in the drawing at the top of this post.  That’s a rendering of the side and front view.  The overhang will add the illusion of floating and function as a toe kick so you don’t stub your toes while making the bed.

Diane will design and make 100% cotton quilt for it since we both like natural materials and both like to do projects together.  As you can see from the drawing it’ll be of frame and flat panel construction.  If you know my work and philosophy about finishing woods you’ll be shocked to know that this will be painted black!  Our nightstands (purchased) are black with a Cherry veneered top. The headboard is one that I made years ago to match them.  It has Walnut panels laid out in a grid (two rows of three)  made of Poplar that has been painted black to match the nightstands.

Everything in our bedroom will have a cohesive look.  The mattress is one of those new ones that is almost 12″ thick.  The platform will be made of Poplar with flat panels I’ll make from the Alder plywood left over from the computer monitor project.  This will give me another opportunity to improve my skills with the HLVP spray rig purchased when we did the kitchen makeover.  If you’re interested in seeing that project here’s a LINK to the blog posts I wrote for that.  That was white paint so the bed, with black paint will be pretty much the opposite!

WoodworksbyJohn-PlatformBed-LasVegas-1Whereas the dovetailed boxes were pretty much all hand work, this project will be predominately  machine work.  I’m using 5/4 Poplar;  here is the pile of wood cut this afternoon.  At the far left are the pieces that will make the rim around the plywood base, then comes 8 pieces for the top and bottom of the side and center sections.  Also, the top and bottoms for the front.  The predominant measurement for the length of the bed is 80″ so 7′ lengths of wood would have been ideal.  I was hopping for 14′ but as luck had it, all available material was 10 footers.  That meant I had some odd shaped pieces left over that you can see at the upper left on the assembly table.  After cutting the material to uniform width, they needed to be dado’d out for the plywood panels.  The dado is 1/4″ wide by 5/8″ deep; the tongues on the vertical pieces will be full width to match that.  That should give more than enough strength for this bed.  The plan is to make two sections with stretchers attached to support the plywood base for the mattress.  The bed will be assembled by using 1/4″,  flathead machine screws and threaded inserts.

WoodworksbyJohn-PlatformBed-LasVegas-2Here’s a method of  centering  your dado in the boards.  After putting the blade on the tablesaw I adjusted the fence to about 3/8″ from the blade.  Feed your board into it part way, then flip it over and cut part way again.  The blades should line up.  It took about 3, trial and error adjustments but here you can see that they are pretty well centered.  Although I usually don’t like to mark up my wood with pencil, each piece is marked on the inside to help line up the tongue and groove joinery.  Those marks will be on the inside of the bed so nobody except a dust mite or two will ever see them!  Pencil marks are difficult to sand off of wood, much easier to use an eraser first — seems strange doesn’t it?

The plan for tomorrow is to cut all of the vertical members to the exact size, set up the dado, and cut all of the tongues.  Usually I cut tenons with a tenoning jig but with 22 pieces that need tongues on both sides the dado head followed by the rabbet block plane should make quick work of fitting all of these joints.

Posted in Uncategorized | Tagged , , , , | Leave a comment

Hand Cut Dovetails — Part 2

WoodworksbyJohn-Dovetail-SlidingLid-2In my last blog I was working on the sliding lid boxes which are almost completed.  All that remains is the shellac finish, lining the bottoms, and adding dividers for some that will be marketed as remote control storage boxes.  Must admit I was getting tired of the semi mass production of cutting the dovetails but I remind myself that it’s a good exercise.  The picture shows them ready for finish.  The Spalted Maple lids are a really cool feature to them and I’ve learned quite a bit about using this wood.  Sanding wasn’t a good option, it results in the sanding dust from the dark areas being ground into the lighter areas and giving a smudged appearance.  Instead, I’ve used a cabinet scraper to smooth the surface and my thoughts are that once the wood is sealed with shellac I’ll be able to polish it.  All of the boxes with the Spalted Maple lids are made of Walnut and Quarter Sawn Sycamore, the other is made of some Striped Maple with a Bird’s Eye Maple lid.  Okay, lets work on the pin boards for the dovetails.

The process begins with marking them out, I love this little fixture that helps to hold the pieces in alignment:WoodworksbyJohn-LasVegasFurnituremaker-Dovetail-Tutorial-10


The board has been scribed to match the thickness of the tails so those cuts are made first.  I leave the piece in the fixture but raise it up to avoid cutting into the fixture:

After repeating this process on all of the pieces (mass production remember?) the waste is removed.  I tried to be methodical and it was effective.  Removing the waste follows the same procedure of first creating that wedge shaped pocket right at the scribe line.  This is an effective way of keeping the edge perpendicular to the board by not allowing the bevel of the chisel to push the cut backwards beyond your scribed line.

WoodworksbyJohn-LasVegasFurnituremaker-Dovetail-Tutorial-14Once all were cut and fitted, bottoms of 1/4″ Baltic Birch ply were sized and the insides of each box was sanded prior to glue up.  One of the things I really dislike about the semi, mass production process is that it seems to add stress to my life!  I over tightened one of the clamps and created a minor split in one of the boxes — seemed I forgot the adage of righty tighty, lefty loosey; could it be seniorites?

WoodworksbyJohn-Dovetail-SlidingLid-1In any case, planing the ends flush then some machine sanding followed by hand block sanding completed the process.  It’s been good but I’m definitely ready to tackle a piece of furniture.  Boxes are fine but not what I prefer to spend most of my woodworking time on.  Also need to prepare for a demonstration at our next Sin City Woodworkers meeting on making and using scratch stocks.


Posted in Sliding Lid Box, Tutorial | Tagged , , | Leave a comment

Hand Cut Dovetails — Mass Produced?

WoodworksbyJohn-LasVegas-CustomWoodworker-DovetailTutorial-15One down and seven corners to go for this first run of these dovetailed, sliding lid boxes.  The Lore of the Dovetail is one that has always interested me.  Obviously I’m not alone in that since I’ve had numerous students wanting to learn how to cut them and given several classes at Wooditis that feature projects made with dovetails, either through or half blind.  Mass production and dovetails usually aren’t used in the same sentence unless a jig, fixture, or CNC is employed.  Matter of fact, some of the snobbery or elitist aspect of this joint is that it’s entirely made by hand but …. something I always point out to students it didn’t start out this way.  Basically, the mechanics of this joint is what gives it the endearing quality. The original intent wasn’t too be showcased and show off the skill of the maker, rather it’s design gives it strength even if the glue fails.  I’m told that Egyptian artifacts have this joint and we know that they’re still intact.

Now, as a custom woodworker the term mass produced isn’t in my vocabulary but being efficient is.  Except for a select few, custom work is not about become rich and famous.  For most of us it’s the love of the craft and working with our hands that excite us to create.  I’m no exception so I decided to see how I could cut these joints efficiently.  I touched on it a little in my previous post as I prepared the stock for the next 5 boxes that are the same basic design; a dovetailed box with a sliding lid.

To start I employ the Stanley 140 trick by cutting a rabbet on the tailboards.  I’ve written about this technique before which is named after the Stanley 140 rabbet skew plane.  Its purpose is to make your lay out easier and give a clean corner inside of your box.  It’s referred to by this name since thats the tool used.  Here’s a photo essay of how I go about it:

You can see how the rabbeted edge will give a definite break to the inside of the box.  To be efficient the rabbeting was done right after the groove was cut for the box lid and bottom.  I figured it was quicker to use the 1/4″ set up and make two passes then it would be to change the blade.

Next came the tail lay out.  Even though the boxes are slightly different in width and length, their height is the same.  I’m using some Walnut and Quarter sawn Sycamore for these boxes.  When making drawers I always cut both sides tails at the same time so treated these the same way.  The main design here was to have the tail conceal the groove for the bottom panel, that’s what dictates tail placement.  Here’s the process for that:

I did this to every board before going on to the next step.  Although I tend to be a perfectionist I’ve learned that with woodwork it’s a hard goal to attain!  Wood has a mind of it’s own and minor problems comes with the territory.  However; when you repeat the same process you develop a “muscle memory” and find that each cut or process becomes easier and feels more natural.  At least that’s been my experience.

After all of the cuts were made the waste needed to be removed, here’s my process for the cuts on the outer edge of the tails.

Chiseling the waste between the tails follows the same general procedure.  I teach making a V-shaped cut with the chisel initially.  The bevel of the chisel tends to push it back behind your scribed line as you cut into the wood.  By removing a wedge (first picture) you’ve eliminated that wood that tends to push the chisel backwards.  I start this on the outer face and leave material to support the board when it’s flipped over.

So, there you have it!  Cutting dovetails is a process that I enjoy doing.  I know all of the arguments for employing a Leigh or other brand of jig.  When faced with a chest of drawers or utility cabinet I have an ancient Craftsman router and jig and I’ll put out my Baltic Birch drawers in a short amount of time.  Luckily, most of my work isn’t based on deadlines and since the focus is the hand crafted quality I put into it this philosophy works for me.  That may have to change from time to time but my pleasure comes from spending time at the bench, testing my skills and tools to create hand crafted pieces.  Speaking of changing, I just received a request for a series of 10 boxes that will house men’s shaving accessories — if I get that job you can bet the miters will be cut with a carefully set up tablesaw, not a miter box and shooting board!

Posted in Sliding Lid Box, Tutorial | Tagged , , , , , , | Leave a comment

Dovetailed Boxes with Spalted Maple Lid

WoodworksbyJohn-SpaltedMaple-Blog-AWork is progressing nicely on the sliding lid, dovetailed boxes using the pieces of Spalted Maple I received as a gift.  If you recall my last post I referred to this wood as being “punky” — wonder what that means?  I’ve always used that to describe a wood that is soft and spongy feeling but Googling it I also learned that it’s wood that is ideal for starting a fire!  Whatever definition you use, it can be a challenge to work with.  The only previous experience with it was to make my drafting table and in that instance I had several wide boards to laminate together.  You can use  Cyanoacrylate glue to solidify the wood fibers.  Here’s a LINK that’ll give you information on this glue, commonly referred to as CY.

WoodworksbyJohn-SpaltedMaple-Blog-2The problem I ran into was when it came time to shape the lids to fit the groove in the sides of the boxes.  I mentioned milling the boards to required sizes in my previous post.  One thing I discovered is that the fungus will transfer to other areas of the wood when you plane the board.  It also seems to be somewhat abrasive so I decided to not use my bronze smoothing plane once I noticed that.  Went to my 60’s era Stanley with a cambered blade and it worked just fine, after all; that’s all I had until I could justify the cost of Lie-Nielsens beauty a number of years ago.

WoodworksbyJohn-SpaltedMaple-Blog-3Here’s what happened with the lid, after using a router bit to establish most of it the wood gave way as it was fitted with a rabbet block plane.  I wanted to use the plane on the end grain as well but the characteristics of this piece just wouldn’t allow it.  Here’s where I learned that sanding this wood can transfer the fungus (black) sanding dust into the surrounding lighter colored wood.  The solution was to make another lid and keep the remains of this nice piece for a smaller project somewhere down the line.

The Cy glue was used to solidify some of the edges and replace small bits that came off as the lid was formed.  My next challenge was to design a way to slide the box open.  You may have seen a hole drilled completely through but that didn’t appeal to me.  Besides the roughness of the edges I was betting that with the characteristics of this board there would probably be a lot of tear out.  I’m after subtle so used some of the remnants of the failed lid to experiment with carving a finger depression into the lid.  Here’s a photo sequence of how that worked out:

As I mentioned, sanding the Spalted Maple caused a transfer of the sanding dust.  Planing can do the same and an experiment with using a card scraper resulted in the same dilemma!  I ended up using a super fine piece of scotch brite abrasive pad (white) which seems to polish the wood.  The finish will be a Platinum shellac and the flakes are dissolving in denatured alcohol as I write.  I’m confident that after a few coats are applied it will help to solidify the grain structure of the wood and things will be just fine! After that the surface will be sanded with some 400 grit paper, more shellac, and finally rubbed out with wax.

Johns Drafting TableI’d like to share this picture of the drafting table I made years ago.  The side and front panels are Spalted Maple as is the top.  When I draft it’s covered with the same material traditionally used on drafting tables.  If you’re of the age that remembers those types of things rather than CAD or Sketch Up, that’s a left handed Vemco drafting machine!!

Posted in Sliding Lid Box | Tagged , , , , , , , | Leave a comment

Mystery Box Postponed

Screen Shot 2013-08-28 at 5.14.52 PMYou probably recall what I referred to as my Mystery Box project.  That was because the end use for it couldn’t be divulged as it was for marketing an item my client wanted to “keep under wraps”.  Apparently there’s quite a market for this and they wanted to be one step ahead of the competition by having a beautiful presentation box.  Well, things got a little more complex as to what they wanted to incorporate in it.  After making a prototype I discovered that our joinery technique needed some strengthening, and after adding Brusso hardware we went over budget.  Right now, believe it or not, they are gearing up for Christmas which is their busiest time for their product so they have decided it’s best to wait until after that time and consider going ahead with the project then.  I hope so, it was an interesting challenge and I love those!

In the meantime, I always try to keep the philosophy of one door closes and another opens.  After the failure of the initial prototype I went ahead and made another.  I happened to have a piece of clear Pine that was just about the same size so decided to tune up my miter sled and add splines to the joint.  Next was doing the top/bottom technique that they wanted to try on the Mystery Box.  They are after a streamlined, seamless look.  Since I had started this already figured might as well make a project out of it to add to the Etsy store.  For that I had some Lacewood to experiment with.  Here’s the result, what do you think??shop update-WoodworksbyJohn

I’m going to call this The Banded Box.  Diane says it almost looks like a landscape with the grain of the Pine taking on the appearance of moutons above the ribbon of inlaid Lacewood.  When I do something like this I like to finish the exterior with the first 3-4 coats prior to separating the box and lid.  That way I can concentrate on a great oil finished exterior and shellac the interior after.  Shellac is odorless where the oil finish is objectionable to some.  The box will be separated on the band of Lacewood, probably about 1/3 or the way down.

Showupdate-WoodworksbyJohn-1The other thing completed today was gluing up the dovetailed boxes that will have a sliding, Spalted Maple lid.  Just took this quick shot as I was calling it a day so it’s a bit out of focus but you get the idea.  Used my standby, liquid hide glue so it’ll require a full 24 hours to cure.


Posted in Uncategorized | Tagged , , , , | Leave a comment

Hand Cut Dovetails & Spalted Maple

If you’ve ever heard of or seen a wood that’s been “spalted” you’ll appreciate the unique beauty of it.  Here’s a photograph I attempted to crop to give you a good view of it.Spalted Maple

When wood is spalted it means that some type of fungus has gotten into it and left, what most consider to be, some beautiful and unique markings.  Here’s an interesting LINK about the process.  Spalted wood does have some disadvantages and challenges in that it becomes punky, in other words soft and rotted — after all, the process of splating is basically the wood being attacked by fungus.  The leader of my Bible study group was kind enough to give me several pieces of Spalted Maple he picked up on a trip to the Northwest.  I’m starting a new series of boxes and this seems like the perfect place to use the beautiful  pieces that he gave me.

The first step was to take these random sized pieces and turn them into uniform sized pieces.  The width of these boards will determine the maximum width of the boxes but I had to get them square first.  If you follow my blog you’ll know that I consider myself a hybrid woodworker using both power and hand tools but that my preference is the hand work.

WoodworksbyJohn-CustomFurniture-LasVegas-SlidingTopBox-SpaletedMaple-1Resawing these pieces requires one perfect 90 degree corner that will rest on the bandsaw table and be supported by the fence.  The first step was to use my old No.7 Stanley to create a flat face.  In this photograph you can see the progress I’m making, chalk outlines the low spots.  I’m working contrary to the norm which would have you jointing an edge first.  The edges were so angled I chose to do the face first and then square the edge to it.  After that corner was square I adjusted the fence to cut a 5/8″ thick board.  After each cut the board was planed to remove the saw marks and another piece resawed.  I was able to get 3 pieces and have one of about 1/2″ left over.

WoodworksbyJohn-CustomFurniture-LasVegas-SlidingTopBox-SpaletedMaple-2The next step was making the boxes for the lids to go on to!  Diane and I are preparing for our first craft show and were just notified that we had passed the jury process and are accepted into the Summerlin Craft Fair.  This is our first joint experience and she’s doing her wonderful dolls, RagDollsRising.  Since I want the wood and construction details of my boxes to be the feature of my work, hand cut dovetails is the joint of choice.  Yes, they do take a bit of time to complete but there’s something so satisfying to me about manipulating hands, mind, and tools to create my work.  Allow me to do a brief tutorial on the methods I employ.

WoodworksbyJohn-CustomFurniture-LasVegas-SlidingTopBox-HandcutDovetail-2When I teach dovetails I’m quick to point out that there are several ways to go about the process and every woodworker will probably develop their own set of nuances.  I’m a “tails first” dovetailer so that’s what I’ll teach.  Since the box will have a sliding lid a 1/4″ dado was cut into the top of all the pieces.  At the same time, I also cut a dado to house the bottom piece.  The tails will conceal this dado so that determined the layout.  I marked the slope of the tail so that it will be about 1/8″ away from that dado.  I’m making two boxes at the same time to be efficient.  The ends of both of them were clamped together and cut at the same time.  These tails will be about 5/8″ wide, since the mating joint is one that is scribed, if the size varies a little it’s not a big deal.

Screen Shot 2013-08-27 at 11.18.35 AMSince I’m trying to be as efficient as I possibly can I’m doing all of the cuts that are similar at the same time.  Tage Frid wrote a classic woodworking book back in the 70’s which I bought.  I was always impressed by this picture of how he stacked his pieces when dovetailing a set of drawers.  Guess I’m trying to emulate what he did, this picture left a definite impression on me!  Here he had all of the pieces stacked one on top of the other and I’m sure they all fit exactly.  I’m working on getting to that point and do find that the more I work at this joint that muscle memory is making the work easier and more accurate.

WoodworksbyJohn-CustomFurniture-LasVegas-SlidingTopBox-HandcutDovetail-3After the tails were cut on every end piece it was time to scribe the tails onto the pin board which is actually the side of the box.  Every time I use this fixture to help align the parts I love it!  One of the best things I found on YouTube.  It makes it much easier to align the pieces as you transfer the tails.

Anxious to see how these will finish.  I’m using three types of wood for these boxes, Spalted Maple for the lids, Walnut for the ends, and Quarter Sawn Sycamore for the sides.  At this time the finish I have in mind is some Blond Shellac, I have the flakes but need to mix up a fresh batch — we’ll see!

Posted in Sliding Lid Box, Types of Boxes | Tagged , , , , | 1 Comment